 PaperClip32
User Guide
Release 5.9
PaperClip32
User Guide
Release 5.9
© Copyright 2010, PaperClip, Inc. The PaperClip32 product name and PaperClip Logo are registered trademarks of PaperClip, Inc. All brand and product names are registered trademarks of their respective corporations.
Revisions
This section contains the latest revisions to this document.
New Features
Rubber Stamp annotations
A new annotation called a “rubber stamp” has been added. Rubber stamps are user-supplied images of stamp-like messages (received, approved, rejected, etc.) or signatures. New user privileges have been added to allow users to create, modify and delete stamps. In addition, the usage of a stamp can be limited to a PaperClip32 Group or User. Using a rubber stamp in this manner will allow you to securely place your personal signature on a image. 97, 143
In Image annotations
In-image annotations are annotations that physically become a part of the image. Any on-image annotation including boxes, sticky notes, text, rubber stamps, etc. can now be “burned” permanently into the image. A new user privilege has been added for the ability to burn annotations.... 146
Clipping Enhancements
A new property has been added to specify a “look-up” field in the Overlay Template definition. This allows the VCP to use only the specified fields for folder lookup. The ability of specifying a look-up field allows the VCP system to be more flexible in how folder indexes are used.
For example, you have one index field which always has a consistent (and unique) value like an account number, but also need a last and first name in the folder index. In this case the host application updates the spelling of a name, the folder still will be found because PaperClip32 now can ignore the name in the VCP look up.
PaperClip will also test if there was a change in the name value and allow the user to update it, thus keeping it in synch with the host application.
Additionally, clipping has been expanded to include folder data fields ................................ 88
Conversion of images is available for import (including scanning) and export functions. Select Image Conversion from the Setup menu to configure ………… 99
Folder Tabs Enhancements
A new property “Hide tab if no documents” was added to the folder tab definition. If there are no documents that satisfy the tab filter then the tab will not show up in the folder window ………………………………………….83
Pick Lists Import/Export
A new list import and export feature was added to the drawer field setup for defining pick lists. Pick lists can be easily imported using a simple text document, and can be displayed in alpha-numeric or user specified order. ……… 79
Additional User Privileges
User privileges for Query/Execute and Drawer/Browse have been added. Also a Note/Burn privilege allows users to use new In-Image Annotation feature. New Stamp privileges allow user to Create, Delete and Modify the new rubber stamp annotations………………………....................... 44
Table of Contents
Contents
Red, single underline denotes a Level 1 Heading
Blue, double underline denotes a Level 2 Heading
Green, triple underline denotes a Level 3 Heading
Imaged Documents and SoftClip Documents
PaperClip32 Users & Task Groups
Integrating PaperClip32 With Other Applications
PaperClip32 Command Line Switches
System Administration Overview
Document Storage Considerations
Directories for Storing Images, Batches, and Temporary Files
Establishing Document Types: Classify Documents Effectively
Network Access Considerations and User Accounts
How Task Groups, Distribution Lists, and Route Slips Can Enhance an Organization’s Workflow
Defining Fields: Folder Index, Folder Data and Document Data
![]() Add Fields: Folder Index, Folder Data and
Document Data
Add Fields: Folder Index, Folder Data and
Document Data
![]() Creating Pick Lists for Folder Index, Folder
Data, and Doc Data Fields
Creating Pick Lists for Folder Index, Folder
Data, and Doc Data Fields
![]() Importing/Exporting Pick Lists for Drawer
Fields
Importing/Exporting Pick Lists for Drawer
Fields
![]() Modify a Field: Folder Index, Folder Data and
Document Data
Modify a Field: Folder Index, Folder Data and
Document Data
![]() Delete a Field: Folder Index, Folder Data and
Document Data
Delete a Field: Folder Index, Folder Data and
Document Data
![]() Create Folder Tabs for a Drawer
Create Folder Tabs for a Drawer
Dial-Up, Terminal Emulation, and Free-Form Text Overlays
![]() Set Up a Database/Spreadsheet Overlay Template
Set Up a Database/Spreadsheet Overlay Template
![]() Set Up a Dialog Box Overlay Template
Set Up a Dialog Box Overlay Template
![]() Set Up a Dial-Up, Terminal Emulation, or
Free-Form Text Overlay Template
Set Up a Dial-Up, Terminal Emulation, or
Free-Form Text Overlay Template
Troubleshooting Overlay Creation
Dial-Up, Free-Form, or Terminal Emulation Overlays
Select an Alternate Set of Keystrokes to Copy Data to the Clipboard
Automating Data Highlighting prior to Copying It to the Clipboard
PaperClip32 Reports (PC Reports)
Understanding the Explore Folders Window
![]() Add Folders Directly Via PaperClip32
Add Folders Directly Via PaperClip32
![]() Add Folders Clipped to Your Application
Add Folders Clipped to Your Application
![]() Open Folders Directly via PaperClip32
Open Folders Directly via PaperClip32
Working With PaperClip32 Documents
Getting Documents into PaperClip32
Working with SoftClip Documents
![]() Never Store SoftClips to Bins (Add a New
SoftClip Document)
Never Store SoftClips to Bins (Add a New
SoftClip Document)
![]() Always Store SoftClips to Bins (Add a New
SoftClip Document)
Always Store SoftClips to Bins (Add a New
SoftClip Document)
![]() Prompt to Store SoftClips to Bins (Add a New
SoftClip Document)
Prompt to Store SoftClips to Bins (Add a New
SoftClip Document)
![]() Creating a DocumentLink Template
Creating a DocumentLink Template
Imaged Documents – Viewer Menu Commands
Additional Viewer Window Keystrokes
Viewing SoftClip Application Documents
![]() Work from the Page List Window
Work from the Page List Window
![]() Working with the Thumbnail list
Working with the Thumbnail list
![]() Move an Annotation to the Front or Back (of an
Image)
Move an Annotation to the Front or Back (of an
Image)
![]() Burn an Annotation to create an In-Image
annotation
Burn an Annotation to create an In-Image
annotation
![]() Access the Annotation Properties
Access the Annotation Properties
![]() Copy a Document using Drag-and-Drop
Copy a Document using Drag-and-Drop
![]() Move a Document using Drag-and-Drop
Move a Document using Drag-and-Drop
Creating a Shortcut to a Document
![]() Create a Shortcut to a Document
Create a Shortcut to a Document
![]() Create a Shortcut to a Document using
Drag-and-Drop
Create a Shortcut to a Document using
Drag-and-Drop
![]() Print a Document from inside PaperClip32
Print a Document from inside PaperClip32
Printing SoftClip Documents Using an External Application
![]() Rescan a Page from the Viewer Window
Rescan a Page from the Viewer Window
![]() Rescan a Page from the Document Page List
Rescan a Page from the Document Page List
![]() Rescan a Page from the Review Pages Dialog Box
Rescan a Page from the Review Pages Dialog Box
![]() Modify Pages from the Page List
Modify Pages from the Page List
![]() Stage Documents in PaperClip32;
Stage Documents in PaperClip32;
![]() Archive Documents from the menu
Archive Documents from the menu
![]() Search for Archived and Un-Archived docs
Search for Archived and Un-Archived docs
Examples of batch Archive queries
![]() Review and Store a Scanned Batch
Review and Store a Scanned Batch
![]() Assemble the Document for Indexing
Assemble the Document for Indexing
![]() Index the Document after Assembly
Index the Document after Assembly
Querying For Documents and Folders
![]() Sort Queries in the Query List Window
Sort Queries in the Query List Window
![]() Run the Query in the Background
Run the Query in the Background
![]() Run a Query from a Command Line
Run a Query from a Command Line
![]() Print
Query Search Result List
Print
Query Search Result List
![]() Send Shortcut to Folder Query Results
Send Shortcut to Folder Query Results
![]() Specify the Default Route Setup
Specify the Default Route Setup
![]() View Package History From the InBox
View Package History From the InBox
![]() View Package History From the Package Menu
View Package History From the Package Menu
![]() View Package History From the Process Information Dialog Box
View Package History From the Process Information Dialog Box
![]() View Folder History From the Folder Menu
View Folder History From the Folder Menu
![]() View Folder History From the Process Information Dialog Box
View Folder History From the Process Information Dialog Box
![]() View Document History From the Document Menu
View Document History From the Document Menu
![]() View Document History From the Process Information Dialog Box
View Document History From the Process Information Dialog Box
![]() View Page History From the Page Menu
View Page History From the Page Menu
![]() View Page History From the Process Information Dialog Box
View Page History From the Process Information Dialog Box
![]() View Batch History From the Batch Menu
View Batch History From the Batch Menu
![]() View Batch History From the Process Information Dialog Box
View Batch History From the Process Information Dialog Box
![]() View Background Process Status
View Background Process Status
![]() Change the Status of a Background Process
Change the Status of a Background Process
Microsoft Outlook and Outlook Express
![]() Restore Desktop to Last Saved Setting
Restore Desktop to Last Saved Setting
![]() Alter and Save Desktop Configuration
Alter and Save Desktop Configuration
![]() Restore Desktop to Default Arrangement
Restore Desktop to Default Arrangement
Your Application As a Front-End
![]() Select the Application Record Before Hot-Keying
Select the Application Record Before Hot-Keying
![]() Scan a New Document into a Clipped Folder
Scan a New Document into a Clipped Folder
![]() Add a SoftClip Document to a Clipped Folder
Add a SoftClip Document to a Clipped Folder
Headings are color-coded and underlined to graphically depict the organization of topics. One look at a heading orients you to your position in the topic hierarchy:
This icon ![]() denotes procedures you perform.
denotes procedures you perform.
Note: Notes use this format to emphasize critical information.
Bold Text in the on-line help system identifies hotspot text that you can click to jump to another topic or to the Glossary of Terms.
PaperClip32 document image management software lets you manage all your office documents in a familiar file cabinet / file folder-type structure. Thus, all documents that relates to a specific client, account, invoice, etc. can be stored centrally and accessed from a central point regardless of where each document originated. For example, you can have word-processing documents, spreadsheets, faxes and/or paper-based documents that have been scanned into the system inside a single PaperClip32 Folder.
PaperClip32 makes the storage and retrieval of your documents simple and efficient. Most users are already comfortable using certain applications and may not want to change how they work merely to accommodate a new document management system; so we’ve designed PaperClip32 to work with you. Since PaperClip32 lets you clip electronic file folders to other applications, you might be working in your personnel database and, simply by pressing a hot key, retrieve the electronic file folder associated with any one of the employees in the database. PaperClip32 integrates tightly with other packages without programming, by extracting information displayed on the screen. This capability lets you attach PaperClip32 folders not only to your Windows database applications, but also to DOS applications running under Windows, to custom programs, to accounting and human resources packages, and even to applications running on a mainframe or minicomputer attached to the PC network via standard terminal emulation.
You can also work directly in PaperClip32, independently of applications. Folders can be found by selecting the appropriate file drawer and browsing through a list of folder labels, or by specifying your own selection criteria.
Finally, you can use programs like Borland Paradox, Microsoft Access, or any custom Windows application as your front-end into PaperClip32. In this way, you can access all your PaperClip32 folders from any number of Windows applications, each with its own user-defined overlay. In fact, you can use a combination of both the direct and front-end application methods to meet all your filing and document management needs.
PaperClip32 replaces the paper documents in your filing cabinets with electronic images. It automatically simplifies all your filing and labeling chores. Its powerful routing and queuing capabilities help automate much of the work in your office that might otherwise be done manually.
PaperClip32 is a complete document management system that offers the following features and more:
· automates routine filing chores, ensuring that documents are properly stored and easily accessed
· stores imaged documents, whether they are scanned, imported from disk, or faxed
· automates distribution and routing of documents to others
· clips electronic folders to existing Windows applications, providing for instant access to PaperClip32 documents
· allows the transfer of documents between optical storage and conventional electronic hard drives (or other storage devices)
Inside PaperClip32, document storage and labeling closely follows the physical filing cabinet model. This means that documents consist of one or more pages, labeled and stored in folders. Folders, in turn, are alphanumerically stored within the cabinet drawers. This simple organization makes PaperClip32 easy to understand and flexible to use.
PaperClip32 documents are either imaged documents or SoftClip documents. Imaged documents are documents that either scanned, faxed, or imported from disk. SoftClip documents are software files created with word-processing, spreadsheet, or other application programs, and then automatically captured directly from the application into PaperClip32. Both kinds of documents can be filed and retrieved side-by-side in the same PaperClip32 folder.
Imaged documents may be added to a folder two ways: they can be scanned or they can be imported into a PaperClip32 folder. Likewise, SoftClip documents can be added to a folder two ways: they can be created directly in PaperClip32 through the application using an overlay template file, or they can be imported into a folder. When you create a SoftClip document directly from paperClip32, PaperClip32 launches the software application, allowing you to create a document on the fly.
A page is the smallest unit in PaperClip32. Each page is a scanned image; that is, an electronic copy of a paper document that is scanned, faxed, imported, or clipped from another application into PaperClip32.
Documents are made up of one or more pages. Documents are filed in PaperClip32 in one or more folders, just as in a manual filing system. Two categories of documents are stored in PaperClip32: Imaged documents and SoftClip documents.
· Imaged documents consist of one or more scanned pages captured with a scanner.
· SoftClip documents are documents you create in your software applications. You can create and you can access these application documents from within any PaperClip32 folder, or conversely, you can work from the software application and establish a link between a PaperClip32 folder and the original application document in an ad hoc fashion. When you create a new SoftClip document from within a folder, PaperClip32 launches the SoftClip application, allowing you to create documents on the fly. When a SoftClip document is subsequently retrieved from its folder, PaperClip32 again launches the software from which it was created. This gives you all the viewing and editing tools associated with the application software.
PaperClip32 stores bi-level (black and white) images in TIFF format (CCITT Group IV), compressing file size 20-to-1. Gray scale and color images are stored in JPEG format.
A batch is a group of pages that have been scanned or imported into PaperClip32, but have not yet been indexed or filed into documents. For example, all of the paperwork received on a given day can be scanned into PaperClip32 as a batch. The batch can then be reviewed, assembled into documents, and filed in folders.
Folders in PaperClip32 serve the same purpose that manila folders serve in a manual filing system. For example, you might keep all of the orders related to a particular client in a single PaperClip32 folder labeled with that client’s name and account number
Folder Index Fields are defined when you set up each file drawer. Each folder may be labeled with up to ten identifying fields, called folder index fields. Each folder requires, at minimum, one folder index field.
To allow you to further identify folders, PaperClip32 allows you to define up to ten Folder Data Fields. These fields are not used to sort the folders, but to help you further define individual folders.
Each folder is unique, and each folder is labeled by name and identified by its folder index fields and optionally, folder data fields. PaperClip32 uses the folder index field to search and locate documents in your folders.
Unlike folders, individual documents are not indexed with index fields. However, you can use additional fields, called document data fields, to identify and describe individual documents in the folder. PaperClip32 automatically assigns four document data fields every time a document is created:
|
1. Document Type |
This is a required field, selected from a manager-defined list. Examples: Contract, Letter, Floor Plan, and Resume. |
|
2. Document Description |
While optional, this field allows document identification with free form text. |
|
3. Create Date |
PaperClip32 automatically creates this date and time stamp field. |
|
4. Number of Pages |
PaperClip32 automatically enters the number of document pages. |
You can create additional document data fields to help distinguish one document from another.
PaperClip32 thus simplifies the filing and retrieving of your documents by applying these folder index fields, folder data fields, and document data fields to every document in every folder. This enables you to uniquely identify each folder and each document.
During system setup, the system manager must specify the storage location for the document types as: on-line; on magnetic media; or near-line on high-volume media such as optical platters.
On-line storage is recommended for documents in current use. Magnetic media allow for fast retrieval, but are limited in storage capacity. Near-line storage is recommended for long-term storage. Near-line media may be magnetic, magneto-optical, or “removable.” Documents stored near-line take longer to retrieve, but the storage capacity is usually much greater.
Documents that are accessed on a regular basis, like active invoices or open insurance claims, should be stored on-line, while infrequently accessed documents should be stored near-line.
Before you can access PaperClip32, you must be assigned a user account. This identifies you by name and password for the system login. User accounts also define your privileges, determining which PaperClip32 tasks you can perform, and on which objects you may perform them. You are assigned an InBox when your user account is set up. The InBox is an electronic mail box that may contain documents, folders, pages or batches that have been routed to you by other users.
The system manager creates the Task Groups used within PaperClip32. Task groups are made up of users with common access to documents, folders, and drawers. Task groups help manage workflow within PaperClip32. When an object is routed to a task group, members of that group have an opportunity to act on that object as a group, with that action of one member on the object affecting the group as a whole.
Any combination of PaperClip32 documents, folders, pages, and batches can be put together in a package and sent (or routed) to a variety of recipients. A routed package notice will appear in the InBox of each recipient of the package. If a package is addressed to a task group, PaperClip32 places identical packages in each group member’s InBox. Any changes, annotations, deletions, etc. made to the package by one user will be seen by the next user who opens the package. If a package is addressed to a user, the package record is a true private copy. This means that changes made to one recipient’s package will not affect the copies of that notice sent to anyone else.
Senders may only route attachments to which they have access, and for which they have routing privileges. On the receiving end, the level of access rights to routed attachments is dictated by the privileges in the recipient’s user profile. When a package containing private attachments (attachments with an owner defined) is routed to anyone other than its owner, those attachments may only be viewed or routed. The routing commands available at any given time depend on the attachments currently in view:
PaperClip32 integrates its filing system with your existing application software to simplify the labeling, filing, and retrieving of your documents. Typically, you integrate PaperClip32 with any of your applications using the following system setup functions.
· Setup Document Types
· Setup Overlay Templates
· Setup DocumentLinks
A brief discussion of each follows.
Document Types correlate with the file types associated with the software applications installed on your server or workstation. The PaperClip32 software, based on entries in the Windows Registry, automatically detects these applications and file types. Any valid software application and its associated file type are thus recognized as SoftClip Applications. These are the applications that you can move into and out of from your PaperClip32 software.
To integrate these SoftClip Applications and file types into your PaperClip32 system, you create specific Document Types that are based on these valid application file types. For example, you might define a Document Type called Internal Memos and correlate it with the.doc file type of Microsoft Word, which is the application your organization uses for its word processing and internal communications needs. Or you might define a Document Type called Invoice that correlates with the.xls file type of Microsoft Excel, which you use in your Accounting area to generate and track company invoices.
Your Document Types are used to classify documents (e.g., invoices, insurance claims, or federal tax returns). They define the initial storage bin for imaged documents associated with this document type, and they assign the associated software (i.e., application description) for SoftClip document types. Document types can be available to the entire system or to just a specific user, group, or drawer.
Although document types may be added at any time, they should be established when the PaperClip32 database is initially defined. Documents should be categorized by document type from the outset.
An Overlay Template must be defined in order to “clip” a drawer and its folders to an application screen. The overlay template establishes a direct processing link between) this application and the PaperClip32 drawer and its folders. This enables PaperClip32 to extract the data from the application into the target drawer and folder. The overlay template establishes a one-to-one link between fields or items of data in the application document and the required folder index fields in the folder. An overlay template may be defined for an existing PaperClip32 drawer, or the drawer may be created during overlay template definition. You can create three types of overlay templates, corresponding to the general processing nature of the data to be captured in the target software application:
· Database/Spreadsheet;
· Dialog Box; or
· Dialup, Terminal Emulation, or Free-form Text.
Once your overlay template is defined, PaperClip32 folders can be created directly from the software application by hot keying into PaperClip32 and using the overlay template to capture the application data.
With PaperClip’s DocumentLink feature, you establish a link between a SoftClip application document and all copies of that specific document that are stored inside PaperClip32 folders. You can then use the hotkey method to instantly access any of the folders in which the document is stored. This means, for example, that you can easily update or replace stored versions of a document in multiple folder and storage locations.
The PaperClip32 command line processing capability allows rudimentary control of PaperClip32 functionality from another program, Windows shortcut, batch file, script file, Windows Start Menu / Run command, etc. Since PaperClip32 is registered, you don’t need to specify the path when running PaperClip32 from these other places, just PCLIPWIN <parameters>.
|
Switch and Syntax |
Instance Active |
Meaning |
|
/S<path> |
new |
Share location path: overrides setting in PCLIPWIN.INI file |
|
/D[#] |
new |
Demo scan mode need to create \demofile directory in the “share location” dir with 10 single page TIFF files named scanfile.0 –scanfile.9 |
|
/C |
new & passed |
Clip to the current application window |
|
/U<user name> |
new |
Log in as user |
|
/P<user password> |
new |
Log in with password |
|
/F<”drawer|index information”> |
new & passed |
Open/create folder by drawer name & index. The drawer name and each index field is separated by “|” characters. Ex: “Drawer1|Index1|Index2|Index3” |
|
/I<file list> |
new & passed |
Import files into currently open folder |
|
/IF<file list> |
new & passed |
Import files into currently open folder |
|
/ID<file list> |
new & passed |
Import files into currently open document |
|
/IP<file list> |
new & passed |
Import files into currently open package |
|
/IB<file list> |
new & passed |
Import files into currently open batch |
|
/WM |
new & passed |
Maximize window (or start maximized) |
|
/WN |
new & passed |
Minimize window (or start minimized) |
|
/WD |
new |
Force new instance of PaperClip32 to run |
|
/RN[<seconds>] |
new & passed |
Inbox refresh notify interval 0 or not specified = off. PaperClip32 default = 60 seconds |
|
/q<”Query Name”> |
new & passed |
Run a saved query from a scheduler or script. |
Notes:
1. Case is not important for the switches.
2. ‘New’ in the above table means that the commands can be specified on the command line only when a new PaperClip32 program instance launched. ‘Passed’ means that the parameters will be passed to a currently running PaperClip32 if you run PaperClip32 again with the parameters.
Example:
If PaperClip32 is already running and I want to disable notify, I can run PCLIPWIN /RN. Instead of executing PaperClip32 again, it will turn off notify for the currently running PaperClip32. From this follows the fact that if you run PaperClip32 twice from the same menu choice, shortcut, etc., it will result in only one copy of PaperClip32. The second time, nothing will happen.
3. There are two conditions under which a second copy of PaperClip32 will start. These are:
/WD is specified, or
/S is specified and the share location is different from the copy already running.
The installation program automatically creates a program group and menu item off of the Start button, Programs pull-right menu selection.
Note: You can create a shortcut to the application on your computer by clicking the right mouse button with the cursor located over an empty section of the Windows Desktop and choosing New | Shortcut from the pull-right menus as they appear. For more details on creating Desktop shortcuts for use with Windows, refer to the appropriate Windows user resources.
You can use either of the following procedures to start PaperClip32:
· Double-click on the shortcut icon with your mouse; or,
· Click on the Taskbar Start button, and select Programs | PaperClip32 | PaperClip32 from the pull-right menus as they appear.
The mouse pointer will change to an hourglass while the computer starts the program. In a few seconds you will be presented with the application Login Window. By default, PaperClip32 uses your Windows 95/NT login name for PaperClip32 login.
No matter which way you invoke PaperClip32; there are several ways to execute most document functions. You can select a drop-down list from the menu bar, then click on the appropriate command. Or, you can click on the command icons from PaperClip32’s tool bar. You can also summon the floating menu from anywhere on the screen by pressing the right mouse button. The floating menu offers appropriate options for the current folder, document, or package.
All user functions are performed and accessed from the PaperClip32 menu bar, the tool bar, or the floating menu. Most setup functions are restricted to the system manager (e.g. workstation-record definition, document types etc.). Users may view these records, and in some cases may modify their own records.
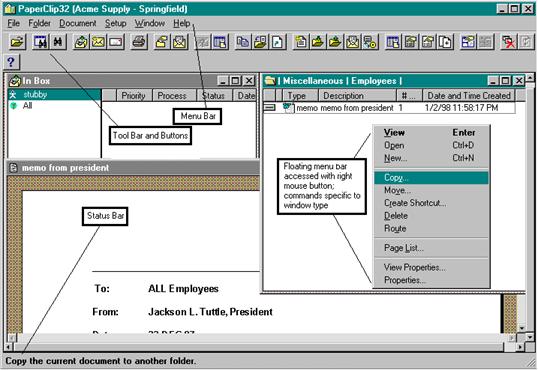
As you navigate through the system, PaperClip32’s Toolbar continually updates to reflect your current processing options. This means that the processing options most directly related to the task you are trying to perform appear as icons on the toolbar. Each icon performs a different function. You can hold your mouse cursor over an icon on the toolbar to see a brief description of its intended purpose use.
PaperClip32 provides you with several kinds of help that may assist you during processing. These include an either field-level “What’s This? Style help, or context-sensitive, on-line help which you may access at anytime during processing by pressing the <F1> key or by clicking the dialog box Help button. You may also access help by choosing Index from the Help pull down menu.
To obtain information about the current version and date of the application software installed at your location, choose About PaperClip32 from the Help pull down menu. The About dialog box appears showing you the pertinent system information.
Only users with supervisory rights can access the system management functions used to create and maintain the following:
· On-line and Near-line Bins
· Workstation Configurations
· User Accounts
· Task Groups
· System Parameters
· Document Link Templates
· Document Types
· File Drawers
· Overlay Templates
· Distribution Lists
· Route Slips
These users with supervisory rights also set up the initial drawers used with the system. For information on setting up personal drawers, refer to The Active Directory button is only visible when the Single Sign On feature is enabled. See section below.
Single Sign On is an automatic logon to Paperclip32 using the Windows login user as the user for PaperClip32. Since Windows already authenticates the user, PaperClip32 does need not authenticate. PaperClip32 does however validate the Windows user name upon startup. Windows authenticated users may be mixed with PaperClip32 authenticated users in your system setup.
This optional PaperClip32 feature must be enabled by editing the PCLIPWIN.INI file as follows:
[Options]
SingleSignOn=1
The name must match the Windows user name excluding the domain. For example, \\PCLIP\DAVE Windows user would correspond to a PaperClip32 user DAVE. The name and password field will be automatically filled out when you use the “Active Directory” button to browse and select a Windows user name.
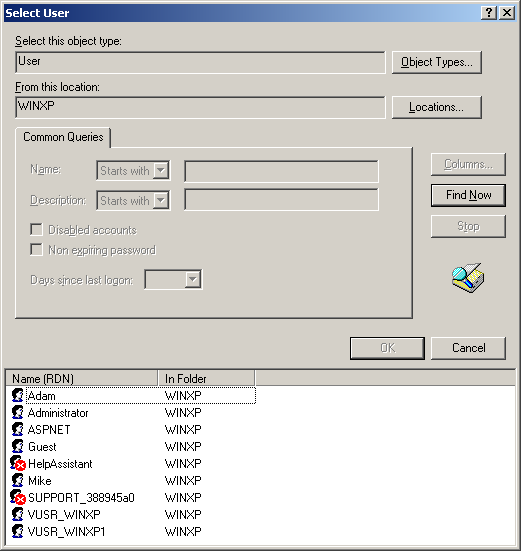
The Select User dialog box (above) is shown when you press the “Active Directory” button.
When this user runs PaperClip32 no login prompt will be displayed. The user will automatically get logged into PaperClip32 based on their Windows login name.
Single Sign On is only available for Windows 2000 workstations or better. You can run in a mixed environment allowing Windows 98/NT systems to authenticate the normal way and Windows 2000/XP workstations to use SSO.
SSO auto login can be overridden by using the PaperClip32 command line option –U with a user name. This will force the system to prompt for the password for that user.
Example command line:
Pclipwin.exe –uMANAGER
This command line will prompt the user for the password for the MANAGER account even though they may be logged into Windows with a different name.
Drawers.
You should consider your document management and imaging needs carefully before implementing PaperClip32. Advance planning will smooth your organization’s transition into electronic document management and imaging and can help you achieve maximum benefit from the application software.
PaperClip32 easily addresses the document management and imaging needs of small businesses, specific departments, or entire organizations. PaperClip32 users are assigned access rights and privileges according to your explicit management and security requirements.
Depending on the volume and frequency of access, documents can be stored either on-line (magnetic media) or near-line (optical, magneto-optical, removable media). Because PaperClip32 works with your Windows and DOS applications, you can import existing word processing files and spreadsheets into the system as SoftClip files.
PaperClip32 uses the CCITT Group IV fax format to compress imaged files (only for bi-level images) from their original size into a much smaller and more easily managed size. With PaperClip32, you can set system-wide default storage locations and still specify storage locations for individual document types.
Once PaperClip32 has been installed, default settings for storing imaged files, SoftClip files, scanned batches, and temporary files should be established. The system manager can change these default settings.
A system manager should consider the following:
· Default Document Storage
· Storage of SoftClip Files
· Directories for Storing Images, Batches, and Temporary Files
PaperClip’s default is to store imaged documents, temporary files, and scanned batches in PaperClip32 sub-directories on the file server. However, different directories can be established for storage.
SoftClip files are data files associated with other application software. SoftClip files may be stored on on-line media and later staged near-line. A dynamic link can be created with existing applications by storing the SoftClip files in their existing application directories and creating a pointer to these files, rather than copying them to PaperClip’s directory. This way, changes made to these documents through PaperClip32 will appear in the original document files. PaperClip32 can also store these documents in a separate directory so that changes made in PaperClip32 will not affect the original files.
PaperClip32 uses these directories as temporary storage locations before moving documents into the images directory. Keep in mind that if you change these directories after implementing PaperClip32, all files must be moved from the existing directories to the new directories.
Document types classify documents within PaperClip32 folders, increase search efficiency, and determine a document’s initial storage bin.
Document types tell PaperClip32 whether a specific type of document (e.g. Invoices, Purchase Orders, Letters) will be an image document or a SoftClip document. You can also assign specific storage locations for different types of documents.
Documents that must be accessed frequently should be stored on-line. This provides quicker access and retrieval. Documents that do not require as frequent access can be stored near-line, providing greater storage capacity.
To add a new workstation to PaperClip32, you create or add a workstation record. The workstation configuration defines the workstation name, the scanner interface, the location of certain PaperClip32 files, user interface settings, and control over the workstation mode of operation or functionality.
Workstation configuration should be performed before user accounts are established.
It is necessary to set up workstation names for all physical workstations that will access PaperClip32. As additional workstations are added, new workstation definitions must be added. In addition to choosing workstation names you must use the actual “computer name” for each PC using PaperClip32. The computer name is defined in the network configuration of Windows 95/NT. For scan workstation, a scanner must be selected from the list of available supported scanners.
Workstation configuration also allows for assignment of a different temporary directory for each workstation. The temp directory is used to buffer scanned images. This directory can be set to a local path in order to optimize heavy scanning.
Data security is critical to the proper implementation of PaperClip32. User account records establish and maintain user ID’s and passwords, privileges, and access to PaperClip32 functions.
Specific users can be assigned different rights based on data security needs. A user may be granted supervisory rights, which give that user all available system manager and user privileges in PaperClip32. A user may also be granted global access rights, which enables access to all PaperClip32 drawers, folders, and documents, regardless of ownership.
Note: Due to the volatility of Global Access Rights, it is recommended that these rights be restricted to the System Manager and a backup System Manager.
Drawers, documents, and folders may be owned by individual users or by task groups, so that access to sensitive documents can be restricted. A user may also be granted Workflow access rights, which allows him to participate in automated Workflow processes. Users without these rights will not even see automated Workflow processes from the Processes dialog box.
Drawers, folders, documents, overlay templates, and scanned batches can be created, modified, or deleted by a user who has been assigned these specific privileges by the system manager. Some users may only need creation and modification privileges for documents, while other users also need to create, modify and delete drawers and folders. In addition, certain users can be assigned privileges to route documents, folders, and batches and copy, move, archive, and export documents.
PaperClip’s routing capabilities enables users to send folders and documents, complete with notes and instructions for further processing, to different users and groups of users across a network. Routing can enhance workflow and productivity in your organization.
PaperClip32 provides a variety of methods to route objects. Depending on your needs, you may establish one or more of the following:
· Task Groups
· Distribution Lists
· Route Slips
Task groups are groups of users that share batches, pages, documents, folders, and drawers, which they may jointly own, so that access to them is restricted to the group. Task groups typically consist of users in one department, or groups of users working together on similar projects.
Specific group privileges can be assigned. Provided task group privileges are being enforced, they supersede privileges established in the user account. In this way, individual users who are part of a task group working on particular PaperClip32 objects can use functions for manipulating those objects that they might not be otherwise allowed to use.
Distribution lists provide a means for routing PaperClip32 objects to multiple user InBoxes. When a package is routed via a distribution list, it appears in the InBox of each addressee on the list. Their individual actions will not affect one another with regard to the routed package. Each user or task group on the distribution list is guaranteed an opportunity to view, print, or further process the package.
Route slips enhance workflow routing for business processes that require that specific individuals’ sign-off on objects before others can access them. When a package is routed via a route slip, the object is only placed in the InBox of the first addressee on the list. After review, it can be routed to the next user or task group on the route slip. At this point, the entry will be deleted from the first addressee’s InBox and sent to the next addressee on the route slip.
System-wide parameters, or default settings, tell the system where to store on-line and near-line documents, scanned batches, temporary files, and SoftClip template files. These settings are initially established when PaperClip32 is installed, but they may be changed.
1. Select System Parameters from the Setup menu. The System Parameters dialog box appears with the Directories tab controls shown.
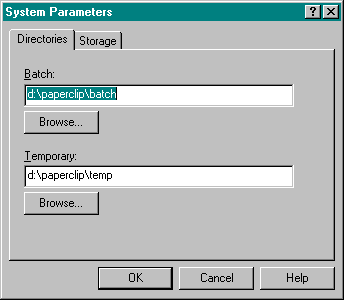
2. Select Batch Directory to change the directory where PaperClip32 holds batches until they are indexed. The default sub-directory, BATCH, is created upon installation. If this directory is changed, all existing batches must be moved to the new location.
3. Select Temp Directory to change the default temporary storage for batch scanning, faxing, and image retrieval. The default sub-directory, TEMP, is created upon installation.
4. Click on the Storage tab.
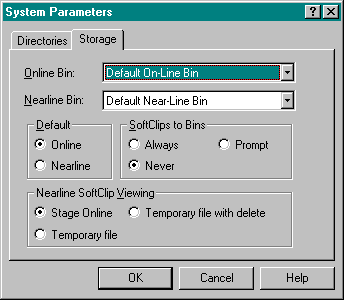
5. Select On-line Bin to change the default on-line storage bin (sub-directory) where PaperClip32 stores files on magnetic media. If the Default On-line Bin is selected, PaperClip32 stores documents associated with this bin in the DEFBIN sub-directory. To set up a different system-wide default on-line bin, select it from the list of bins previously created.
Note: Additional on-line bins must be created before they can be selected.
6. Select Near-line Bin to select a default near-line storage bin for all documents. Near-line bins are magnetic or magneto-optical media that fully support the DOS file system.
7. Select the desired Default Document Storage location. Select On-line for the default setting to be a bin on the hard drive. Select Near-line for the default setting to be the magnetic, magneto-optical, or removable media drive. The system uses this default value when new document types are set up, but it can be changed in the document type record. If the document type does not specify a storage location, the system default is used.
Note: SoftClip documents are always created on-line and may be staged to near-line media.
8. In the SoftClip to Bins group box, specify the appropriate SoftClip storage option:
|
Never |
The user assigns the name and storage location. The system stores the document in the directory specified (usually the software application’s directory). Any changes made to the document, independent of PaperClip32, will be reflected when the document is retrieved through PaperClip32. |
|
Always |
The system automatically names and stores the file in its appropriate storage bin. Any changes made to the document, independent of PaperClip32, will not be reflected when the document is retrieved through PaperClip32. |
|
Prompt |
Allows the user to select the SoftClip storage option for each document. |
9. In the Nearline SoftClip Viewing group box, specify the near-line SoftClip viewing option:
|
Stage On-line |
This stages a SoftClip document from near-line to on-line as long as the near-line bin is not designated as non-optical or fixed. When retrieved, the document will be stored in an on-line bin, and the document that existed in the near-line bin will no longer be accessible through PaperClip32. This is the default. |
|
Temporary file |
This will create a temporary file in either the workstation or system temporary directory. The user has the responsibility for deleting files that are no longer needed by the SoftClip application. |
|
|
|
|
|
Note: The temporary directory is defined as the temporary directory path assigned in Setup, Workstations. If no temporary directory is designated, PaperClip32 will use the System Parameters temporary directory. |
|
Temporary File with Delete |
This creates a temporary file in either the workstation or system or temporary directory. These files will be available for the current Windows session only. At the start of a new PaperClip32 session any temporary files created for the current workstation before the start of the current Windows session will be automatically deleted. |
10. Click OK to save the newly entered system parameter information or Cancel to ignore any changes made to system parameters. In either case, you return to the application desktop.
Workstations should be set up before user accounts are created. Workstation configurations are specific to individual workstations on the network. If the workstation will be used with a scanner, the scanner interface must first be defined. The temporary storage location of PaperClip32 image files can also be changed.
1. Choose Workstations… from the Setup menu. The Workstations dialog box appears.
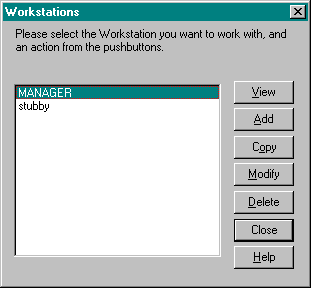
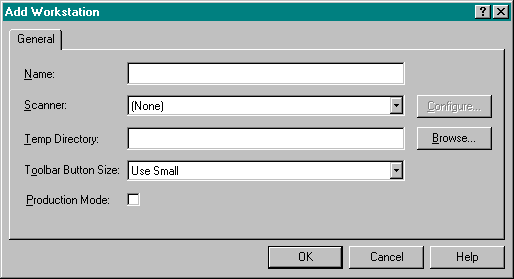
2. Click Add. The Add Workstation dialog box appears with the General tab controls displayed.
3. Type the workstation name in the Name: box.
Note: The workstation name should be the PC’s “computer name” as defined in the network setup of Windows 95/NT.
4. To connect a scanner to this workstation, select it from the Scanner: drop-down list box and choose Configure. The Configure option is only available after a scanner has been selected.
5. In the Temp Directory: box, specify a directory location for temporary file storage during batch scanning, faxing, and image retrieval. Optionally, choose Browse… to specify a suitable temporary directory location.
6. Use the Toolbar Button Size: list box to set the size of the toolbar buttons that display on the workstation.
7. Turn on the Production Mode: check box to enable Production Mode capability for this workstation. A check mark appears in this box when Production mode is active.
Note: Production Mode must be enabled in the user account record for this setting to have effect.
8. Click on OK to save the workstation configuration, or on Cancel to ignore any changes made to the workstation configuration.
9. Click on Close to return to the PaperClip32 window.
Note: Some scanners are configured at the board level, in which case PaperClip32 will not allow you to configure the scanner, and there are features that may not be available with all scanners. Refer to the scanner documentation to determine the appropriate settings. Options not available for specific scanners are grayed out.
10. In the Add Workstation dialog, select a scanner and click the Configure… command button.
Note: The instructions that follow are for a Kofax controller. The actual dialog box you see will vary depending on the scanner device and controller manufacturer you are using.
11. Set the appropriate options for your scanner:
|
Dots per Inch (DPI) |
This sets the number of dots-per-inch to scan the image. For most documents (letters, invoices, forms, etc.) 200 DPI is recommended. Higher resolutions require significantly more storage space. However, they do produce a higher quality image, both viewed and printed. |
|
|
Note: For most documents (letters, invoices, forms, etc.), a resolution of 200 DPI is recommended. Higher resolutions do not produce a significant difference in viewing quality (especially with VGA monitors), but require significantly more storage space. However, they do produce a higher quality printed image. |
|
Brightness |
To change the brightness, check the Manual radio button, and then move the thumbnail left or right to adjust. If the original is light, press the Darken button or move the thumbnail to the left. Press Norm for an average setting. Press Lighten for a darker original. If you leave Auto selected, the scanner automatically determines brightness. |
|
Dither |
Select the appropriate dithering type from the list. These values are scanner-dependent. Dither simulates shading in a bi-level (black/white) image by alternating pixels. |
|
Contrast |
Select Manual to adjust the contrast setting using the thumbnail. Select Automatic to allow the scanner to determine the proper contrast setting. |
|
Mode |
Select Black and White for regular printed text. Select Photo mode for halftones. These values are scanner-dependent |
|
Page Size |
Select from a drop-down list of possible page sizes |
|
Orientation |
Select Portrait for vertical (default) or Landscape for horizontal. This option may not be available on some scanners. |
|
Paper Source |
Select Auto, Flatbed or ADF (Auto Doc Feeder). These options may not be available on all scanners. |
12. When scanner configuration is complete, choose OK to save the scanner settings or Cancel to ignore any changes. In either case, you return to the Workstations setup dialog box.
1. Select Workstations… from the Setup menu. The Workstations dialog box appears.
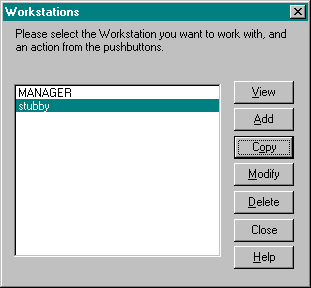
2. Select the workstation to be copied and choose Copy. The Add Workstation dialog box appears.
3. Change the workstation name and any other options as desired.
4. When the information has been entered, click OK to add the workstation or on Cancel to return to the Workstations dialog box without copying any workstation information.
1. Select Workstations… from the Setup menu. The Workstations dialog box appears.
2. Select the workstation to modify and choose Modify. The Modify Workstation dialog box appears.
3. Make any modifications to the workstation record.
4. Click on OK when the workstation configuration is complete or on Cancel to ignore changes made to the workstation configuration.
5. Click on Close to return to the application desktop.
1. Select Workstations… from the Setup menu. The Workstations dialog box appears.
2. Select the workstation to view and choose View. The View Workstation dialog box appears.
3. When viewing is complete, click on Cancel to return to the Workstations dialog box.
1. Select Workstations… from the Setup menu. The Workstations dialog box appears.
2. Select the workstation to delete and choose Delete. The system prompts you to confirm the deletion.
3. Click on Yes to delete this workstation or No to cancel.
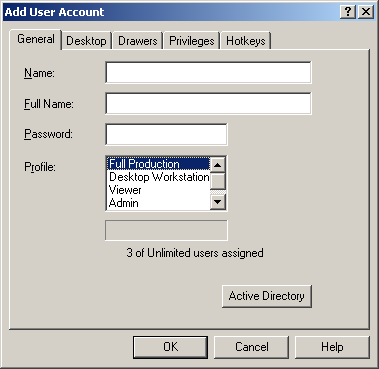
In order for individuals to access and use the PaperClip32 system, they must be assigned an individual user account. When you add a user you must specify a user profile for that user. You may choose any one of the following profiles:
|
Full Production |
This type of user can create, modify and delete documents if given the appropriate rights. Also, the user can view, print, fax, e-mail and annotate documents and can send packages to other users. |
|
Desktop Workstation |
This type of user can modify and delete documents if given the appropriate rights. Also, the user can view, print, fax, e-mail and annotate documents and can send packages to other users. |
|
Viewer |
This type user can view, print, fax, and e-mail documents. |
|
Admin |
This user type is intended for the system manager. The Admin user has the same rights as the Viewer account and the additional rights to perform setup operations. |
|
Inactive |
This user type disables the user login. |
Note: PaperClip32 maintains user limits based on each type of user profile. An error message displays when you try to assign a user of a certain type and the user limit for that type has been reached. Before you may add any additional users of that type, you must purchase a new registration key.
The system maintains each user’s information in the User Account Record. The user account record contains the user name, password, a list of user-specific privileges, and the Production Mode settings. Any user may be assigned global access rights whether or not they are a supervisor. This enables that user to access all drawers, folders, and documents, regardless of their ownership.
PaperClip32 also offers Executive Privilege support. This privilege level allows a user to hide privately owned objects even from system managers. This means, for example, if a user has executive privilege, then no one can see any objects owned by that user (except for that user of course). In addition, a supervisor cannot change the password or remove executive privilege from a user. This ensures that a system manager cannot circumvent the rights inherent to the executive privilege-level.
Security issues and appropriate access to confidential documents should be considered when assigning executive and supervisory privileges and global access rights. The combination of user privileges and task group membership determines how each user may use the PaperClip32 features and functions.
Note: Be aware, even if a user does not have create privileges, SoftClip documents can still be modified from the original SoftClip application program.
The user account record is also used to set up a personal drawer and to change the default hot-key assignments.
Clicking on View, Add, Copy or Modify from the User Accounts dialog box displays the information associated with the selected user account record.
The user account record contains the following user-related information:
|
Name |
The user’s unique account name (e.g., JOHN). This user account name also becomes the user’s InBox name. This entry is required by PaperClip32. |
|
Full Name |
The user’s full name (e.g., JOHN DOE) |
|
Password |
The user’s password; any combination characters. |
|
|
Note: Passwords may be from 3-20 alphanumeric characters. |
The login ID and password are the keys that grant the user access to the PaperClip32 environment. As each password is created (and later when the password is entered by the user) each character is displayed as an asterisk as it is typed.
Note: By default, PaperClip32 uses your Windows 98/2000/XP login name when logging into PaperClip32. You should set up your PaperClip32 users’ names consistent with your Windows 98/2000/XP login names or use the Single Sign On feature for auto login using your Windows account.
The Active Directory button is only visible when the Single Sign On feature is enabled. See section below.
Single Sign On is an automatic logon to Paperclip32 using the Windows login user as the user for PaperClip32. Since Windows already authenticates the user, PaperClip32 does need not authenticate. PaperClip32 does however validate the Windows user name upon startup. Windows authenticated users may be mixed with PaperClip32 authenticated users in your system setup.
This optional PaperClip32 feature must be enabled by editing the PCLIPWIN.INI file as follows:
[Options]
SingleSignOn=1
The name must match the Windows user name excluding the domain. For example, \\PCLIP\DAVE Windows user would correspond to a PaperClip32 user DAVE. The name and password field will be automatically filled out when you use the “Active Directory” button to browse and select a Windows user name.
The Select User dialog box (above) is shown when you press the “Active Directory” button.
When this user runs PaperClip32 no login prompt will be displayed. The user will automatically get logged into PaperClip32 based on their Windows login name.
Single Sign On is only available for Windows 2000 workstations or better. You can run in a mixed environment allowing Windows 98/NT systems to authenticate the normal way and Windows 2000/XP workstations to use SSO.
SSO auto login can be overridden by using the PaperClip32 command line option –U with a user name. This will force the system to prompt for the password for that user.
Example command line:
Pclipwin.exe –uMANAGER
This command line will prompt the user for the password for the MANAGER account even though they may be logged into Windows with a different name.
Clicking on the Drawers tab of the User Account dialog will display the Personal Drawer dialog box.

From this dialog box, a personal drawer of file drawers can be established for each user. Access to these drawers will be restricted by ownership of the drawers as assigned when they are created. Once the personal drawer is established, the user can hot key to it from any application, without setting up an overlay template.
Clicking on the Desktop tab will display the Setup Desktop dialog box; this is where the PaperClip32 workspace is configured.
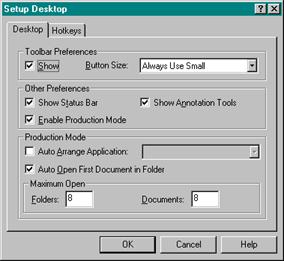
From this dialog box production mode can be enabled or disabled, as can the toolbar and the status bar. These preferences may be turned on or off as desired. The default hot key assignments used in PaperClip32 can also be altered from the Hotkeys tab of this dialog box.
1. Click on Desktop to configure this user’s workspace. The Setup Desktop dialog box appears.
2. To display the toolbar, select Show Toolbar.
3. To display the status bar, select Show Status Bar.
4. To display the annotation tools, select Show Annotation Tools.
5. To utilize Production Mode, select Enable Production Mode. The Production Mode button will become active.
6. Click on the Production Mode button to configure the Production Mode settings for this user.
Note: Any changes made to the user’s Production Mode settings will not take effect until that user logs out of PaperClip32, and than logs back into PaperClip32 after the changes are made.
Clicking on the Privileges tab of the User Account dialog displays the Privileges dialog, which is used to specify the following user rights with respect to PaperClip32 functionality.
|
Supervisor |
A Full Production user assigned supervisory rights will be granted all privileges in the PaperClip32 privileges dialog box and the ability to access all setup functions. This includes the ability to create, modify and delete user accounts, task groups, distribution lists, route slips, workstation records, system parameters, on-line bins, near-line bins, document types, and SoftClip applications. |
|
Global Access Rights |
A Full Production user assigned global access rights has access to all documents, folders, and drawers in the system regardless of individual or group ownership of those objects (except those owned by an “Executive” level user). |
|
Executive |
A Full Production user assigned executive rights can secure drawers, folders, documents and Notes from any user including supervisors. The executive user password can only be changed by the executive user. |
|
Workflow Access |
Not implemented. |
Beyond the capabilities specific to each user profile type, individual users may only perform those tasks for which they have been assigned privileges. These privileges enable a user to create, modify, delete, route, copy, move, stage, index and export documents, folders, batches, drawers, and overlays in PaperClip32. The system administrator may modify these privileges at any time.
Be careful in assigning the modify and delete privileges for users, since these functions can affect system integrity. Thus, if a user deletes a drawer, all folders and documents within that drawer will be deleted along with it.
The following listing shows the privileges available in PaperClip32:
|
Privilege |
Description |
|
Create |
Allows the user to define drawers; add new documents and folders; scan, fax, and import individual images; and import SoftClip documents into the PaperClip32 database. The user can also define application overlay templates, create OCR documents, packages, stamps, and scan or import batches. |
|
Modify |
Allows the user to modify documents and descriptions, drawer names and descriptions, scanned batches, packages, stamps and application overlay templates. Modify also allows the user to create notes and delete pages. |
|
Delete |
Allows the user to remove documents, folders, batches, drawers, rubber stamps, packages and overlays from the PaperClip32 environment. |
|
Route |
Allows the user to send pages, documents, folders, and batches to users, task groups, distribution lists, or route slips. |
|
Drawer/ Browse |
Allows user to browse drawers. If not given, user can only access documents and folders via queries, clipping, or shortcut links. |
|
Query/ Execute |
Allows user to execute a saved query. |
|
Note/Burn |
Allows user to burn annotations into an image document, creating an In-Image annotation |
|
|
Note: In order to route a document or folder you must have rights to create and delete a package. |
|
Copy |
Allows the user to copy documents between folders |
|
Move |
Allows the user to move a document between folders. |
|
Stage |
Allows the user to stage and archive documents. |
|
Index |
Allows the user to access the Batch List. A user must also be assigned Document Create privileges in order to index scanned batches. |
|
Export |
Allows the user to export documents to disk as TIFF files. |
|
|
Allows the user to Send a Copy of a document via Email |
|
Inet Expr |
Allows the user to Send a document via Internet Express |
|
|
Allows the user to Print a document |
1. Select User Accounts… from the Setup menu. The User Accounts dialog box appears.
2. Click Add. The Add User Account dialog box appears with the General tab controls displayed.
3. Enter the user account Name in the Name: box and the user’s full name (up to 30 characters.) in the Full Name: box.
4. In the Password: box, type a password for the user. As the password is typed, PaperClip32 will display asterisks (*) for each character entered.
5. Specify a user profile in the Profile: box. You may choose from any of the profiles listed.
|
Select… |
To… |
|
Full Production |
Indicate to the system that this user can create, modify and delete documents if given the appropriate rights. Also, the user can view, print, fax, e-mail and annotate documents and can send packages to other users. |
|
Desktop Workstation |
Indicate to the system that this user can modify and delete documents if given the appropriate rights. Also, the user can view, print, fax, e-mail and annotate documents and can send packages to other users. To add such users, at least 10 Full Production users must be part of the system. |
|
Viewer |
Indicate to the system that this user can view, print, fax, and e-mail documents. To add such users, at least 10 Full Production users must be part of the system. |
|
Admin |
This user type is intended for the system manager. The Admin user has the same rights as the Viewer account and the additional rights to perform setup operations. |
|
Inactive |
Users of this type cannot login to the system. Inactive users may be created prior to obtaining additional user licenses. |
6. Choose the Desktop tab to configure the user desktop.
7. Use the Toolbar Preferences group box controls to configure the display of the user’s desktop toolbar. Turn on the Show checkbox to display the toolbar for the user. A check mark appears in this box when the toolbar is displayed.
8. Specify a preference for the toolbar button size for this user in the Button Size: list box.
|
Select… |
To… |
|
Use Workstation Setting |
Indicate to the system that this user prefers the button size to default to the value set for the workstation. In this case, all users using this workstation will see the same button size. |
|
Always Use Small |
Indicate to the system that this user prefers the small button size whenever they log onto a workstation. In this case, the user will see the small size buttons no matter from which workstation they access the system. |
|
Always Use Large |
Indicate to the system that this user prefers the large button size whenever they log onto a workstation. In this case, the user will see the large size buttons no matter from which workstation they access the system. |
7. Specify Other Preferences for the user account.
|
Turn On… |
To… |
|
Show Status Bar |
Indicate to the system that this user prefers to see the status bar. A check mark appears in this box when the status bar is displayed. |
|
Show Annotation Tools |
Indicate to the system that this user prefers to see the annotation tools. A check mark appears in this box when the annotation tools are displayed. |
|
Enable Production Mode |
Indicate to the system that this user wishes to use the PaperClip32 production mode capabilities. A check mark appears in this box when the production mode is active and the Production Mode group box controls are enabled. Specify the Production Mode Setup preferences. |
8. Select the Drawers tab and configure the Personal Drawer(s) for the user. Use the arrow keys to move the Drawers between the Available and Personal Drawer lists.
9. Select the Privileges tab to set the privileges for the user account.
· To classify the user as a Supervisor, with rights to add additional users, task groups, route slips, distribution lists, workstation records and system setup functions, turn on the Supervisor check box in the Special section. A supervisor user is automatically assigned all privileges in the Privileges table. A check mark appears in this box when it is active.
· To grant the user global access rights to all documents, folders, and drawers, regardless of individual or group ownership, turn on the Global Access Rights check box in the Special section. A check mark appears in this box when it is active.
· To grant the user Workflow access rights, turn on the Workflow Access check box under the Special section. A check mark appears in this box when it is active.
· The Executive privilege level allows a user to hide privately owned objects even from system managers and global access users. This means, for example, if a user has executive privilege, then no one can see any objects owned by that user (except for that user of course). In addition, a supervisor can not change the password or remove executive privilege from a user.
· To grant the user individually customized access rights, click on one or more privileges to assign to the selected object from the Privilege list on the right. Selected privileges will be highlighted for each Object selected on the left.
· To grant the user all privileges to all objects, click on All privileges to all objects at the bottom of the dialog box.
10. Select the Hotkeys tab to set the individualized hotkey assignments for this user account. Enter the Hot Key assignments for this user in the appropriate edit boxes. You may specify hotkeys for any of the following functions: Create Overlay, Visual Context Processor, Custom Drawer List, and Create DocumentLink.
11. Click OK to save the user account record information for this user and return to the User Accounts dialog box or choose Cancel to ignore any changes and return to the User Accounts dialog box.
12. Click Close to close the User Accounts dialog box and return to the main application desktop.
1. From the main application desktop, select User Accounts… from the Setup menu. The User Accounts dialog box appears.
2. Click Add. The Add User Account dialog box appears with the General tab controls displayed.
3. Click the Drawers tab to set up a personal drawer for this user.
4. From the Available Drawer List, select the drawers to be added to the personal drawer and click on the Add button. The drawer will be moved to the Selected Drawers list.
5. To remove a drawer from the Personal drawer, highlight the desired drawer on the Selected Drawers list, and click on the Remove button. The drawer will be moved to the Available Drawers list.
6. When the Personal drawer is complete, click on OK to save the changes, or on Cancel to ignore the changes. The Add User Account dialog box appears.
7. Click on OK to save the changes and return to the User Accounts dialog box, or on Cancel to ignore any changes.
8. Click Close on to return to the PaperClip32 window.
1. When you turn on Enable Production Mode, the system enables the Production Mode group box controls with additional options for Production Mode processing.
2. To automatically arrange a clipped application on the user desktop each time they log in, select Auto Arrange Application. Turning this checkbox on automatically arranges the applications during production mode processing. A check mark appears in this box when it is active.
3. When Auto Arrange Application is selected, the Application to Arrange drop-down list becomes active. Select an application for the user’s desktop.
Note: The clipped application must have been set up (an overlay must have been created for the application) before being selected from the drop down list.
4. To have PaperClip32 automatically open the first document in an opened folder (either from the New Folder dialog box or by hot-keying from a clipped application to a folder), select Auto Open First Document in Folder. Turning on this checkbox automatically opens the first document in the folder during production mode processing. A check mark appears in this box when this option is active.
5. To limit the maximum number of open folders or open documents for this user during a processing session, enter the numerical limits in the Maximum Open Folders and Maximum Open Documents fields.
Note: If the user will be performing extensive indexing, these maximums should be set to one.
1. Choose User Accounts from the Setup menu and select a user or choose Add to add a new user. The User Accounts dialog box appears.
2. Click the Hot Keys tab, select the Hot Key Name to be changed and type in any Function Key and any combination of one, two, or three Modifier Keys (i.e., the Shift, Ctrl, or Alt keys) in the edit box controls. These are the hot key links the user will employ during processing to quickly access the related functions.
Note: Individual users may also change the hot keys they use by choosing Desktop… from the Setup pull down menu, selecting the Hot Keys tab and editing the hot key assignments shown.
1. Choose User Accounts from the Setup menu and select a user. Click on the Modify button. The Modify User Accounts dialog box appears. Click the Groups Tab.
2. Highlight the Task Group name from the Not Member Of: list, and click the Add [ß] button to move the selected user to the Member Of: list. Go to the Task Group setup to assign privileges for this user.
3. To remove the user from the Task Group, highlight the Task Group in the Member of: list, and click the Remove [à] button.
![]() Copy a User Account
Copy a User Account
1. Select User Accounts from the Setup menu. The User Accounts dialog box appears.
2. Select the workstation to be copied, and click Copy. The Copy User Account dialog box appears.
3. Change the name and any other information as desired.
4. Click OK to save the new user account or Cancel to return to the User Accounts dialog box.
1. Click on User Accounts from the Setup menu. The User Accounts dialog box appears.
2. Select the desired user and click on Modify. The Modify User Account dialog box appears:
3. Make any modifications to the user’s account, rights, and privileges.
4. Click Drawers to modify the user’s personal drawer.
5. Click Desktop to modify the user’s desktop settings and/or Hotkey assignments.
6. When all modifications have been made to the user’s account, click OK to save the changes and to return to the User Accounts dialog box or Cancel to exit without saving.
7. Click Close to return to the PaperClip32 window.
1. Select User Accounts from the Setup menu. The User Accounts dialog box appears.
2. Click View. The View User Account dialog box appears.
3. Click Cancel to return to the User Accounts dialog box.
1. Click on User Accounts from the Setup menu. The User Accounts dialog box appears.
2. Select the desired user and click on Delete. PaperClip32 prompts you to confirm the deletion.
3. Click on Yes to delete this user, or on No to cancel.
4. Click on Close to return to the PaperClip32 window.
When the user account is added, PaperClip32 automatically creates an InBox for the user. All users have an InBox. The InBox contains packages that consist of documents, folders, pages or batches that have been routed by other users. You can view the contents of your InBox by selecting InBox from the File menu, to display the InBox window.
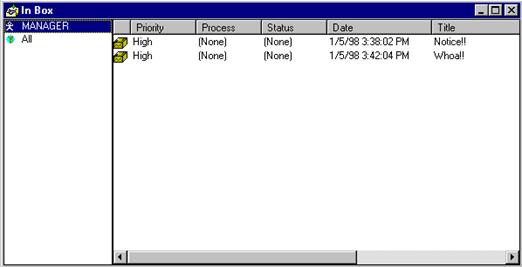
Each package in your InBox is labeled with the sender’s name, the recipient’s name, the date and time that the object was sent, the number of items in the package, a note, and a priority. The icon to the left of the priority identifies whether or not the recipient has previously opened this package.
Each recipient category (user or task group) is listed separately on the left side of the inbox window. For example, the user JOHN may have packages listed under JOHN as well as under GROUP1, GROUP2, etc.
In addition, the 25 highest-sorted packages (see Sort Method below) are listed separately, regardless of whether they were routed to you as an individual or as a member of a task group.
As each user or group is selected, the contents of the inbox window will change to reflect the current selection.
Whenever PaperClip32 is running, either expanded or minimized in background mode, users are automatically notified by audio and visual means that an item has been added to their inbox. These notifications are received upon receipts of an inbox item addressed to the individual user or to a group in which the user is a member.
You can create task groups to help manage workflow within PaperClip32. By assigning individual users to specific task groups, multiple users can share drawers, folders, and documents.
Task groups can be organized around a specific department or work group (e.g., accounting, payroll, etc.). Because all members of a task group may simultaneously access items routed to the group, task groups become an efficient way to make items available to more than one user.
Clicking on View, Add, Copy, or Modify from the Task Groups dialog box displays the task group record.
The task group record contains the following information:
|
Name |
The task group name, from 1 to 8 alphanumeric characters. This ID also becomes the task group’s name for routing purposes. PaperClip32 requires this entry. |
|
Description |
This (optional) field describes the purpose of the task group. |
|
|
|
|
Membership |
Any PaperClip32 user may be assigned membership to a task group. When a task group is initially created, all active PaperClip32 users appear in the non-members list. You may select specific members to add to the task group. |
|
Privileges |
Specific privileges, or rights, may be defined for individual members of a task group. These rights supersede rights assigned to the individual users through user-account setup, when the user is working with items owned by the group. When group privileges are not established for a user, PaperClip32 defaults to the privileges established in that user’s User Account. |
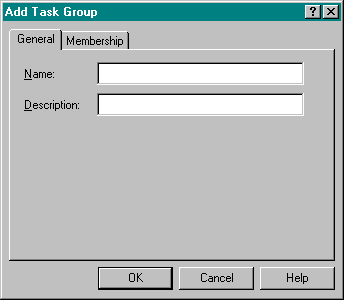
1. Select Task Groups from the Setup menu. The Task Group dialog box appears.
2. Click Add. The Add A Task Group dialog box appears with the General tab control shown so you can add the new task group.
3. Type a name for the Task Group in the Name: box. This is the name of the task group that displays during processing.
4. Type a description of the Task Group in the Description: box. This should be a brief, but meaningful, description of the purpose of the task group.
5. Click on the Membership tab to assign users as members of the new task group. The Membership tab controls display.
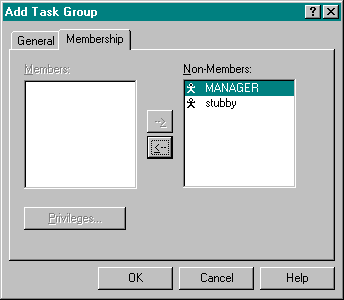
6. Set the Membership List for the task group. From the Non-Members List, select the users you want to add to the task group and click on the Add arrow. The user name moves to the Members list.
7. To remove a user from the Members List, select the users you want to remove from the task group and click on the Remove arrow. The system removes the user name from the Members list.
8. Optionally, click Privileges to set the privileges for the task group users. You can set privileges for all users simultaneously or for each user individually.
9. Click OK to save the new task group detail or Cancel to return to the Task Group dialog box without setting any new group information.
10. Choose Close to return to the application desktop.
You may assign privileges to an individual user as a member of a task group. These task group privileges override the individual privileges only with respect to objects that are owned by the group itself.
Note: You may select Enforce Group Privileges for specific projects, and then deselect it at the project’s completion. Also, if you do not assign additional privileges to this user, then PaperClip32 defaults to using the individual’s privileges which were previously set during User Account setup.
1. In the Add a Task Group dialog box Membership tab, select the user’s name from the Members list and then click Privileges. The Task Group Member Privileges dialog box appears.
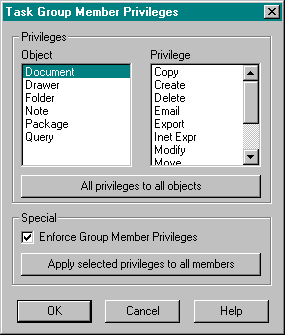
2. Select the object for which you wish to assign privileges from the Object list on the left. The Object you select will be highlighted.
3. Select one or more privileges to assign to the selected object from the Privilege list on the right. The privileges you select will be highlighted.
4. Optionally, select All privileges to all objects to assign all privileges.
5. To enforce these assigned group privileges for this user, select Enforce Group Privileges. This activates the assigned group privileges for this individual user. For group owned objects, the group privileges will take precedence. If this is not checked, then the user’s individual privileges will take precedence.
6. To assign this user’s privileges to all the current members of the task group, select Apply selected privileges to all members button.
7. Click OK to return to the Add Task Group dialog box.
8. Click Close to return to the application desktop.
1. Select Task Group from the Setup menu. The Task Groups dialog box appears.
2. Select the task group to be copied and click Copy. The Add Task Group dialog box appears.
3. Change the name and any other information as desired.
4. Click OK to save the new task group or on Cancel to return to the Task Groups dialog box without copying the selected task group.
5. Choose Close to return to the application desktop.
1. Select Task Groups from the Setup menu. The Task Groups dialog box appears.
2. Select the desired task group and click Modify. The Modify Task Group dialog box appears:
3. Modify the General tab name or description information as needed.
4. On the Membership tab, optionally select an individual member and click Privileges to edit the privileges for that member.
5. Choose OK to save the modified privileges and return to the Modify a Task Group dialog box or choose Cancel return to the Modify a Task Group dialog box without modifying any privileges.
6. Choose Close to return to the application desktop.
1. Select Task Group from the Setup menu. The Task Groups dialog box appears.
2. Choose View. The View Task Group dialog box appears so you can review the task group details.
3. View the General tab name or description information as needed.
4. On the Membership tab, optionally select an individual member and click Privileges to view the privileges for that member or members.
5. Choose Cancel return to the Modify a Task Group dialog box.
6. Choose Cancel to return to the Task Groups dialog box.
7. Choose Close to return to the application desktop.
1. Select Task Groups from the Setup menu. The Task Groups dialog box appears.
2. Select the desired task group and click Delete. The system prompts you to confirm the deletion.
3. Click Yes to delete this group or No to cancel.
4. Choose Close to return to the application desktop.
Distribution lists provide a means for routing a PaperClip32 object to multiple user InBoxes.
Unlike task groups, there are no special group privileges available for distribution lists. When a package is routed to a distribution list, it appears in the InBox of each addressee on the list. Users on the list may then process the entry from their own InBox, and their individual actions will not affect one another with regard to the routed package. Each person on the distribution list can view, print, or further process the package as needed. Addressees may be either individual users or task groups.
Clicking on View, Add, Copy, or Modify from the Distribution Lists dialog box displays the distribution list record. You may perform any of the following actions on selected Distribution Lists.
· Add a Distribution List
· Copy a Distribution List
· Modify a Distribution List
· View a Distribution List
· Delete a Distribution List
The Distribution List Record contains the following information:
|
Name |
A distribution list name comprised of alphanumeric characters. PaperClip32 requires this entry. |
|
Description |
This optional field offers a brief, but meaningful, description of the function of the distribution list. |
|
Membership |
When a distribution list is initially created, all active PaperClip32 users and task groups are non-members. Select the desired members for this distribution list. |
1. Select Distribution Lists… from the Setup menu. The Distribution Lists dialog box appears.
2. Choose Add. The Add Distribution List dialog box appears.
3. On the General tab, type a name and a brief, but meaningful description (optional) for this distribution list.
4. Choose the Membership tab and assign users to the list by clicking on their names from the Non-Members list, and clicking the Add arrow. The selected user is added to the Members list.
5. Repeat this process for all the users you want to add to the list. Double clicking a name will also move it between the lists.
Note: You may add task groups to distribution lists and route slips in the same fashion as you add individual.
6. To remove a user from the Members list, select the user’s name and click the Remove arrow. The system removes the user from the Members list.
7. Choose OK to save the distribution list and return to the Distribution Lists dialog box or choose Cancel return to the Distribution Lists dialog box without saving the list.
8. Click on Close to return to the application desktop.
1. Select Distribution Lists… from the Setup menu. The Distribution Lists dialog box appears.
2. Select the desired distribution list and then click on Copy. The Add Distribution List dialog box appears.
3. On the General tab, type a name and a brief, but meaningful description (optional) for the new distribution list.
4. Choose the Membership tab and assign users to the list by clicking on their names from the Non-Members list, and clicking the Add arrow. The selected user is added to the Members list.
5. Repeat this process for all the users you want to add to the list. Double clicking a name also moves it between the lists.
Note: You may add task groups to distribution lists and route slips in the same fashion as you add individual.
6. To remove a user from the Members list, select the user’s name and click the Remove arrow. The system removes the user from the Members list.
7. Choose OK to save the new distribution list and return to the Distribution Lists dialog box or choose Cancel return to the Distribution Lists dialog box without saving the new list.
8. Click on Close to return to the application desktop.
1. Select Distribution Lists… from the Setup menu. The Distribution Lists dialog box appears.
2. Highlight the desired distribution list and choose Modify. The Modify Distribution List dialog box appears.
3. Choose the General tab and modify the distribution list name and description as needed.
4. Choose the Membership tab and assign users to the list by clicking on their names from the Non-Members list, and clicking the Add arrow. The selected user is added to the Members list.
5. Repeat this process for all the users you want to add to the list. Double clicking a name also moves it between the lists.
Note: You may add task groups to distribution lists and route slips in the same fashion as you add individual.
6. To remove a user from the Members list, select the user’s name and click the Remove arrow. The system removes the user from the Members list.
7. Choose OK to save the modifications and return to the Distribution Lists dialog box, or choose Cancel to return without saving the changes.
8. Choose Close to return to the application desktop.
1. Select Distribution Lists… from the Setup menu. The Distribution Lists dialog box appears.
2. Click on the View button. The View Distribution List dialog box appears.
3. View the distribution list General and Membership tab detail as needed.
4. Choose Cancel to return to the Distribution Lists dialog box.
5. Choose Close to return to the application desktop.
1. Select Distribution Lists… from the Setup menu. The Distribution List dialog box appears.
2. Select the desired distribution list and click Delete. The system prompts you to confirm the deletion of the selected list.
3. Choose Yes to delete this list or No to cancel.
4. Choose Close to return to the application desktop.
PaperClip32 users can store documents in different on-line or near-line storage bins according to the document type they wish to store. Documents requiring frequent retrieval may be stored on-line, while documents that are retrieved less frequently may be stored near-line. Because alternative (non-NOSS) devices are also available for system object storage, PaperClip32 can share devices with other applications.
Storage bins, along with NOSS platter storage class assignments, offer more efficient management of storage resources. Backing up and copying of specific types of documents on magnetic drives or specific optical platters is more convenient.
An on-line bin is a directory on your local or network hard drive. On-line media provides faster access but less storage capacity as compared to near-line media.
Note: A default on-line bin is established at installation. The initial storage location for this bin is DEFBIN. The DOS directory that is to be established as a bin must be created before beginning this procedure. Multiple storage bins cannot share the same directory.
1. Select Bins… from the Setup menu. The Bins dialog box appears.
2. Choose Add. The Add Bin dialog box appears with the General tab controls displayed.
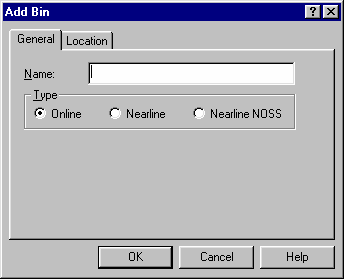
3. Select the Name: box and type a name for this on-line bin.
4. Select Online in the Type group box.
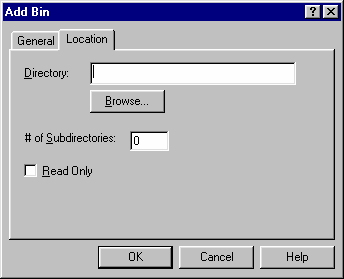
5. Click the Location tab, select the Directory: edit box and type the directory location for the on-line bin you are creating. You may also optionally choose Browse to specify an appropriate directory location.
6. To write files to a subdirectory tree, enter the desired number next to # of Subdirectories. Writing files to subdirectories provides better file system performance for very large bins. You can change this value if desired with no harm to the system. You can also set a value for existing Bins. In this case all previously written files will remain where they are, only newly created files will go into subdirectories.
7. If you would like to set the bin to read-only, check Read Only.
8. Choose OK to save this on-line bin location information and return to the Bins dialog box or choose Cancel to return to the dialog box without saving any changes.
9. Click Close to return to the application desktop.
Note: Exercise extreme caution
in modifying on-line bins, since changes made here will affect the documents
stored in this location.
Also, to change the directory for an on-line bin, all files, including
the BIN.DAT file, must be copied from the current bin directory to the new bin
directory before the directory can be changed for the bin. If the
directory for a storage bin is changed, all documents in the bin must be moved
to the new directory.
Finally, the initial storage location of a document is based on its
type. Users must stage the document to change the bin storage location.
1. Select Bins… from the Setup menu. The Bins dialog box appears.
2. Select an on-line bin and choose Modify. The Modify Bin dialog box appears with the General tab controls displayed and the Online bin type selected.
3. Select the Name: box and type a new name for this on-line bin.
4. Click the Location tab, select the Directory: edit box and type the new directory location for the on-line bin you are modifying. You may also optionally choose Browse to specify an appropriate directory location.
5. To write files to a subdirectory tree, enter the desired number next to # of Subdirectories. Writing files to subdirectories provides better file system performance for very large bins. You can change this value if desired with no harm to the system. You can also set a value for existing Bins. In this case all previously written files will remain where they are, only newly created files will go into subdirectories.
6. If you would like to set the bin to read-only, check Read Only.
7. Choose OK to save this newly modified on-line bin location information and return to the Bins dialog box or choose Cancel to return to the dialog box without modifying any changes.
8. Click Close to return to the application desktop.
1. Select Bins… from the Setup menu. The Bins dialog box appears.
2. Select the desired on-line bin and then click View. The View Bin dialog box appears with the General tab controls displayed and the Online bin type selected.
3. Choose Cancel after viewing this on-line bin detail. The Bins dialog box reappears.
4. Click on the Close button to return to the application desktop.
Note: When attempting to delete a bin that contains documents or if a document type has been created for a bin, a message displays stating “References to Bin Exist.” Choose OK. You cannot delete this bin until all associated documents and document types are deleted.
1. Select Bins… from the Setup menu. The Bins dialog box appears.
2. Select the desired On-line bin and then choose Delete. A confirmation prompt appears.
3. Choose OK to delete this Bin or Cancel if you do not want to delete this Bin.
4. Click on Close to return to the application desktop.
Near-line bins are used to store documents to different locations on a fixed or removable DOS drive (e.g., magnetic, magneto-optical, or removable media storage drives). Near-line bins may also be defined as one of many NOSS servers.
Note: A default near-line NOSS bin is established at installation. The initial storage location is the default NOSS Server (typically APTNOSS) and the storage class is set to a default of 1. If you are not using NOSS, you may delete this bin.
Storage classes apply to NOSS optical storage only and allow users to assign specific platters for specific types of documents.
Note: A new non-NOSS near-line bin should be established for a document type whenever its current bin contains over 500 documents.
1. Select Bins… from the Setup menu. The Bins dialog box appears.
2. Choose Add. The Add Bin dialog box appears with the General tab controls displayed.
3. Select the Name: box and type a name for this Near-line bin.
4. Specify the Nearline bin type in the Type Group box.
|
Choose… |
To Add… |
|
Nearline NOSS |
A Nearline NOSS type bin. Click on the Location tab, use the Server: box to specify an appropriate server location, and select a Storage Class or leave it as the default (1). Storage classes are used to indicate the platter that will be used to store the document. A platter with the specified storage class must exist on the NOSS server. |
|
|
Note: When using NetBIOS, only one image server is supported. If IPX or TCP/IP is being used, multiple NOSS servers can be set up, and different NOSS near-line bins can be used to distinguish documents stored on different servers. If more than one NOSS server is installed, an alternate NOSS server can be selected from the drop down server list. Up to 100 NOSS servers are supported under IPX or TCP/IP. |
5. Choose OK to save this near-line bin location information and return to the Bins dialog box or choose Cancel to return to the dialog box without saving any changes.
6. Click Close to return to the application desktop.
1. Select Bins… from the Setup menu. The Bins dialog box appears.
2. Choose Add. The Add Bin dialog box appears with the General tab controls displayed.

3. Select the Name: box and type a name for this near-line bin.
4. Select Nearline in the Type group box.
5. Click the Location tab, select the Directory: edit box and type the directory location for the near-line bin you are creating. You may also optionally choose Browse to specify an appropriate directory location.
6. To write files to a subdirectory tree, enter the desired number next to # of Subdirectories. Writing files to subdirectories provides better file system performance for very large bins. You can change this value if desired with no harm to the system. You can also set a value for existing Bins. In this case all previously written files will remain where they are, only newly created files will go into subdirectories.
7. If you would like to set the bin to read-only, check Read Only.
8. Choose OK to save this near-line bin location information and return to the Bins dialog box or choose Cancel to return to the dialog box without saving any changes.
9. Click Close to return to the application desktop.
![]() Modify a Near-line Bin
Modify a Near-line Bin
Note: When changing the directory of an near-line bin, all files, including the BIN.DAT file, must be copied from the current bin directory to the new bin directory before the directory can be changed.
1. Select Bins… from the Setup menu. The Bins dialog box appears.
2. Select the desired near-line bin and choose Modify. The Modify Near-Line Bin dialog box appears.
Note: If the directory for a storage bin is changed, all documents in the bin must be moved to the new directory.
1. Make any modifications to the near-line bin detail information.
2. Choose OK to save this newly modified near-line bin location information and return to the Bins dialog box or choose Cancel to return to the dialog box without saving any changes.
3. Choose Close to return to the application desktop.
1. Select Bins… from the Setup menu. The Bins dialog box appears.
2. Select the desired near-line bin and choose View. The View Near-Line Bin dialog box appears with the General tab controls shown. Select the Location tab to view directory and server location and Storage Class detail.
3. Click on Cancel after viewing the near-line bin to return to the Bins dialog box.
4. Click on the Close button to return to the application desktop.
Note: When attempting to delete a bin that contains documents, or if a document type has been created for a bin, PaperClip32 displays the message “References to Bin Exist.” Click on OK. This bin cannot be deleted until all associated documents are deleted.
1. Select Bins… from the Setup menu. The Bins dialog box appears.
2. Click on the desired near-line bin and choose Delete. The system prompts you to confirm the deletion.
3. Choose OK to delete the bin and return to the Bins dialog box or choose Cancel if you do not want to delete the bin.
4. Choose Close to return to the application desktop.
Document Types are used to classify documents (e.g., invoices, insurance claims, or federal tax returns). They define the initial storage bin for documents associated with this document type, and they assign the associated software (i.e., application description) for SoftClip document types. Document types are available to the entire system or to just a specific user, group, or drawer.
The Document Type specifies the application software to be used to view/edit the document by selecting a registered “file type”. For imaged documents, PaperClip32 registers the “PaperClip32 Image Document” file type. SoftClip files are handled by selecting the registered file types associated with the SoftClip applications installed on your server or workstation. The PaperClip32 software, based on entries in the Windows Registry, automatically detects these applications and file types. To integrate these applications and file types into your PaperClip32 system, you need to create specific Document Types that are based on these valid application file types.
Although document types may be added at any time, they should be established when the PaperClip32 database is initially defined. Documents should be categorized by document type from the outset.
Note: To change the storage location for a document, it must be staged between on-line and near-line storage.
To display a document type record, select Document Types in the Setup drop-down menu and click on View, Add, Copy, or Modify.
The document type record contains the following information:
|
Name |
The name of the document type (e.g., Invoices, Contracts, etc.). |
|
Description |
A brief, but meaningful description of the document type. |
|
File Type Assigned |
For imaged document types, accept the default “PaperClip32 Image Document”. For SoftClip document types, select the appropriate application name from the application list. |
|
File Access Information |
Including which viewer/view action to use, which open action to perform, and the default action for the file (i.e., view or open). |
|
File Storage Information |
The on-line and/or near-line storage location for this document type as well as the default storage location if neither is specified. These bins are used for staging. If None is specified, the default is the system-wide default bins specified in the System Parameters dialog box. |
|
|
Note: The default storage location for SoftClip documents is always on-line. They can be staged to near-line storage, as needed. |
|
Ownership |
Define a user or group as the owner of the Document Type. |
1. Select Document Types from the Setup menu. The Document Types dialog box appears.
2. Click on the Add button. The Add Document Type dialog box appears.
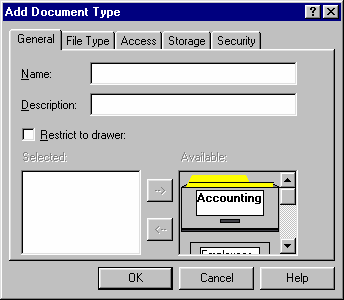
3. Enter a Name and Description for this document type.
4. If you would like to restrict this Document Type to a specific drawer, check Restrict to drawer: and move the desired drawer to the Selected column.
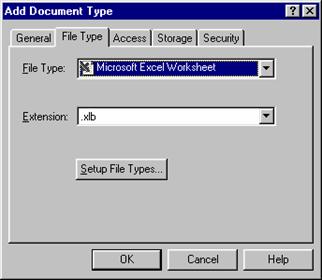
5. Select the File Type tab. Open the drop-down list and click on the appropriate application. The extension text box displays the file extension of the selected type.
Generally, File types are added automatically when applications are installed. You may wish to add more file types here but keep in mind that this will add the file types to Windows 95/NT. For example, you may want notepad to open.TXT,.BAT, and.INI files. An application to handle the file type must already be installed.
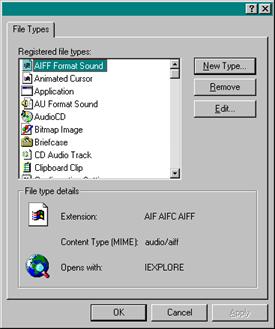
Note: Steps 6-14 are normally done automatically when the Application software is installed. Skip these steps if your file type is already registered.
6. Click New Type. This displays the Add a New File Type dialog. This Windows 95/NT dialog box is explained in more detail in the Windows 95/NT documentation.
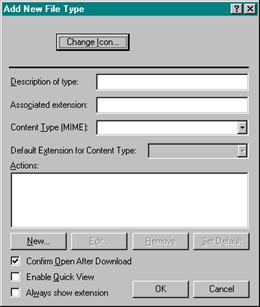
7. Click the Change Icon command button to display icons you can select to identify the new file type.
8. Enter a file type description and the file extension associated with the SoftClip application.
9. Open the Content Type drop-down list and select the appropriate type. The matching default file extension displays.
10. Click the New command button to specify the default action to be taken on the file type when the SoftClip application is executed, for example, open, print, etc. The choices are application-dependent.
11. Click Browse and select the drive and directory location of the application to be used on the new file type.
12. Click DDE to turn on this option. Enter the DDE processing parameters on the displayed dialog.
13. Click OK to complete the new file type setup.
14. Turn on the check boxes to set the file type processing options.
15. Click Close on both dialogs to return to the Add Document Type dialog.
16. Click the Access tab to specify your Viewer settings.
17. Set the Viewer options, which control what happens when you invoke the View command from the Document menu. Click PaperClip Viewer, open the drop-down list box, and then select the viewer. The default is the PaperClip32 default viewer.
18. Click View Action, open the drop-down list box, and then select the default action (normally open).. The PaperClip32 Image Document file type defines these actions.
19. Click QuickView to use this PaperClip32 feature, which means that you can view specific SoftClip application documents using the Windows QuickView (external) viewer window, without having the native software application available. This option will only be available if the registered application file type definition has the “enable quick view” option checked.
20. Set the Open Action, which control what happens when you invoke the Open command from the Document menu. Open the drop-down list box beside Open Action and then select the default action: new, open, print, or printo. The open action will open the document using the associated application program. Print and printo will print the document to a printer or to a print file.
21. Set the Default Action to open or view (active for SoftClip file types only). This is the action PaperClip32 uses when you double-click a document in a folder (pressing Shift double-click uses the opposite action). The open action invokes the application software associated with the file type; the view action opens up the file inside of the PaperClip32 viewer window (read-only).
22. Click the Storage tab. Define the Default Document Storage location by selecting Online or Nearline.
23. Select an Online storage bin, or leave the Default On-line Bin selected.
24. Select a Near line storage bin or leave the Default Near-Line Bin selected.
25. Click the Security tab.
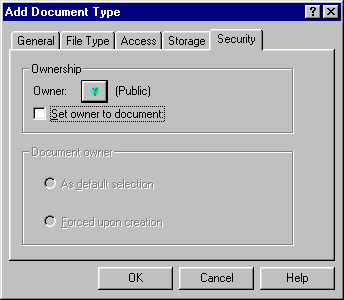
26. To restrict access to this Document Type, select an Owner by pressing the owner button.
27. Check Set owner to document: to specify the Owner selected as the owner of any document created with this Document Type. The radio buttons in the Document owner section are active when this box is checked.
When the As default selection radio button is selected, the owner will be automatically selected in the owner field when creating a document. The user can change the selection if desired before creating the document.
When the Forced upon creation radio button is selected, the owner will be automatically selected as the owner for the document. The user will not be able to change the owner field when this Document Type is specified. To change the owner during document creation, you would select another Document Type that does not have this restriction.
28. Click on OK to return to the Document Types dialog box.
29. Click on Close to return to the PaperClip32 window.
1. Select Document Types… from the Setup menu. The Document Types dialog box appears.
2. Choose Add. The Add Document Type dialog box appears with the General tab controls shown.
3. Type a name and a description for this document type in the edit boxes.
4. If you would like to restrict this Document Type to a specific drawer, check Restrict to drawer: and move the desired drawer to the Selected column.
5. Select the File Type tab. Verify that the drop-down list box shows PaperClip32 Image Document. If it does not, open the drop-down list and click on the PaperClip32 Image Document. The extension text box displays the file extension of the selected file type.
6. Click the Access tab to specify your Viewer settings.
7. Set the Viewer options, which control what happens when you invoke the Open command from the Document menu. Click PaperClip Viewer, open the drop-down list box, and then select the viewer. The default is the PaperClip32 default viewer.
8. Click the Storage tab. Define the Default Document Storage location by selecting Online or Nearline.
9. Select an Online storage bin, or leave the Default On-line Bin selected.
10. Select a Nearline storage bin or leave the Default Near-Line Bin selected.
11. Click the Security tab.
12. To restrict access to this Document Type, select an Owner by pressing the owner button.
13. Check Set owner to document to specify the Owner selected as the owner of any document created of this Document Type. The radio buttons are active when this box is checked.
When the As default selection radio button is selected, the owner will be automatically selected in the owner field when creating a document. The user can change the selection if desired before creating the document.
When the Forced upon creation radio button is selected, the owner will be automatically selected as the owner for the document. The user will not be able to change the owner field when this Document Type is specified. To change the owner during document creation, you would select another Document Type that does not have this restriction.
14. Click on OK to return to the Document Types dialog box.
15. Click on Close to return to the PaperClip32 window.
1. Select Document Types from the Setup menu. The Document Types dialog box appears.
2. Select the document type to be copied, and then click on Copy. The Add Document Type dialog box appears.
3. Change the Description and any other information as desired.
4. Click on OK to save the new document type, or click on Cancel to exit without saving the changes.
1. Select Document Types from the Setup menu. The Document Types dialog box appears.
2. Click on the desired document type, and then click on Modify. The Modify Document Type dialog box appears.
3. Make any modifications to this document type.
4. Click on OK to return to the Document Types dialog box.
5. Click on Close to return to the PaperClip32 window.
1. Select Document Types from the Setup menu. The Document Types dialog box appears.
2. Select the desired document type, and then click on View. The View Document Type dialog box appears.
3. After viewing the document type, click on Cancel to return to the Document Types dialog box.
Note: An active document type (assigned to a document) cannot be deleted.
1. Select Document Types from the Setup menu. The Document Types dialog box appears.
2. Click on the desired document type, and then click on Delete. PaperClip32 prompts you to confirm the deletion.
3. Click on OK to delete this document type, or on Cancel not to have it deleted.
4. Click on Close to return to the application desktop.
Note: If you are a system operator your ability to perform the procedures described here is determined by the privileges assigned to you by the system manager.
Before you can create folders or documents in PaperClip32, you must create the drawers that will hold them. These can be created by the system manager, admin user, or by any user who has been granted supervisory rights.
When setting up the file drawer, you define folder index fields for each folder and, optionally, additional data fields for the drawer’s folders and documents.
You can create drawers directly through PaperClip32 Setup, even if you plan to map it later to an application screen. You can also create the drawer while defining an Overlay Template. In either case, be sure you have done the following before defining the new drawer:
· Decide on the titles of the folder index fields, folder data fields, and document data fields for the drawer.
· Determine the appropriate field lengths and any optional data field masks that may be used.
A file drawer record is the information that is stored for each drawer. The following information about each file drawer is recorded in its Drawer dialog box.
|
Name |
The file drawer name. |
|
Description |
A brief, but meaningful, description that describes the function of the drawer to others. |
|
Owner |
The owner of the drawer. |
|
Internet Secure |
Indicates that the specified drawer is secure from access via the Internet. |
|
Folder Index Fields |
Folder index fields are defined when adding a file drawer. Later, when folders are added to the drawer, values for these fields may be entered manually (in the case of drawers that stand alone), or extracted automatically by the Visual Context Processor™ (in the case of drawers that have been clipped to an application), or entered by an import program. You may define up to ten folder index fields, with a maximum total of 100 characters. At least one index field is required to define a drawer. |
|
Folder Data Fields |
These fields are user-defined fields that further identify folders. These fields are not used for indexing, but aid in searching. A total of ten folder data fields may be defined. |
|
|
|
|
Document Data Fields |
These fields help identify each document within a folder and provide the ability to search for specific groups of documents. Each document is labeled with at least three document data fields: document type, document description (optional), create date, and number of pages. Up to ten custom document data fields can be defined if you need them. |
Note: If a new file drawer is created from within your application as part of an Overlay Template proceed to Overlay Template, Setup.
1. Select Drawers… from the Setup menu. The Drawer dialog box appears.
2. Choose Add. The Add Drawer dialog box appears with the General tab controls shown.
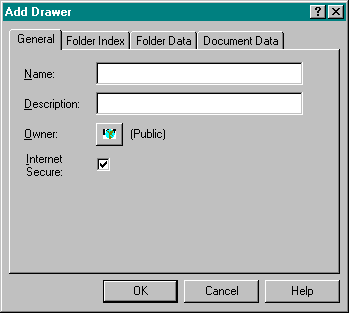
3. Type in a name for your file drawer in the Name: field.
4. Type an optional description for the drawer in the Description: field.
5. Choose Owner to specify an owner for the drawer.
6. Turn on the Internet Secure: checkbox to protect the newly added drawer from access via the Internet. A check mark appears in this box when it is active.
Note: PaperClip32 has a built-in firewall protection feature. This allows remote access to certain drawers, folders and documents to be totally restricted even if Internet access is available.
7. Click the Folder Index tab and choose Add… to add Folder Index fields. Once you add fields, use Modify… and Delete to edit existing fields.
Note: The folder index fields, folder data fields, and document data fields may not be changed once a folder has been created. However, folder and document data fields (not index fields) may be added later if needed after the drawer is created.
8. Click the Folder Data tab and choose Add… to add Folder Data fields. Once you add folder data fields, use Modify… and Delete to edit existing fields.
9. Click the Document Data tab and choose Add… to add Document Data fields. Once you add document data fields, use Modify… and Delete to edit existing fields.
10. Choose OK to create the drawer and return to the Drawers dialog box or choose Cancel to return the dialog box without adding the new drawer.
11. Click on Close to return to the application desktop.
You can enter from one to ten folder index fields, and up to ten folder data fields. In addition, up to ten document data fields may be defined.
You may classify fields as either numeric or character
|
Numeric Fields: |
Numeric Field Types accept numbers with or without decimals. Decimal numbers are limited to a specified fixed number of places. +/- signed numbers are also accepted. |
|
Character Fields: |
The total number of characters for each character field (Folder Index, Folder Data and Document Data) must be less than 100. Allow for an extra delimiter character for each field. For example, two fields, each 40 characters long requires 82 characters. |
|
Date/Time fields
|
Accepts a date, time or both. The data and time format depends on your Windows settings for date and time. |
|
Currency |
Similar to numeric field but allows for currency formatting and symbols. The currency symbol is taken from the Windows defined settings. |
|
Boolean |
Accepts True/False condition (yes/no) |
Use character field types to define a field with alphanumeric characters; e.g. NAME, SOCSECNO, PHONE, TYPE etc.
Use a mask with a character field type to restrict data entry to a particular pattern of characters. For further information, see Mask Characters.
Once the folder index fields are defined for a drawer, there are two ways to add folders to that drawer; either directly inside PaperClip32 or indirectly from another application (Clipped Drawers, via SoftClip).
Note: You should verify the folder index, folder data, and document data fields carefully before you actually create a folder. This is because once a folder has been created for this drawer, these fields cannot be modified or deleted.
Note: Create a test folder to verify that your drawer is set up properly. If you need to make changes in the drawer’s folder index, folder data, or document data fields, delete the test folder and modify the drawer as needed.
These drawers are accessed from within an application. PaperClip32 automatically extracts the folder by selecting the appropriate index field values from the context of the application. If you plan to clip the drawer to an application, select only fields that are unlikely to change such as customer number, social security number, last name, etc.
These are drawers accessed from within PaperClip32. When you create such a folder, the system prompts you to enter the index fields.
Once specified and saved during file drawer setup, folder index fields for a drawer cannot be added or deleted. Once a folder is created for the drawer, folder index fields can not be modified. Individual folders, however, can be re-labeled with different values for these fields.
For example, if the index fields LNAME (Last Name), FNAME (First Name), and SSN (Social Security Number) are assigned to a drawer, these field names cannot be changed and will be required for every folder. However, the field values (DOE, JANE, 027-33-6091) may be updated.
![]() Add
Fields: Folder Index, Folder Data and Document Data
Add
Fields: Folder Index, Folder Data and Document Data
1. From the Add or Modify A Drawer dialog box, click in the box of the field to be added, and then choose Add. The Add (field type) Field dialog box appears.
Note: The title of the Add dialog box reflects the type of field that you are adding.
2. Type a field name in the Name: edit box.
3. Specify a field length in the Length: box. You may specify a maximum of 50 characters or 9 digits.
4. Turn on the Required checkbox to make the field required for every folder in the drawer. If you think you will have to search for folders on this field, it is safer to make it required. A check mark appears in this box when it is active.
5. Select the appropriate field type for the field, either Character or Numeric.
6. If you would like PaperClip32 to verify the data entered into the index field against a particular pattern of numbers and/or characters, click on the Edit Allowed Values button. When the Field Valid Values dialog appears, enter that masking pattern in the Mask: field (for example, -- for social security number.) Masks may be entered for Character-type fields only.
Note: To change the default date format, exit PaperClip32. From the Windows Control Panel, select International. Change the date format and restart PaperClip32.
7. Choose OK to add the new field detail and return to the Add A Drawer dialog box or choose Cancel to return to the dialog box without adding any fields.
8. Repeat the above steps until you have added/modified all the folder and document fields you need.
9. Choose Close to return to the application desktop.
|
@ |
In any position, matches any single alphabetic character (A-Z). |
|
# |
In any position, matches any single digit (0-9). |
|
? |
In any position, matches any single character, including punctuation. |
|
% |
Used when a literal match is required for reserved masking characters (@, , ?, % and *). |
|
*@ |
Represents one or more alphabetic characters. |
|
*# |
Represents one or more digits. |
|
*? |
Represents one or more alphanumeric characters, including punctuation. |
|
Example Masks |
Sample Matches |
|
// |
12/25/93 |
|
-- |
123-44-5678 |
|
|
(social security number) |
|
@@ |
NJ, CA, OH |
|
ABC? |
ABCZ, ABC1, ABC& |
|
ABC*? |
ABC%^, ABC45, ABCY |
|
%% |
50%, 90%, 38% |
|
ABC |
ABC23, ABC90 |
|
(###) ###-#### |
(201) 555-1213 |
![]() Creating Pick Lists for Folder Index,
Folder Data, and Doc Data Fields
Creating Pick Lists for Folder Index,
Folder Data, and Doc Data Fields
1. From the Add or Modify A Drawer dialog box, select the character field you want to create a Pick List for, and then choose Modify. The Modify(field type) Field dialog box appears. Click on the Edit Allowed Values button.
2. When the Field Valid Values dialog appears, click on the Add button. Enter in a value and press Ok. The string will appear in the Pick List window. Press Add to add another value. To edit a value, highlight the value and click Edit. To remove a value, highlight and click Delete.
3. To change the order of the values in the list, select the User Defined Order checkbox. Then highlight the value you want to move, and press the Up or Down buttons to position the value.
4. To restrict the data entered into the field to Pick List values, select the Allow Pick List Values Only checkbox. When this is checked, the user is restricted to Pick List Values when entering data.
5. Select Ok when the Pick List is complete.
![]() Importing/Exporting Pick Lists for Drawer
Fields
Importing/Exporting Pick Lists for Drawer
Fields
1. From the Add or Modify A Drawer dialog box, select the character field you want to create a Pick List for, and then choose Modify. The Modify(field type) Field dialog box appears. Click on the Edit Allowed Values button.
2. When the Field Valid Values dialog appears, click on the Import button. Browse for the file containing the list of values to import, and click Open. In the message box that appears, Press Yes if you wish to replace the existing list with the new list, or Press No if to append this list to the existing list.
3. To change the order of the values in the list, select the User Defined Order checkbox. Then highlight the value you want to move, and press the Up or Down buttons to position the value.
4. To Export an existing Pick List, click on the Export button. Browse for a location and type in a name for the pick list file. This file can be used to Import into another field’s pick list.
![]() Modify
a Field: Folder Index, Folder Data and Document Data
Modify
a Field: Folder Index, Folder Data and Document Data
1. From the Add or Modify A Drawer dialog box, click in the box of the field to be added, and then choose Modify. The Modify(field type) Field dialog box appears.
Note: The title of the Modify dialog box reflects the type of field which you are adding.
2. Type a field name in the Name: edit box.
3. Specify a field length in the Length: box. You may specify a maximum of 50 characters or 9 digits.
4. Turn on the Required checkbox to make the field required for every folder in the drawer. If you think you will have to search for folders on this field, it is safer to make it required. A check mark appears in this box when it is active.
5. Select the appropriate field type for the field, either Character or Numeric.
6. If you would like PaperClip32 to verify the data entered into the index field against a particular pattern of numbers and/or characters, enter that masking pattern in the Mask: field (for example, -- for social security number.) Masks may be entered for Character-type fields only.
Note: To change the default date format, exit PaperClip32. From the Windows Control Panel, select Regional Settings. Change the date format and restart PaperClip32.
7. Choose OK to save the newly edited field detail and return to the Modify A Drawer dialog box or choose Cancel to return to the dialog box without adding any fields.
8. Repeat the above steps until you have added/modified all the folder and document fields you need.
9. Choose Close to return to the application desktop.
![]() Delete
a Field: Folder Index, Folder Data and Document Data
Delete
a Field: Folder Index, Folder Data and Document Data
1. To delete a field, select the desired field and click on the Delete button.
2. The system prompts you to confirm the deletion. Choose OK to delete the field and return to the previous dialog box or choose Cancel to return to the previous dialog box without deleting any field definition detail.
3. Choose Close to return to the application desktop.
Note: For clipped applications: If you change the field value of a folder index field, you must change the corresponding field values in the application record to match, and vice versa. Otherwise, the folder will be inaccessible via hot key from the application.
1. Select Drawers… from the Setup menu. The Drawers dialog box appears.
2. Select a the drawer you want to copy and choose Copy. The Add A Drawer dialog box appears with the General tab controls showing the data associated with the selected drawer.
3. Type the name of the new drawer in the Name: edit box and change any other General tab information as needed.
Note: When copying a drawer, you must change at least the name field to ensure that the drawer is unique.
4. Click the Folder Index tab and choose Add… to add Folder Index fields. Once you add fields, use Modify… and Delete to edit existing fields.
Note: The folder index fields, folder data fields, and document data fields may not be changed once a folder has been created.
5. Click the Folder Data tab and choose Add… to add Folder Data fields.. Once you add folder data fields, use Modify… and Delete to edit existing fields.
6. Click the Document Data tab and choose Add… to add Document Data fields.. Once you add document data fields, use Modify… and Delete to edit existing fields.
7. Choose OK to create the drawer and return to the Drawers dialog box or choose Cancel to return the dialog box without adding the new drawer.
8. Click on Close to return to the application desktop.
1. Select Drawers… from the Setup menu. The Drawers dialog box appears:
2. Select the desired file drawer and choose View. The View A Drawer dialog box appears.
3. Choose Cancel when you are finished viewing the file drawer detail.
4. Choose Close to return to the application desktop.
Note: A drawer that contains folders can only have the name or description field modified. A drawer that does not contain any folders may have any field modified.
1. Select Drawers… from the Setup menu. The Drawers dialog box appears.
2. Select a the drawer you want to modify and choose Modify. The Modify A Drawer dialog box appears with the General tab controls showing the data associated with the selected drawer.
3. Optionally, edit the name of the drawer in the Name: edit box and change any other General tab information as necessary.
4. Optionally, click the Folder Index tab and choose Add… to add Folder Index fields. Once you add fields, use Modify… and Delete to edit existing fields.
Note: The folder index fields, folder data fields, and document data fields may not be changed once a folder has been created.
5. Optionally, click the Folder Data tab and choose Add… to add Folder Data fields.. Once you add folder data fields, use Modify… and Delete to edit existing fields.
6. Optionally, click the Document Data tab and choose Add… to add Document Data fields. Once you add document data fields, use Modify… and Delete to edit existing fields.
7. Choose OK to create the drawer and return to the Drawers dialog box or choose Cancel to return the dialog box without adding the new drawer.
8. Click on Close to return to the application desktop.
Note: Exercise extreme caution when deleting file drawers from PaperClip32 system. If you delete a file drawer, all folders and documents stored in that file drawer will also be deleted. There is no way to undelete a drawer and the only way to recover information deleted in this manner is to restore from a previous backup of PaperClip32. As a precaution, rather than actually deleting an obsolete file drawer, you can rename the drawer with ZZ as a prefix, causing it to drop to the bottom of the filing cabinet.
1. Select Drawers… from the Setup menu. The File Drawers dialog box will appear.
2. Select the desired file drawer and choose Delete. The system prompts you to confirm the deletion process.
Note: Depending on the number and size of the documents stored, deletion may take a significant amount of time.
3. Choose OK to delete the file drawer and return to the Drawers dialog box or choose Cancel if you do not want to delete the file drawer.
4. Click on the Close button to return to the application desktop.
![]() Create
Folder Tabs for a Drawer
Create
Folder Tabs for a Drawer
1. Select Drawers… from the Setup menu. The File Drawers dialog box will appear.
2. Select the desired file drawer and choose Folder Tabs. The Folder Tabs dialog will appear. Choose the Add button. The Add Folder Tab dialog appears.
3. Type in a Name for the tab. This name will appear in the Tab bar of the open folder.
4. To create a filter based on Document type, highlight Document Type and click the Build button. Select the Document Type, and choose Add. Select another doc type if you want to filter on more than one. To Remove a document type, highlight the document type and choose Remove. When complete, select OK.
5. To create a filter based on the Document Description, select Document Description and choose Build. Enter in the string to compare the Descriptions to. Press Add. When complete, select OK.
6. To create a filter based on Date and Time Created, select, and choose Build. Choose the operator; Before, Equals or After. Then select the date. Or select the Days Old radio button, and enter in the number of days old. Any document this number of days old or less will appear in the folder. Press Add. When complete, select OK.
7. To create a filter based on a Document Data Field, select the field and choose Build. Select the operator if applicable, and enter in the parameter. Press Add. When complete, select OK.
8. The order that the tabs appear in the Tab bar can be changed. In the Folder Tabs dialog, select the tab you wish to move. Choose the Move Up button to move the tab toward the beginning of the list. Choose the Move Down button to move the tab toward the end of the list.
9. A tab can be made inactive. An inactive will not appear in the folder. To make a tab inactive, highlight the tab, and click the Active checkbox. An unchecked box is inactive.
10. To hide any tabs that contain no documents, check “Hide Tabs with 0 documents”.
11. When the Tab list is complete, choose the OK button.
PaperClip32 allows for the scanning, importing, faxing, filing, retrieving, routing, displaying, and printing of documents from any application running on Windows 95/98 or NT/2000/XP.
Select any record in your application and press the user-defined Visual Context ProcessorTM (VCP) hot key. The PaperClip32 folder for that record will appear displaying all imaged and SoftClip files. If there is no folder for this record, PaperClip32 will display similar folders, or create one by extracting the necessary information from the clipped application.
An Overlay Template must be defined in order to clip a drawer and its folders to an application screen. The template enables PaperClip32 to extract the data from the other application to create new folders, or to access existing folders from that application.
Most database applications use a form view for data entry and retrieval (i.e., you see an entire form or full screen of information). Often, they also offer a tabular view for examining multiple records in row-and-column format.
This overlay type is used to clip to most database applications (in either form or tabular view), as well as to spreadsheets which also contain columns and rows of data.
As the name implies, the Database/Spreadsheet Overlays apply to most common, commercially available database and/or spreadsheet Windows applications.
This overlay type is used to clip a Windows dialog box or a form with a set of fixed location, editable fields. These applications typically display one record at a time in a dialog box in the application window. Some database applications in form view (for example, applications created with SQL Windows), off-the-shelf accounting applications (for example, Simply Accounting for Windows), as well as custom-built applications, which are created with programming languages like Visual Basic, must be set up as Dialog Box overlays.
Free-form text applications (e.g., word processors), and applications accessed via Windows terminal emulation are clipped in the same manner. In order to get data from one of these applications into PaperClip32, you must first highlight the appropriate data in that application. Such applications do not contain preset data fields or edit controls in a fixed location. Thus, you must tell PaperClip32 what data to extract.
|
Terminal Emulation |
Windows-based terminal emulation (and dial-up) programs are applications used to connect PCs to other PCs, minicomputers, mainframes, and information services. |
|
Free-Form Text |
Any application that manages free-form text, such as a word-processor or text editor applications are in the category of free-form text applications. |
In order to create an overlay template for a terminal emulation or free-form text application, select the data in the other application by highlighting it and then use the Overlay Hot Key (Ctrl F2) or the VCP hot key (Ctrl F3). The keystrokes required to highlight the appropriate data can be automated with an Overlay Script.
Logically, because there are differing overlay templates types, the procedures for defining each varies slightly. Some applications, which are not terminal emulation or free-form text, might also not be easily distinguishable as either the Database/Spreadsheet or Dialog Box type. If this is the case with your application, as a general rule, try using the Database/Spreadsheet type first and then try the Dialog Box type. Try experimenting with a few sample documents first to see which type works best for you.
An overlay may be defined for an existing PaperClip32 drawer, or the drawer may be created during overlay definition. This latter method ensures that the application fields and drawer fields correspond.
In any event, before beginning overlay template setup for an application, you should:
· Verify that there are no conflicts between the PaperClip32 overlay hot key (Ctrl+F2) and/or the VCP hot key (Ctrl+F3) sequence and the selected application. If there is a conflict, change the hot key sequences.
Then select one of the following:
1. Setting Up Database/Spreadsheet Overlays
2. Creating Dialog Box Overlays
3. Creating Terminal Emulation, and Free-Form Text Overlays
Whichever Overlay Template type you choose to create you will need to decide how your data is going to be mapped from your application screen to the folder index and folder data fields. You can map screen data to all or some of the folder index fields. You must map at least all of the required folder index fields if you want the Overlay Template to create folders in the system. If you only map some of the fields then the Overlay Template will only be able search for folders in the system based on the limited field info. You could add folders this way as well but you would have to perform an Add Folder operation from the Folder List and provide (type in) the missing indexes.
Note: If you set up an initial template without anchors and later discover that additional overlay templates must be defined for these applications, you should delete the original template and re-create it with anchors.
For certain overlay types (i.e., Dialog Box, Dial-Up, Free-Form, and Terminal Emulation overlays), you should identify anchors on the other application window itself. Anchors are regions of text or specific controls that help PaperClip32 identify the window context. By contrast, Spreadsheet/Database overlays distinguish window context by means of the window’s title bar. For such overlays, anchors are unnecessary.
When you define anchors, select ones that are unique to the application window and that will always be present when the window is visible regardless of the particular record in view. Select text, such as label fields, that do not change when moving between records. In addition, anchors must be different for each screen for which overlays are to be defined.
Note: Information on the screen such as the application title, controls (e.g., buttons and edit controls), or field names (e.g., LASTNAME) will probably not change position, nor is the text likely to change. Conversely, specific field values, such as SMITH, are not appropriate anchors, since the value changes from record to record.
![]() Set
Up a Database/Spreadsheet Overlay Template
Set
Up a Database/Spreadsheet Overlay Template
1. Run PaperClip32 and minimize it. PaperClip32 should now be running in the background.
2. Launch your target application.
3. In that application, go to the screen displaying the data for which you wish to build a template. (If this screen displays multiple records, as in tabular view, highlight one record to serve as a sample upon which to build a template.)
4. Invoke the Overlay Editor by pressing Ctrl+F2. The Select Application Window Type dialog box appears.
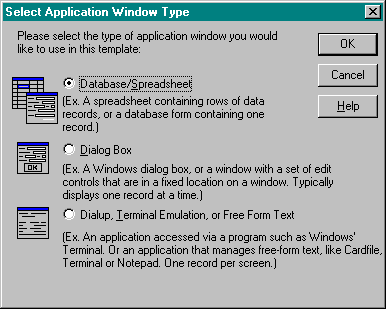
5. Select Database/Spreadsheet and choose OK button. The Select Application Screen dialog box appears.
6. Press Select Screen to select the application screen for this template. The Select Application Screen dialog box briefly disappears and your application window is active again.
7. Select the title bar of your application screen. The Select Application Screen dialog box reappears with the program name and window title filled in:
8. Choose OK. The Add Overlay Template dialog box appears.
9. Enter a template Name.
10. Click the Drawer tab. The list of available drawers will display.
11. If your target drawer exists, select it, and then click OK.
12. To add a drawer at this point, choose the Add Drawer button. This displays the Add Drawer dialog.
13. Type in the drawer setup information, then select the new drawer and click OK to return to the Add Overlay Template dialog box.
14. Click the Fields tab. Then click Add to display the Select Overlay Field dialog, showing the record or data you highlighted in your application. Consider the following example.
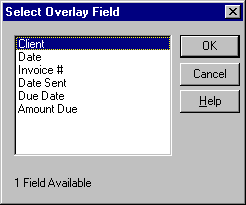
15. Click one of the listed overlay fields and click OK. This displays the Add Overlay Field dialog, as shown in the following example.
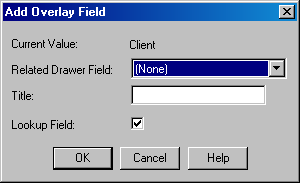
16. Open the drop-down list box beside Related Drawer Field. This is a list of the Folder Index Fields that define the folders in the selected drawer.
17. Select the index field that maps to the overlay field data you selected. This establishes a one-to-one relationship between the data in your sample document and the corresponding index field in the folder. The index field label appears also in the Title field.
18. Check the Lookup Field box if this is to be a key lookup field for the template. If this is not a key lookup field, uncheck the box. When not checked, this field will be ignored when searching for a folder. By including the unchecked field in the template, the clipped values will be compared to any existing data, and PaperClip32 will ask if you want to update the fields with any new data.
19. Click OK to complete the mapping and to close the Add Overlay Field dialog. This returns you to the Add Overlay Template dialog, with your data item displayed.
· This ensures a unique folder match when PaperClip32 retrieves folders from the application because each field is uniquely identified.
· As you select these fields, you may modify or delete them by clicking on the Modify… and Delete. And making the desired changes.
19. Click the Script tab to change the PaperClip32 default keystroke script.
20. Click OK. This completes the mapping of an overlay template to a file drawer and folders in this drawer can be clipped to the application. PaperClip32 returns to the background and your target application window is active again.
21. You can now use your new template to create your first folder. Highlight a record in your application and press Ctrl+F3 the default VCP hot key. A No folders match message will appear.
22. If you click Yes, PaperClip32 creates a folder for you by automatically extracting all required labeling information from the selected record in the application window. PaperClip32 then displays the New Document dialog box, allowing you to create a new document at this time.
23. If you choose not to create a document at this time, click on the Cancel button. A new empty folder is still created for you. Then click anywhere on your applications screen to return PaperClip32 to the background.
![]() Set
Up a Dialog Box Overlay Template
Set
Up a Dialog Box Overlay Template
1. Start and minimize PaperClip32.
2. Launch the target application.
3. In your application, click anywhere on the window displaying the data for which you wish to build a template.
4. Invoke the Overlay Editor by pressing Ctrl+F2. The Select Application Window Type dialog box appears.
5. Select Dialog Box and click OK. The Select Application Screen dialog box appears.
6. Choose Select Screen to select the application screen for this template. The Select Application Screen dialog box disappears and your application window is active again.
7. Click once on the title bar of your application screen. The Select Application Screen dialog box reappears with the program name and window title shown.
8. Click OK. The Select Anchors dialog box displays.
9. If you are planning to create only one overlay for this application, click OK to proceed without defining any anchors for this window. The system warns you that since you are not defining anchors, you will only be able to create one overlay template for this dialog box application.
· Click Yes to proceed. PaperClip32 displays the Add Overlay Template dialog box. Proceed to step 11.
· If more than one overlay will be created for this application, click Add to define anchors for this dialog box. Your target application screen appears.
10. Select the appropriate text or screen area for this anchor from your application screen. PaperClip32 inserts that text into the select anchors dialog box.
· One or two anchors per overlay should be sufficient. Click Add to add additional anchors, or OK when you have finished adding anchor fields.
· When you click OK, The Add Overlay Template dialog box appears.
11. Enter a template Name.
· If the drawer already exists, select the drawer you wish to map to this application screen, and then click OK.
· To add a drawer at this point, click New Drawer. Type in the drawer setup information, then select the new drawer and click OK to return to the Map File Drawer dialog box.
12. Click Edit Script to change PaperClip32’s default keystroke script.
13. When you have finished mapping the drawers and editing the script, click OK. The Add Overlay Template dialog box reappears.
14. Click Select Field. Instead of the Select Overlay Fields dialog box, PaperClip32 displays the application window itself; and the mouse pointer is changed to a cross hair.
15. Highlight the data from your application that corresponds to a folder index field in the drawer, and press Ctrl+F2. The Add Overlay Template Field dialog box appears.
16. The Field Title is automatically assigned the name of the related drawer field. Click OK.
17. To identify the folder index field that corresponds to this overlay field, select the appropriate field from the Related Drawer Field list. The Add Overlay Template dialog box reappears with the new field in the Overlay Fields box. Check the Lookup Field checkbox if this field is to be used to search for a folder.
· Repeat steps 14-17 to map all the fields in the selected drawer. This ensures a unique folder match when PaperClip32 retrieves folders from the application.
· As you select these fields, you can modify or delete them by clicking on the Modify and Delete buttons, respectively, and making the desired changes.
18. When all the appropriate fields have been mapped, click OK. PaperClip32 returns to the background; your application window is active again.
19. You can now use your new template to create your first folder. Highlight a record in your application and press Ctrl+F3, the default VCP hot key.
20. If no corresponding folder exists, a No folders match message will appear.
· If you click Yes, PaperClip32 creates a folder for you by automatically extracting all required labeling information from the selected record in the application window. PaperClip32 then displays the New Document dialog box, allowing you to create a new document at this time.
· If you choose not to create a document at this time, click Cancel. The new empty folder is still created for you. Then click anywhere on your applications screen to send PaperClip32 back to the background.
![]() Set Up a Dial-Up, Terminal
Emulation, or Free-Form Text Overlay Template
Set Up a Dial-Up, Terminal
Emulation, or Free-Form Text Overlay Template
Overlay templates for dial-up, terminal emulation, or free-form text applications instruct PaperClip32 to map to precise screen locations. This template extracts its index fields from the highlighted row-and-column screen addresses.
1. Run PaperClip32 and minimize it. PaperClip32 is now running in the background.
2. Launch your target application.
3. In that application, go to the screen displaying the data for which you wish to build a template. Highlight the entire record, or the area of data for which you want to create the overlay.
4. Invoke the Overlay Editor by pressing Ctrl+F2. The Select Application Window Type dialog box appears.
5. Select Dial-up, Terminal Emulation, or Free-Form Text and click OK. The Select Application Screen dialog box appears.
6. Select the application screen for this template by clicking on Select Screen. The Select Application Screen dialog box disappears, and your application window is active again.
7. Click on the title bar of your application window. The Select Application Screen dialog box reappears with the program name and window title shown.
8. Click OK. The Select Anchors dialog box appears:
9. Choose Add to define anchors for this window. PaperClip32 returns to your application screen. The Select Anchor Field dialog box appears.
10. Highlight the text to be used as an anchor from your application screen, then click OK. PaperClip32 inserts that text into the select anchors dialog box.
11. Click OK again. The Add Overlay Template dialog box appears.
12. Enter a template Name.
13. If the drawer already exists, select the drawer you wish to map to this application screen, then click on OK.
14. To add a drawer at this point, click New Drawer. Type in the drawer setup information, then select the new drawer and click OK to return to the Map File Drawer dialog box.
15. Click Edit Script to change PaperClip32’s default keystroke script.
16. When you have finished mapping the drawers and editing the script, click OK. The Add Overlay Template dialog box reappears.
17. Click Select Field button. A modified Select Overlay Field dialog box appears. PaperClip32 displays the application window itself.
18. Highlight a field value that corresponds to the folder index fields in the drawer.
19. If your application presents data in a tabular format, be sure that the Multiple Records Per Screen option in the Add Overlay Template dialog box is checked. Select overlay fields from one row only.
20. Click OK. The Add Overlay Template Field dialog box appears with the selected field in the Current Value Field
21. The Field Title is automatically assigned the name of the related drawer field. Click OK.
22. To identify the folder field that corresponds to this overlay field, select the appropriate field from the Related Drawer Field list. The Add Overlay Template dialog box reappears with the new field in the Overlay Fields dialog box. Check the Lookup Field checkbox if this field is to be used as a key search field.
23. Repeat steps 14-17 to map all the folder index fields in the selected drawer. This ensures a unique folder match when PaperClip32 retrieves folders from the application.
24. As you select these fields, you may modify or delete them if you realize that you have selected the wrong field, or if you wish to change the field title.
25. When all the appropriate fields have been mapped, click OK. PaperClip32 returns you to the application window. You can now use your new template to create your first folder.
26. If Multiple Records Per Screen is not checked, highlight all the text for the first record (usually the entire screen). It may already be selected. Then press Ctrl+F3.
27. If Multiple Records Per Screen is checked (because data is presented in tabular format), press Ctrl+F3 (no need to highlight data). The Select Record for Matching Folder dialog box appears. Highlight the appropriate record and click on the OK.
28. If no corresponding folder exists, a No folders match message appears.
29. If you click Yes, PaperClip32 creates a folder for you by automatically extracting all required labeling information from the selected record in the application window. PaperClip32 then displays the New Document dialog box, allowing you to scan or create a new document at this time.
30. If you choose not to create a document at this time, click Cancel. A new empty folder is still created for you. Then click anywhere on your applications screen to send PaperClip32 back to the background.
Note: Do not make changes that will invalidate the link established between the application and the corresponding drawer. The application must include a field that corresponds to each folder index field in the drawer.
1. Select Overlay Templates… from the Setup menu. The Overlay Templates dialog box appears.
2. Select the desired overlay template and click Modify. The Modify Overlay Template dialog box appears.
3. The overlay template name, the drawer to which the overlay template is mapped, the Lookup Field checkbox, and the script assigned to the application can be modified.
1. Select Overlay Templates… from the Setup menu. The Overlay Templates dialog box appears.
2. Select the desired overlay template, and then click View. The View Overlay Template dialog box appears.
3. After viewing the overlay template, click Cancel to return to the Overlay Templates dialog box.
4. Click Close to return to the application desktop.
Note: Deleting an overlay template removes the ability to clip to the visual context for which the template was created.
1. Select Overlay Templates… from the Setup menu. The Overlay Templates dialog box appears.
2. Select the desired overlay template and choose Delete. A prompt appears for you to confirm the deletion.
3. Click Yes to delete this template, or No to cancel.
4. Click Close to return to the application desktop.
Problems with overlay creation may occur if the selected application does not respond to the PaperClip32 default script that assumes that Ctrl+Insert will copy data to the clipboard. This problem does not occur in Dialog Box Overlays. In most cases, by following the instructions below, the overlay can still be created. Once the overlay has been successfully created, the overlay script can be modified so that hot- keying to the corresponding PaperClip32 folders from this application can be automated.
· For records presented in tabular form, such as in a spreadsheet where each record is presented as a row, highlight the entire row before pressing Ctrl+F2. If Ctrl+F2 still does not bring up the Select Application Window Type dialog box, try copying the record to the clipboard with an alternate set of keys (such as Ctrl+C) before pressing Ctrl+F2.
· For records presented in full-screen (form) view, ordinarily Ctrl+F2 selects the entire record and then copies it to the clipboard. If this does not occur try to select the record via the Edit menu (Select All or Select Record) before pressing Ctrl+F2. Consult the application’s manual for instructions on copying data to the clipboard.
Make sure that the dialog box is the active window (click anywhere on it) before pressing Ctrl+F2. PaperClip32 does not use the clipboard for dialog-box overlays, so no adjustments to the keystrokes for selecting data or copying it to the clipboard are necessary.
· Make sure all the appropriate text has been selected from the window (for terminal-emulation overlays, you should select an entire record) before pressing Ctrl+F2.
· If the Select Application Window Type dialog box does not appear, try copying the record to the clipboard with an alternate set of keys (such as Ctrl+C) before pressing Ctrl+F2. Consult the application’s manual for instructions on copying data to the clipboard.
When the VCP Hot Key (Ctrl+F3) is invoked, PaperClip32 copies information from the selected application to the Windows clipboard, and then uses that information to create a link to a PaperClip32 folder.
The PaperClip32 default script assigns the keystrokes Ctrl+Ins to copy information to the clipboard. Most Windows applications conform to this standard sequence of keystrokes for copying data, but occasionally an application will require alternate keystrokes.
For terminal emulation and DOS box applications, the highlighting of data can be automated by changing the overlay script.
If a Windows application does not copy data to the clipboard using the Ctrl/Ins key sequence, then the script for overlay templates associated with that application must be changed. Once the script for this application’s first overlay has been changed, PaperClip32 will assign that script automatically to any subsequent overlays.
The PaperClip32 default script appears in the script editor as:
KEY C CONTROL
A script can be modified to automate the selection of data before it is copied to the clipboard.
Microsoft Access applications in form view are an example. To create or use an overlay, you must again choose Select Record from the Edit menu before you hot key.
You can automate this by adding the Select Record keystrokes (Alt/ES) to the script before the Copy to Clipboard keystrokes (Ctrl+Ins).
KEY E ALT
KEY S
KEY INSERT CONTROL
1. Select Overlay Templates from the Setup menu. The Overlay Templates dialog box appears.
2. Select the overlay template to be edited, and click on the Modify button. The Modify Overlay Template dialog box appears with multiple tab controls.
3. Click on the Script tab. The Script editing controls appear.
4. Enter script keys in the Key: edit box and click Add Key. The new key appears in the list box at below.
5. To select a set of keystrokes, click on the <Ctrl>, <Alt>, and/or <Shift> keys to assign the first key in the sequence and then click on the keyboard character key to be used with it.
6. To remove an existing line, select the line in the list box and then click Remove Key.
7. To replace an entire script, click Clear Script.
8. Repeat this process for each set of keystrokes to be added to the script.
From inside any application such as Microsoft Word, etc., press the PaperClip32 Ctrl-F7 hot-key. This invokes the DocumentLink feature, if no DocumentLink template exists for the application, the Add DocumentLink template dialog will appear as follows:
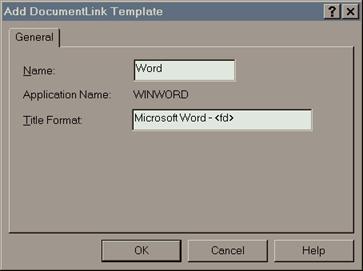
Complete the fields in the dialog box to save the new DocumentLink Template.
Note: You must enter the application title format string. This is the string displayed by the application in the title bar. The “<fd>” char string is a special string that you must type to denote where the file name is in the title bar string.
PaperClip32 allows the user to create a rubber stamp, which is a custom annotation. A stamp can be any appropriately sized bitmap (BMP). Other image files (PNG, JPG, TIF) have limited support. Sample stamp images are provided in the \sample stamps folder under the Paperclip32 server folder.
![]() Create
a Stamp
Create
a Stamp
1. Select Stamps… from the Setup menu. The Stamps dialog box appears.
2. Click Add. The Add Stamp dialog box appears.
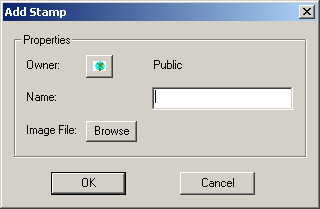
3. If all users are to have access to the stamp object, leave the owner Public. Otherwise choose an appropriate owner.
4. Enter a Name that will identify the stamp object in the Stamps dialog.
5. Click the Browse button and find the image file to associate with this stamp object.
6. Click OK to return to the Stamps dialog.
7. Click Close to return to the application desktop.
![]() Modify a Stamp
Modify a Stamp
1. Select Stamps… from the Setup menu. The Stamps dialog box appears.
2. Click on the appropriate stamp and click Modify. The Modify Stamp dialog box appears.
3. Make modifications to the Stamp owner or name.
4. Click OK to return to the Route Slips dialog box.
5. Click Close to return to the application desktop.
![]() View a Stamp
View a Stamp
1. Select Stamps… from the Setup menu. The Stamps dialog box appears.
2. Click on the appropriate stamp and click View. The View Stamp dialog box appears.
3. After viewing the Stamp, click Close to return to the Stamps dialog box.
4. Click Close to return to the application desktop.
![]() Delete a Stamp
Delete a Stamp
1. Select Stamps… from the Setup menu. The Stamps dialog box appears.
2. Select the desired stamp and click Delete. If the Stamp is currently in use on a document, a message box will appear saying it cannot be deleted. Click OK to clear.
3. Click Close to return to the application desktop.
PaperClip32 includes an optional Image Conversion process that will modify image documents to have a specified DPI and compression format. This conversion can happen at document import (including scanning), document export, or on an ad-hoc basis. Separate settings are available for import and export.
The Image Conversion feature provides the following options:
|
Convert only B&W images |
This will convert Black-and-White images to the preferred DPI, while leaving gray scale and color images unconverted.. |
|
Convert all images |
This will convert Black-and-White images to the preferred DPI, and will convert Gray Scale and Color images to Black-and-White with the preferred DPI. |
|
No conversion |
This setting disables the feature. No conversion will take place |
|
Acceptable DPI(s) |
This designates DPIs that are acceptable to the system and will not trigger a conversion. Multiple values are allowed. |
|
Preferred DPI |
This is the DPI that all converted documents will be after the conversion process. Only one value allowed. |
|
G4 Compression |
If checked, all converted documents will have G4 Compression format. If not checked, then documents will have original compression. |
![]() Configure
Image Conversion
Configure
Image Conversion
1. Select Image Conversion from the Setup menu.
2. Set configuration parameters for Import and/or Export.
3. Click OK to close dialog and save settings. Click Cancel to close dialog without saving.
4. Restart Paperclip32 for settings to take effect.
PaperClip32 supports a manual workflow process called a Route Slip. It contains an ordered list of recipients for a package. A package routed via a route slip will appear in the InBox of the first user or task group in the route slip list. That recipient must then route it to the next addressee via the Continue option, and so forth, in order for subsequent users to have access to the package.
Clicking on View, Add (as shown below), Copy, or Modify from the Route Slips dialog box displays the route slip record.
The route slip record contains the following information:
|
Name |
The route slip name, from 1 to 8 alphanumeric characters. PaperClip32 requires this entry. |
|
Description |
This optional field describes the function of the route slip. |
|
Membership |
When a route slip is created, all active PaperClip32 users and task groups are non-members. Select specific members for this route slip. |
5. Select Workflow, Route Slips… from the Setup menu. The Route Slips dialog box appears.
6. Click Add. The Add Route Slip dialog box appears.
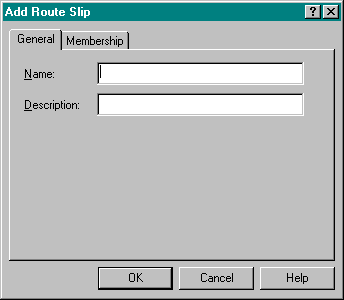
7. Enter a name and brief, meaningful description (optional) for the route slip.
8. Click the Membership tab. Highlight the first non-member user on the route slip, and click the left arrow icon. That individual’s name moves from the Non-Members list to the Members list. Repeat this process, in order, for all users to be assigned to this route slip.
9. To remove a user from the Members list, select the user’s name and click the right arrow icon.
Note: Double clicking on a name moves that user between the Members and Non-Members lists.
10. Click OK to return to the Route Slips dialog box.
11. Click Close to return to the application desktop.
![]() Copy a Route Slip
Copy a Route Slip
1. Select Workflow, Route Slip… from the Setup menu. The Route Slips dialog box appears.
2. Click Copy. The Add Route Slip dialog box appears.
3. Change the name and any other desired information for the status.
4. Click OK to save the new route slip, or Cancel to return to the Route Slips dialog box without saving the new status.
5. Click Close to return to the application desktop.
6. Select Workflow, Route Slips… from the Setup menu. The Route Slips dialog box appears.
7. Click on the appropriate route slip and click Modify. The Modify Route Slip dialog box appears.
8. Make any modifications to the route slip.
9. Click OK to return to the Route Slips dialog box.
10. Click Close to return to the application desktop.
5. Select Workflow, Route Slips… from the Setup menu. The Route Slips dialog box appears.
6. Click View. The View Route Slip dialog box appears.
7. After viewing the Route Slip, click Cancel to return to the Route Slips dialog box.
8. Click Close to return to the application desktop.
4. Select Workflow, Route Slips… from the Setup menu. The Route Slips dialog box appears.
5. Select the desired route slip and click Delete. A prompt appears for you to confirm the deletion.
6. Click Yes to delete this route slip, or No to cancel.
7. Click Close to return to the application desktop.
You can send shortcuts (pointers) of folders, documents, pages, and batches to other PaperClip32 users or send copies of folders, documents, pages, and batches to non-PaperClip32 users via MS Outlook or other MAPI compliant email systems.
To PaperClip32 Users
1. Select the document you wish to route and select Send/Send Shortcut from the Document menu.
2. Enter the email address in the “To…” area of your email application and send the email.
To non-PaperClip32 Users
1. Select the document you wish to route and select Send/Send Copy from the Document menu.
2. Enter the email address in the “To…” area of your email application and send the email.
PC Reports displays and prints information from PaperClip32’s system setup tables providing you with system documentation and auditing. To start PaperClip32 Reports double-click on the icon on your desktop or select PaperClip32 Reports in the Start/Programs listing.
The screen below shows the PaperClip32 Reports window and a list of the system reports available.
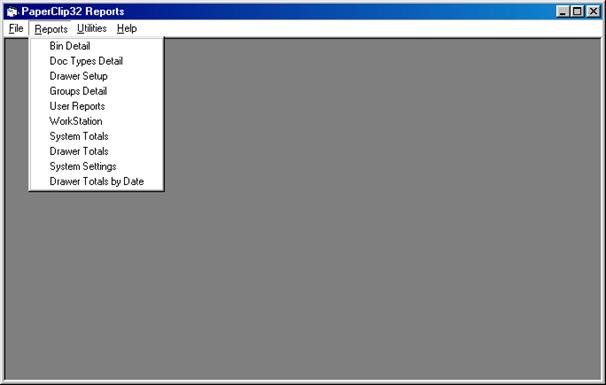
Under the Utilities tab there are two selections, View Reclock and Clear Broadcast table.
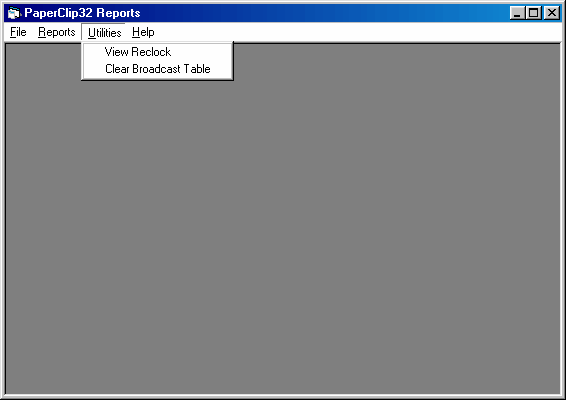
Whenever a user does an activity such as open a folder or open a document, a bit is set in the Reclock table (pronounced rec lock). This prevents another user from deleting a folder or document while another user has the folder or document open. When a workstation shutdowns due to a power failure or locks up and must be rebooted, the Reclock table may not be cleared. This utility will allow you to clear the locks for a single workstation or all the workstation
The picture below shows the locked records for the workstation named MANAGER during an online session in PaperClip32. It’s recommended that you do not delete locked records while a workstation is logged in.
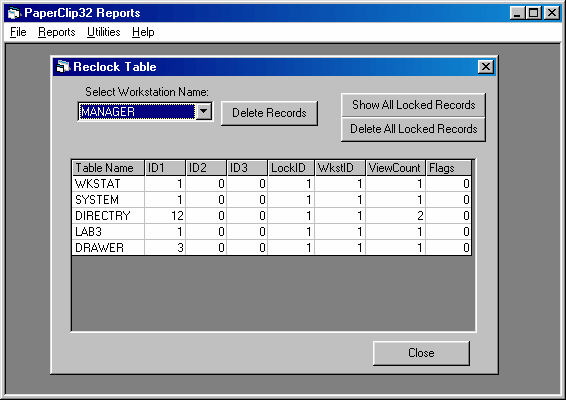
The Broadcast Table contains information about user activity. If you are not using the PaperClip32 Audit module, it is recommended that you clear the broadcast table as a step during system maintenance.
There are various switches that can be entered in the pclipwin.ini to modify the operation of PaperClip32. The pclipwin.ini file is located in the PaperClip root directory. To edit open the file with Windows Notepad will launch with the contents of the ini file displayed. The following diagram is an example.
Caution: Never make changes to the pclipwin.ini file without first making a copy of the file under a new name.
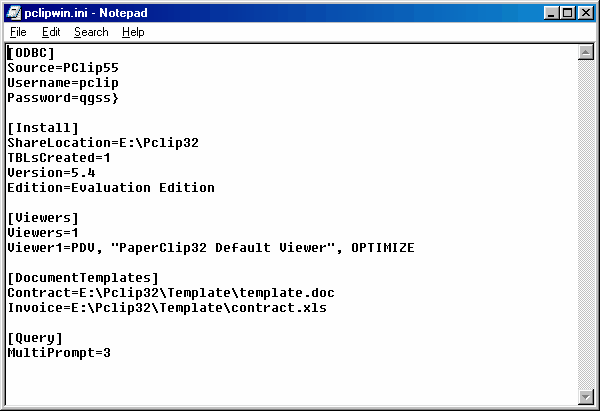
The switches available and shown in the figure above are DocumentTemplates and Query.
When you create a new document with a SoftClip document type, PaperClip32 launches the specified application and a template file appears. There are two types of template files you can select. There is the default template defined during installation of the application (Word, Excel, etc.). The other is a template you can define to be used multiple times to create, for example, invoices or contracts.
In the pclipwin.ini file enter a [DocumentTemplates] section. In that section, enter the Document Type you assigned to the template file name with the path to the template file. The file paths can be any DOS 8.3 or UNC path spec.
The following are examples of pclipwin.ini entries:
[DocumentTemplates]
Contract=\\Server1\PaperClip32\Templates\Contract.doc
Letter=k:\PaperClip32\Templates\Let.doc
Invoice=L:\Accounting\Files\Invoice.mrg
Proposal=\\Server2\Sales\proposals\template.xls
In most cases, the file path should be accessible by all PaperClip32 workstations by creating the directory on the server.
When you define the Query Expression information while creating a Query (see Creating Queries), one of the options is Prompt on Execution. If you select Prompt on Execution, you will be prompted for a text string when the Query is executed. The default number of prompts is one. You have the option to define multiple prompts for a Query in the pclipwin.ini file.
In the pclipwin.ini file, enter a [Query] section, and in that section enter MultiPrompt=# of prompts.
Once your drawers have been defined, you can add new folders or work with existing folders. There are two basic ways to add folders. You may add folders directly by choosing Add from the Folder menu. With this method, you must then type the appropriate field values for each folder index field. You may also add folders automatically from within another application program for which overlay templates have been defined, by pressing the Visual Context Processor (VCP) hot key.
Note: Your ability to perform the procedures described here is determined by the privileges assigned to you by the system manager.
From the Explore Folders window you can open existing folders, add new folders, view, modify, and delete folders, and search for folders that meet your specified search criteria.
The Explore Folders window appears when you choose Explore Folders from the File menu or when you click the Explore Folders icon on the toolbar.
Note: To quickly find or add a new folder, use the Quick Folder feature described at the end of this section.
The Explore Folders window is divided into two panes; A drawer/folder index tree view on the left and a folder or document list on the right.
You can open up more than one Explore Folders windows to simultaneously browse multiple drawers in the system.

The left window pane in the Explore Folders window represents your file room. The File Room window is a tree view of your drawers and folders. The top level tree node “File Cabinets” contains two drawer categories (cabinets); Personal Drawers and All Drawers. The Personal Drawer cabinet lists the drawers that you defined in your user preferences setup for drawers. The All Drawers cabinet lists all of the drawers defined in the system including your personal drawers. Of course you will only be able to see drawers that you have access rights to see.
The File Room also contains the Quick Lists. Quick Lists contain user configurable lists of newly created folders and documents, and recently opened folders and documents.
If you select a drawer in the tree the complete list of folders that the drawer contains is listed in the right window pane. Clicking the “+” sign in the tree expands the drawer allowing you to browse the folder labels in the drawer.
The magnifying glass icon in the upper right of the File Room window is the Quick Folder filter. To use this you must first select a drawer name in the tree because the filters are drawer specific.
The Explore Folders window allows you to find folders in many different ways. The File Room tree view allows you to expand drawers showing the folders organized in a hierarchical manner based on the order of the folder index scheme defined in the drawer setup. This means that tree view will contain one level or branch for each folder index field defined.
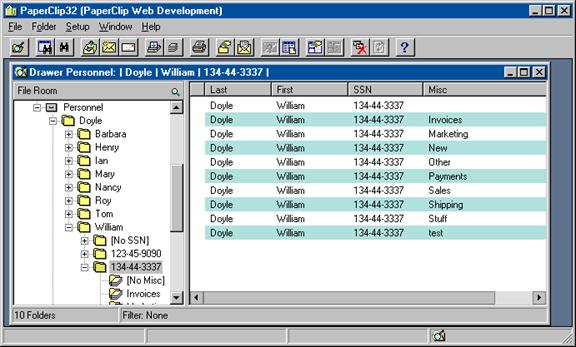
The above screen shows the folder indexes in the tree view and a list of matching folders for the selected node in the right window pane. The following is a list of icons and their meaning in the tree view.
![]() File Cabinets.
This is the root tree node which contains the file cabinets for the system.
File Cabinets.
This is the root tree node which contains the file cabinets for the system.
![]() Quick Lists. This node
contains lists of New Folders, New Documents, Recent Folders, and Recent
Documents.
Quick Lists. This node
contains lists of New Folders, New Documents, Recent Folders, and Recent
Documents.
![]() File Cabinet.
There are two cabinets in the system; The Personal Drawers and All Drawers
cabinet.
File Cabinet.
There are two cabinets in the system; The Personal Drawers and All Drawers
cabinet.
![]() Drawer.
When you select this kind of node from the tree a list of folders in the
selected drawer is displayed in the right window pane.
Drawer.
When you select this kind of node from the tree a list of folders in the
selected drawer is displayed in the right window pane.
![]() Folder
Index. When you select this kind of node in the tree a list of folders is
displayed in the right window pane that match the folder index criteria for the
particular node selected.
Folder
Index. When you select this kind of node in the tree a list of folders is
displayed in the right window pane that match the folder index criteria for the
particular node selected.
![]() Folder
Document List. When you select this kind of node in the tree a list of
documents contained in the specified folder is displayed in the right window
pane. This node is always the last node in the tree (leaf). This node
represents a complete path to a single folder in the system.
Folder
Document List. When you select this kind of node in the tree a list of
documents contained in the specified folder is displayed in the right window
pane. This node is always the last node in the tree (leaf). This node
represents a complete path to a single folder in the system.
![]() Quick
Folder. This icon in the upper right corner of the tree view activates the
Quick Folder function for finding folders and applying a filter for the tree
view and folder lists.
Quick
Folder. This icon in the upper right corner of the tree view activates the
Quick Folder function for finding folders and applying a filter for the tree
view and folder lists.
When you expand the drawer node in the tree a list of unique values for the first folder index field is displayed. If there are more folder index fields defined for the drawer then you will be able to expand the folder index nodes further until you find the folder that you are looking for. These folder index nodes do not represent only one folder. What they represent is a group of folders that match the folder index values defined at each hierarchical level in the tree. If you select a folder index node in the tree a list of folders that match the indexes up to that point are displayed in the right window pane. You can browse through the list of folders to find the one you are looking for here or continue to use the tree view. The last level in the tree (the leaves) is represented by a different icon. This icon looks like a folder with a stack of documents. This is the actual folder icon. There is one of these icons for each folder in the system. Note the difference between this icon and the Folder Index icon, which represents a list of folders that match the index defined at that tree level.
![]() The tree view
can be filtered by using the Quick Folder feature to help find folders in a
specified drawer. If you have a large drawer that contains 1000’s of folders
then you will need to use a filter to narrow the tree view’s scope. The status
bar on the bottom of the Explore Folders window shows what the current filter
is if any. Small drawers may not need the entry of a filter to allow for
optimal navigation.
The tree view
can be filtered by using the Quick Folder feature to help find folders in a
specified drawer. If you have a large drawer that contains 1000’s of folders
then you will need to use a filter to narrow the tree view’s scope. The status
bar on the bottom of the Explore Folders window shows what the current filter
is if any. Small drawers may not need the entry of a filter to allow for
optimal navigation.
Any time the Explore Folders window is open, the Quick Folder feature is automatically available for use. This feature lets you quickly find a specific folder, show a list of all existing folders, or quickly add a new folder to a drawer. Quick Folder is activated as soon as you type any characters when the focus is on the folder list (right window pane) or by clicking the magnifying glass icon in the upper right corner of the tree window pane. The Quick Folder dialog box appears with the characters you typed shown in the first folder index field. In order to select a specific existing folder, you must fill in all the required folder index fields exactly. If you want to retrieve a list of folders matching the characters you entered, type as many characters of the folder indices as you know. If you are adding a folder, select “Create Folder If New” to have PaperClip create a new folder with the specified index fields.
Once all the required fields are filled in, choose OK and one of the following actions will occur:
· The tree view is refreshed applying the filter criteria.
· If the specific folder exists, it is selected and the right window pane displays a listing of all the documents in that folder.
· If the folder does not exist and Create Folder If New is selected, the system creates the new folder.
· If no folder(s) matching the characters you entered can be found and Create Folder if New is not selected, the systems prompts you to re-enter proper index information and returns you to the Quick Folder dialog box.
· If there are any folders matching the characters you entered, they appear in the right window pane.
· The Explore Folders window status bar shows the current filter criteria.
Notice the status bar on the Explore Folders window. The Filter is shown describing the data fields entered. Each field name and data value is shown in the following format:
Filter: FieldName1 ~ ‘Value1’ FieldName2 ~ ‘Value2’ … FieldNameN ~ ‘ValueN’
The ‘~’ symbol in the filter indicates that a partial or like match is being used. This means that you may specify only part of the data and the query will find any matching items. For example you may only want to filter on names beginning with the letter “A”.
If no filter criteria are present then the status bar shows Filter: None.
If you opened a single folder as the result of a Open Folder operation from the Folder List or from the VCP interface (Application Screen Hot-Key) then the filter will specify an exact match type criteria as follows:
Filter: FieldName1 = ‘Value1’ FieldName2 = ‘Value2’ … FieldNameN ~ ‘ValueN’
The ‘=’ symbol means that the values have to be an exact match. The tree view will only show one folder in this case. You can break away from this filter by collapsing and re-expanding any tree view level. This will allow you to browse for similar folders.
Remember that any time you see a filter in the status bar the folder tree view and lists are limited by the filter. Also the filter is drawer specific so when a filter is active you can only browse that particular drawer. If you want to browse another drawer you can either clear the filter or open another Explore Folders window.
The Quick Lists contain the following user configurable lists: New Folders, New Documents, Recent Folders and Recent Documents.
New objects are those that have been added to the system within a certain number of days. The user can set the number of days old, and the maximum number of items in the list. For example, if the New Documents Days Old is set to 10, and the Maximum New Documents is set to 50, then fifty user-accessible documents 10 days old and less will appear in the list. If there are more than fifty documents, then only the newer documents will be listed.
The Recent lists display the folders and documents that the user has recently accessed, limited by the Maximum number of items in the list. The user can set the number of items that the list displays. A unique Recent Folder list and Recent Document list is saved for each user.
To change the configuration of the Quick Lists, Right Click on one of the Quick List nodes. Click on the Properties menu that pops up. The Quick Lists dialog will appear.
The Folder List contains all the folders in the open (selected) drawer. If a Quick Folder filter has been applied then the list is limited by the filter criteria.
Click on a folder once to highlight it and then select a folder operation from the Folder menu. Some of these operations are also available from the right mouse click context menu. Double-clicking on the folder opens it immediately in a new window.
You may choose from any of the following actions.
|
Choose… |
To … |
|
Open |
View and manipulate all the documents within the selected folder. |
|
Filter |
Opens the Quick Folder dialog, which filters the folder list according to user defined criteria. Also opens with (CTRL+T) |
|
File Room |
Opens and closes the folder tree seen in the left hand pane.. |
|
Add |
Create a new PaperClip folder and add it to the list in the Folder box. |
|
Delete |
Delete a folder. |
|
Route |
Route the folder to a PaperClip32 user’s inbox. |
|
Send Shortcut |
Send a reference (shortcut) of the folder to a PaperClip32 user via Email. |
|
History |
See PaperClip32 package history (workflow). |
|
View Properties |
View the definition information for the selected folder. No modification ability. |
|
Properties |
Modify the folder definition, including the folder name, description, owner, and the folder index and data field values. |
![]() Add Folders
Directly Via PaperClip32
Add Folders
Directly Via PaperClip32
1. Select Explore Folders… from the File menu or click on the Explore Folders icon on the toolbar. The Explore Folders window appears.
2. Highlight the drawer in which the new folder will be added. If this is the first folder you are adding to this drawer, the folders list box will be empty and the message line at the bottom of the window will read “0 Folders found.”
3. Select Add from the Folder menu. The Add Folder dialog box appears.
4. Enter a Description for this folder.
5. To restrict access to this document, select an owner by pressing the Owner button and selecting an owner from the list in the Owner Selection dialog box. If you do not change the ownership, the document will inherit the ownership of the folder in which it is created.
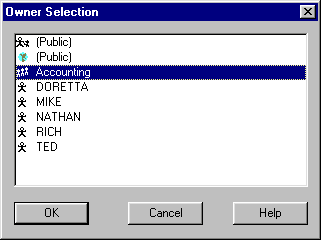
Select an owner and choose OK to save the new owner name and continue processing, or choose Cancel to return to the Add Folder dialog box without specifying a new owner.
Note: The default PaperClip32
owner is called Use Parent. The icon is a parent holding a child’s hand ![]() . If you assign
this ownership to the folder, the folder will inherit the same ownership as the
drawer in which the folder is contained. If the ownership of the drawer
changes, the ownership of the folder will change.
. If you assign
this ownership to the folder, the folder will inherit the same ownership as the
drawer in which the folder is contained. If the ownership of the drawer
changes, the ownership of the folder will change.
6. Turn on the Internet Secure check box if you want this folder blocked from Internet access.
7. Fill in the folder index fields.
Note: The system alerts you if a required field is missing or if it detects a mismatch between the field values you enter and the field type or mask.
8. Choose OK. The Explore Folders window refreshes with the new folder in the Folder list box.
![]() Add Folders
Clipped to Your Application
Add Folders
Clipped to Your Application
1. With PaperClip minimized, select the desired record in your other application. In a database, for example, select a record that occupies a full window form, or for database records in tabular form, select an entire row. In a Dial-Up, Terminal Emulation, Free-Form text, or DOS box applications, highlight the entire screen.
2. Press Ctrl+F3 to invoke the Visual Context Processor (VCP).
PaperClip comes to the foreground and displays the folder window that matches the selected record.
Note: If no corresponding folder exists, a message displays indicating that no folders match the selected record and prompts you whether or not to create a new folder. If you click No, PaperClip32 remains in the background. If you click Yes, PaperClip32 creates a folder by extracting all the required information from the application window. The New Document dialog box appears so you can scan or create a new document as needed. If you do not want to create a document, click Cancel. The system still creates a new empty folder for you. Click anywhere on your other application screen to return PaperClip32 to the background.
![]() Open
Folders Directly via PaperClip32
Open
Folders Directly via PaperClip32
1. Choose Explore Folders… from the File menu or click on the Explore Folders icon. The Explore Folders window appears.
2. Select the desired drawer.
3. Use the tree view in conjunction with the Folder List to find the desired folder.
4. Double-click on the desired folder or select it and choose Open. This will open a new Explore Folders window showing only the selected folder. You can also open the folder by selecting the folder’s document list icon from the tree view. This will not open a new window as the folders contents (document list) will be displayed in the right window pane.
1. Highlight the desired folder and click View Properties from the Folder menu. The View Folder dialog box appears showing you the information for the selected folder.
2. Click Cancel when you are finished viewing the folder information.
Note: Be careful when modifying folders, since changes made here may affect access to all documents within the folder.
1. Click on the folder and choose Properties from the Folder menu. The Modify Folder dialog box appears.
2. Make the necessary modifications to the folder description or field values.
3. Choose OK to save the newly modified folder information or Cancel to return to the PaperClip window without modifying the folder definition.
1. Click on the desired folder and choose Delete from the Folder menu. A message appears asking you to confirm the deletion.
Note: Deleting folders from PaperClip32 deletes all documents in the folder.
2. Choose OK to delete the folder or Cancel if you do not want to delete it.
3. Choose Cancel to return to the application desktop.
Folders can now be organized by “tabs” that you define on a per drawer basis. Up to 30 named tabs can be defined per drawer. A tab is defined by a set of “filters” that allow you to specify what documents are to be contained by that tab. Document properties such as document type, date, note and data fields may be used to define a filter. More than one filter can be defined per tab definition, allowing more than one kind of document to be grouped by that tab. Also available is an “ALL” tab, which displays all documents in the folder, and an “OTHER” tab, which displays the documents not contained in the defined folder tabs. The ALL tab and the OTHER tab may be positioned anywhere in the tab bar, and can be made inactive.
To configure the Folder Tabs for a drawer, see page 82.
The Explore Folders window allows you to open folders from the tree view by selecting the Folder Document List icon. This opens the selected folders document list in the right window pane. See the Working with PaperClip32 Documents section for details on how to create and use documents.
Working With PaperClip32 Documents
PaperClip32 documents are either imaged documents or SoftClip documents.
· Imaged documents are scanned or imported from disk.
· SoftClip documents are software files created with word-processing, spreadsheet, or other application programs.
Both kinds of documents can be filed and retrieved side-by-side in the same PaperClip32 folder. If a document is assigned ownership, it is marked with a key to those who have access. The document does not appear at all to those who do not have access.
Imaged documents may be added to a folder in one of two ways. They can either be scanned or imported into PaperClip32.
1. Open the appropriate folder from the Explore Folders window.
2. Select New from the Document menu, or click on the New Document icon. The New Document dialog box appears.
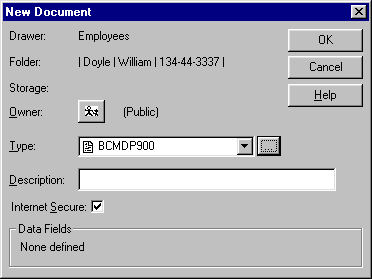
3. To restrict access to this document, select an owner by pressing the Owner button and selecting an owner from the list in the Owner Selection dialog box. If you do not change the ownership, the document will inherit the ownership of the folder in which it is created.
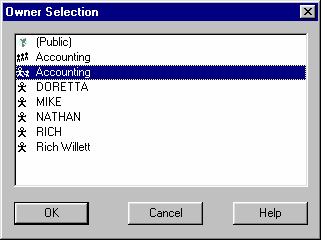
Note: The default PaperClip32
owner is called Use Parent The icon is a parent holding a child’s hand ![]() . If you assign
this ownership to the document, the document will inherit the same ownership as
the folder in which the document is contained. If the ownership of the folder
changes, the ownership of the document will change.
. If you assign
this ownership to the document, the document will inherit the same ownership as
the folder in which the document is contained. If the ownership of the folder
changes, the ownership of the document will change.
4. Select the appropriate document type from the drop-down list box. In this example, select PaperClip32 Image Document.).
Note: Users with Supervisor
privilege will see the Add Document Type button ![]() to
the right of the document type drop-down list box. Select this button to define
a new document type.
to
the right of the document type drop-down list box. Select this button to define
a new document type.
5. Enter an optional Description to further identify the document. This will help to identify the document in the folder window, and in the title bar of the viewer window.
Note: It is highly recommended that you enter a description for all imaged documents. The description helps you identify the document later.
6. Enter the appropriate values for any document data fields defined for this drawer.
7. Click on OK.
8. PaperClip32 displays the Scan dialog box, prompting you, “Select scanning option. “ To Preview Scan Pages, click the checkbox.
9. Place your page on the scanner bed, or place the page(s) in the automatic feed tray, and click on the Scan button. If you prefer to review the scanned pages after they are scanned, click on the Scan and Review button instead. If your scanner is not configured, you must click on the Configure button before you start the scan. For further information, see Scanner Configuration.
10. If your scanner has an automatic document feed, PaperClip32 displays the PaperClip32 document scanner window while it scans. You may click on the Cancel button to abort the scan at any time it is in progress.
11. With a flatbed scanner, the message displays: “Please open scanner flatbed and place document face down. Press <OK> to continue.” Click on the OK button. PaperClip32 displays the PaperClip32 document scanner window while it scans. Click on the Cancel button to abort the scan in progress.
12. When prompted to “Scan another page?”, insert the next page and click on the Yes button, or click on the No button to stop scanning and store the document (or to review before storing, if that is the option you chose).
13. Once the document has been stored, PaperClip32 displays the new document at the top of the folder window’s list of documents. Documents are sorted in date order, with the most recently created documents at the top of the folder.
The Preview Scan allows you to monitor the scan as it progresses. If there is a problem with the scanner settings, the user can Abort the process, correct the problem, and then scan again.
Note: This function is to be used with Kofax scanners. Most TWAIN scanners have a preview window.
1. If you checked Preview Scan Doc, the Preview Scan dialog box will appear when the scanning starts. Each page will appear in the window as the scan progresses.
2. Press Abort if the scan has a problem. If there are no problems, allow the scan to complete.
![]() Review a Scanned Document:
Review a Scanned Document:
1. If you selected Scan and Review when scanning a document the Review Pages dialog box appears after scanning.
2. Manipulate the image in the viewer using any of these viewer features.
|
Choose… |
To do this… |
|
|
Fits the entire image within the viewer window. |
|
|
Restores the image to its original size in the viewer. |
|
|
Fits the width of the image within the viewer window. |
|
|
Magnifies the image; shows a smaller part of the page. |
|
|
Shrinks the image; shows a larger part of the page. |
|
|
Displays a negative of the document image. |
|
|
Magnifies a portion of the document. Drag the magnifier cursor to select the area to be magnified, or press the left mouse button to magnify or the right mouse button to reduce. Press the Esc key to end Zoom. |
|
|
Allows scrolling of the image by dragging it with a hand cursor. |
|
|
Rotates the image back to its original orientation. |
|
|
Rotates the image 90 degrees clockwise from its original orientation. |
|
|
Rotates the image 180 degrees clockwise from its original orientation. |
|
|
Rotates the image 270 degrees clockwise from its original orientation. |
|
|
Moves a different part of the image into view. |
|
|
Fills the entire screen with the viewed image. Press the Esc key to return to the dialog box. |
|
|
Returns to first page of multi-page document. |
|
|
Advances to the previous page of a multi-page document. |
|
|
Advances to the next page of a multi-page document. |
|
|
Advances to the last page of a multi-page document. |
|
|
Deletes the page selected in the Page List window. |
|
|
Rescans a page and inserts the page in the position selected in the Page List dropdown. |
|
|
Rescans the document or batch. |
|
|
Toggles between an enhanced view (scale to gray) and a standard view of black and white images. |
3.
If the scan quality is satisfactory, click on the Store ![]() button
button
4.
If you wish to cancel the document scan, click on the Abort ![]() button. If you wish to rescan
the batch, click on the Rescan
button. If you wish to rescan
the batch, click on the Rescan ![]() button.
button.
You can add an imaged document on disk to the PaperClip32 database.
1. Open the appropriate folder from the Explore Folders window. If you need to create a new folder for this document, select Add from the Folder menu The folder window will appear.
2. Select Import from the Document menu. The New Document dialog box will appear.
3. To assign ownership to this document, select the Owner from the drop-down list.
4. Select a PaperClip32 Image Document type.
5. Enter an optional Description for the document.
6. Enter the appropriate values for any document data fields.
7. Click on the OK button. The Import File(s) dialog box will appear.
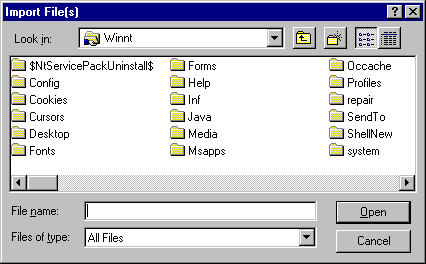
8. Use the dialog box to find the correct drive, directory and file. When the correct image file(s) appear in the File Name field, click on the OK button.
9. To select multiple image files to be part of the same imaged document, click on the left mouse button at each image file, while holding down the Ctrl key.
10. PaperClip32 imports the file(s) and updates the folder window to include the new document.
Note: Importing can also be accomplished via the File/Import menu section or via drag and drop from Explorer.
SoftClip documents can be added to a folder in two ways; either by adding (or creating) it, or by importing it.
You can create your SoftClip documents directly from PaperClip32 through the application using the default template file or a predefined template file (see PCLIPWIN.INI Switches in the System Setup and Administration section). When you select the New Document command with a SoftClip document type, PaperClip32 will launch the specified application allowing you to create a document on the fly. The default template is a blank document, spreadsheet, etc. An example of a predefined template is an invoice template defined in Excel or a contract template defined in Word.
You can add a SoftClip document to the folder using the New Document command on the File menu. The system supports three methods for storing the SoftClip documents in PaperClip32.
1. Open the appropriate folder from the Explore Folders window.
2. Select New Document from the Document menu, or click on the New Document icon. The New Document dialog box will appear.
3. To restrict access to this document, select an Owner from the drop-down list.
4. Select the appropriate SoftClip document type.
As shown in the figure below, the default template document type may be defined as Word Document and the predefined template document type may be defined as Contract.

5. Enter an optional Description for the document. This helps to identify the document in the folder window.
6. Enter the appropriate values for the document data fields.
7. Click on the OK button.
Note: The remaining steps are dependent upon the setting of the SoftClip File Options in the System Parameters record.
Your system manager has previously selected one of three methods for storing SoftClip files in PaperClip32.
|
Never Store SoftClips to Bins |
The user assigns the name and storage location for each document. PaperClip32 stores the document in the selected folder. Any changes made to the document, independently of PaperClip32, will be reflected when the document is retrieved through PaperClip32. |
|
Always Store SoftClip to Bins |
PaperClip32 automatically names and stores the file in its appropriate storage bin. Any changes made to the document, independently of PaperClip32, will not be reflected when the document is retrieved through PaperClip32. Note: When Always Store SoftClip to Bins is selected no additional dialog box will appear. |
|
Prompt |
Allows the user to select the SoftClip storage option for each document, individually. |
For further information, refer to Setup System Parameters.
![]() Never Store SoftClips to Bins (Add a New
SoftClip Document)
Never Store SoftClips to Bins (Add a New
SoftClip Document)
1. PaperClip32 displays the Choose File Name for New SoftClip Document dialog box:
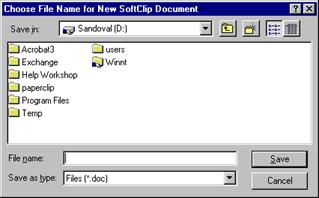
2. Type in the File Name, and click on the OK button.
3. PaperClip32 launches the application and the application defined template. For example, if Word Memos was selected as the document type, then PaperClip32 launches Word and the Word document template.
4. Create the new document, save it and exit from the application to return to the PaperClip32 folder window.
5. The updated folder window will appear, with the new SoftClip document at the top.
![]() Always Store SoftClips to Bins (Add a New
SoftClip Document)
Always Store SoftClips to Bins (Add a New
SoftClip Document)
1. PaperClip32 launches the SoftClip application and the application defined template.
2. Create the new document.
3. Save the file and exit from your application, without changing the file name. PaperClip32 saves the file in its default bin, automatically assigning its own file name (e.g., 48.DOC). PaperClip32 displays the updated folder window, with the new SoftClip document at the top.
![]() Prompt to Store SoftClips to Bins (Add a
New SoftClip Document)
Prompt to Store SoftClips to Bins (Add a
New SoftClip Document)
1. PaperClip32 displays the following message:
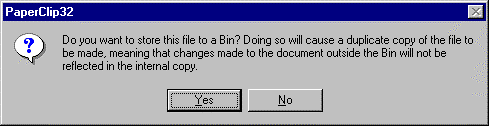
· Click on Yes to have the system create, name, and store the file in the default bin.
· Click on No to maintain the file in its original directory.
2. You must enter a file name, when the Choose File Name for New SoftClip Document dialog box will appear.
3. Click on OK. PaperClip32 launches the application and the application defined template.
4. Create the document and save it before exiting the application. PaperClip32 displays the updated folder window of documents, with the new SoftClip document at the top.
Note: Before you import a SoftClip document, a document type must be defined for the desired software.
1. Open the appropriate folder from the Explore Folders window.
2. Select Import from the Document menu. The New Document dialog box will appear.
3. To assign ownership to this document, select the Owner from the drop-down list.
4. Select the proper SoftClip document type.
5. Enter a Description for the document. This helps identify the document in the folder window.
6. Enter appropriate values for any document data fields.
7. Click on the OK button.
Note: Importing can also be accomplished via the File/Import menu section or via drag and drop from Explorer.
Note: Save the file in the software application before you perform the following steps in PaperClip32.
With the DocumentLink feature, you establish a link between a SoftClip application document and all copies of that specific document that are stored inside PaperClip32 folders. You can then use the hotkey method to instantly access any of the folders in which the document is stored. This means, for example, that you can easily update or replace stored versions of a document in multiple folder and storage locations.
Some applications lock an open file, and will not permit a copy to be made until the file is closed. (For example, Microsoft Write.) During the DocumentLink process, if you attempt to add a software file from such an application to the linked PaperClip32 folder, the application will present an error message. In such cases, you will need to import the document to the folder at a later time.
To use the DocumentLink feature, you need first to create a DocumentLink Template, which matches up the specific software application and its file types with PaperClip32. You can establish a single DocumentLink Template for each software application. Once the DocumentLink Template is defines, you can then hotkey into PaperClip32 from the individual file within the software application.
![]() Creating
a DocumentLink Template
Creating
a DocumentLink Template
1. With PaperClip32 minimized or in the background, open the desired application.
2. Press Ctrl+F7 to display the Add DocumentLink Template dialog. The name of the software application is included in the dialog (this is actually the internal name, which may be somewhat different from the name you are familiar with).
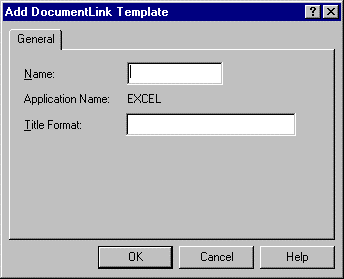
3. Enter a descriptive name for the DocumentLink Template. The name of the software application can be used.
4. Enter a title format to be used. This defines where the file name appears in the title bar of the application. Use the character sequence “<fd>” (without the quotes) to indicate where in the string the file name is positioned. For instance, in Excel you would enter “Microsoft Excel - <fd>” (again, without the quotes).
5. Click OK to save the DocumentLink Template and close the dialog.
The link is now established between the software application and PaperClip32. You can now go into the software application, open a specific file, and use the hotkey method to access the DocumentLink function.
1. With PaperClip32 minimized, open the desired file from within the desired application.
2. Press Ctrl+F3 to invoke the visual context processor (VCP). PaperClip32 will display a message indicating that no folder links have been defined for the file you are currently working with.
Note: if there is not Document Link template associated with the application you will get a message stating, “Unable to link this document to a folder because there is no DocumentLink template for this application.”

3. Click Yes to continue the DocumentLink process, or No to cancel.
4. Click Yes to proceed. The Select Application Screen dialog box appears.
5. If the program name is correct, continue to the step 7. Otherwise click Select Screen. The Select Application Screen dialog box disappears and your application window is active again.
6. Click on the title bar of your application. The Select Application Screen dialog box reappears, with the program name and window title filled in:
Note: If the Window Title field is blank, the application screen has not been properly selected. It is important that the cursor be positioned on the title bar in order to select the application screen.
7. Click OK once the correct window title has been selected. PaperClip32 displays the Select DocumentLink Folder dialog box:

8. Select the appropriate drawer, then double-click on the appropriate folder, or click once on the appropriate folder and then click Select.
9. PaperClip32 displays the New Document dialog box:
10. To restrict access to this document, select an Owner from the drop-down list.
11. Select the appropriate document type. Make sure the document type corresponds with the SoftClip application that you have selected to DocumentLink. Enter the Description field and, if necessary, enter any document data fields. Click OK.
12. The Select SoftClip File dialog box will appear. The linked file is entered under File Name. Select the correct drive and directory:
13. When the file name appears correctly in the File Name list box, click on the OK button.
14. If the system manager has set PaperClip32 to Prompt to Store SoftClips to Bins, PaperClip32 prompts you as to whether or not to copy the file into its default bin.
15. Click on Yes or No. The PaperClip32 window will appear.
1. With PaperClip32 minimized, open the desired SoftClip file from within the desired application. This must be the only file currently open in the application.
2. Press Ctrl+F3. The Document Links window will appear with a list of all copies of that document in the PaperClip32 system. If there are copies of the document in more than one drawer, multiple windows will be opened.
3. Double-click on the desired SoftClip document to open it or select Go To Folder from the Document menu to view the folder of the selected document.
Special icon symbols indicate the document type and storage location of documents within the PaperClip32 folder window.
|
SoftClip Document- Application-dependent |
Indicates that a document type is associated with a SoftClip application. In PaperClip32, the icon of the actual application is displayed so that you can tell different SoftClip documents apart. |
|
|
Indicates that the document has an imaged document type. |
|
|
Indicates that an object (drawer, folder, document) can be seen only by the current user, members of the designated task group or a user with global access rights. Note: If the Shared security symbol does not appear, the object is public and can be seen by anyone.
Note: If a user with Executive Privilege owns the document, even a user with global access rights cannot see the document. |
|
|
Indicates that the document is stored in an on-line storage bin. |
|
|
Indicates that the document is stored in a near-line storage bin. |
|
|
Indicates that the document is Archived. |
You can perform any of the following operations on documents:
|
· View a Document |
· Open a Document |
|
· Use the Viewer Window |
· Work with Document Pages |
|
· Annotate Documents |
· Copy a Document |
|
· Move a Document |
· Create a Shortcut to a Document |
|
· Export a Document to Disk |
· Delete a Document |
You can show a document that is stored in a folder in two ways: in the PaperClip32 viewer (viewing the document), or within the application in which it was created (opening a document). This distinction only applies to SoftClip documents because imaged documents are created in PaperClip32. Both methods of showing the document are available through the Show by Viewing and Show by Opening commands in the Document menu. You can specify how a document will be shown by using the settings on the Access tab when you set up a document type.
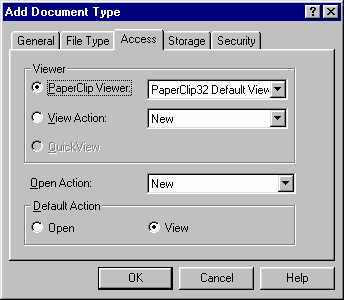
The Viewer options control what happens when you invoke the Show by Viewing command from the Document menu. The only choice available for image document types is PaperClip Viewer. Here you may select the PaperClip32 Default Viewer or you can use a proprietary, third party viewer if your system administrator has installed it for your PaperClip32 configuration.
For SoftClip document types you may alternatively elect to respond to the Show by Viewing command by using the external application to display the document. This would be required in the case where the PaperClip32 Default Viewer does not support the document and there is no third party viewer available. It would be desirable in the case where the application provides features not available in the viewer.
In order to use the external application for the Show by Viewing command, you must select one of the View Actions defined by the application when it is installed. The most common action will be “Open” but your system administrator may also define other custom actions.
Using a PaperClip Viewer is a good choice if the application is not installed on every workstation that will be accessing the documents of the type being configured. In the case where the application is not installed and a PaperClip Viewer does not support the document, the external system QuickView viewer is available and may support the document. When this is selected for the document type, the external QuickView program will be launched when you invoke the Show by Viewing command.
The Open Action, available only for SoftClip document types, defines what occurs when the Show by Opening command is chosen from the Document menu. Opening a SoftClip document requires that the application is installed on your system. The document is available for editing in this case. It may be true that some of the users of your PaperClip32 system will always view documents (either because they do not have the application installed or they have no need or authority to edit the document) while others may open them. Select one of the Open Actions defined by the application when it is installed. The most common action will be “Open” but your system administrator may also define other custom actions.
Finally, for SoftClip document types, you must choose a Default Action: Open or View. This default action is the one performed when you select Show from the Document menu, when you double click the document, or when you press the Enter key with the document selected. The other, non-default action is always available by holding down the Shift key when double clicking or pressing Enter.
1. Open the appropriate folder from the Explore Folders window or from a folder query results window.
2. Select the document.
Once a document is selected, it can be manipulated with one of the following commands.
|
· Show by Viewing |
· Show by Opening |
· Copy |
|
· Move |
· Create Shortcut |
· Delete |
|
· Export |
· Route |
· Stage |
|
· Archive |
· Send |
· Show Copies |
|
· Add New Pages |
· Page List |
· Convert Image |
|
· History |
· View Properties |
· Properties |
3. Using the Folder menu, you can also delete or route the entire folder.
4. If you highlight the document and press ENTER, Paperclip32 uses the doctype default to display the document either in the viewer window (imaged), or in its associated application (SoftClip documents).
When you open an imaged document, PaperClip32 displays the first page of the document in the viewer window. Consider the following example.
Once an imaged document is open, PaperClip32 adds the Page menu choice, containing page-level options, to the menu bar. In addition to the document-level commands offered in the Document menu, you may now use Page menu options to delete or rescan the page currently in your viewer window. You may also examine various parts of the image with scrolling, rotating, magnifying, and reducing tools.
Use the Viewer menu options, the tool bar icons or the +, -, PgUp, PgDn keys from your numeric keypad to rotate, magnify or reduce, and page through the document. Use the scroll bars and arrow keys to scroll left or right on the page.
To enlarge the viewer window, click on the maximize button in the document’s title bar.
You may close the document by clicking on the X button in the upper right corner of the document’s title bar. Imaged Documents – Viewer
You may also invoke the floating menu while in the viewer window by clicking the right mouse button.
|
Best Fit |
Fits the entire image within the viewer window. |
|
Full Size |
Restores the image to its original size in the viewer window. |
|
Fit to Width |
Displays the entire width of the image in the viewer window. |
|
Document Only |
Fills the entire screen with the viewed image. Press Esc or click on the right mouse button and deselect Document Only from the floating menu to return to the viewer window. |
|
Reverse |
Displays a negative of the image. |
|
Zoom |
Magnifies the page a fixed amount centered on the mouse cursor if you left click the mouse, reduces the page a fixed amount if you right click the mouse, or magnifies the image to display that part of the page selected within a frame if you drag a box with the mouse cursor. |
|
Pan |
Allows scrolling of the image by dragging it with a hand cursor. |
|
Go to Page |
Goes to a specific page of the document. |
|
Enhanced Image |
Toggles between an enhanced view (scale to gray) and a standard view of black and white images. |
|
Show Annotations |
Brings up the Show Annotations dialog where you may select which annotations, by owner and by type, to display on the document. |
|
Annotations |
Displays menu of annotation types to apply to the image. |
|
Package Info |
PaperClip32 will display process information for routed folders such as who the package is from, its priority, attachments, etc. |
|
View Properties |
Allows you to view the document type, description, or document data fields. |
|
Properties |
Allows you to modify the document type, description, or document data fields. |
|
|
|
The Viewer menu will be available from the PaperClip32 menu bar when the Viewer window is active.
|
Best Fit |
Displays the entire image in the viewer window. |
|
Full Size |
Restores the image to its original size in the viewer window. |
|
Fit To Width |
Displays the entire width of the image in the viewer window. |
|
Document Only |
Fills the entire screen with the viewed image. Press Esc or deselect Document Only from the floating menu to return to the viewer window. |
|
Magnify |
Magnifies the image; shows a smaller part of the page. |
|
Reduce |
Shrinks the image; shows a larger part of the page. |
|
Reverse |
Displays a negative of the image. |
|
Zoom |
Magnifies the page a fixed amount centered on the mouse cursor if you left click the mouse, reduces the page a fixed amount if you right click the mouse, or magnifies the image to display the part of the page selected within a frame if you drag a box with the mouse cursor. |
|
Pan |
Allows scrolling of the image by dragging it with a hand cursor. |
|
0 degrees |
Brings a rotated image back to its original orientation. |
|
90 degrees |
Rotates the image 90 degrees clockwise from its original orientation. |
|
180 degrees |
Rotates the image 180 degrees clockwise from its original orientation. |
|
270 degrees |
Rotates the image 270 degrees clockwise from its original orientation. |
|
First Page |
Goes to the first page of a multi-page document. |
|
Last Page |
Goes to the last page of a multi-page document. |
|
Next Page |
Goes to the next page of the document. |
|
Previous Page |
Goes to the previous page of the document. |
|
Goto Page |
Goes to a specific page of the document. |
|
Thumbnails |
Show the Page Thumbnail image window control. |
|
Enhanced Image |
Toggles between an enhanced view (scale to gray) and a standard view of black and white images. |
|
Show Annotations |
Brings up the Show Annotations dialog where you may select which annotations, by owner and by type, to display on the document. |
|
Annotations |
Displays menu of annotation types to apply to the image. |
While in the viewer window these additional options are available:
|
Home |
Goes to the top of the current page. |
|
End |
Goes to the bottom of the current page. |
|
Ctrl + Left Arrow |
Moves the image to the left margin of the document. |
|
Ctrl + Right Arrow |
Move the image to the right margin of the document. |
|
Ctrl + Page Up |
Move the image one page up. |
|
Ctrl + Page Down |
Move the image one page down. |
|
Ctrl + Home |
Goes to the beginning of the document. |
|
Ctrl + End |
Goes to the end of the document. |
|
Ctrl + S |
Select the current viewed page. |
The page thumbnail view control allows you to more easily browse and select pages. The Thumbnail view is on by default but can be turned off. The Viewer menu has a “Thumbnails” selection for this. The thumbnail view can be resized allowing larger or smaller images of the document pages. The page number, note and date/time stamp is shown on the top of each page thumbnail. There is also a red checkbox for page selection. You can select multiple pages, then perform any one of the page operations in the Page menu. (See the Working with Thumbnail List section below)
You can view SoftClip Application documents in:
· the native application,
· a proprietary third party viewer, or
· the operating system QuickView application.
Within each of these you have different menu command available for working with the viewed document. Naturally the most functionality is provided in the native application, which supports all normal file commands. The PaperClip32 Viewer provides access to a working subset of the commands available for the Imaged Documents, including page control. The operating system QuickView application does not include viewer menu commands.
PaperClip32 provides options for working with individual pages of imaged documents. Selecting Page List from the Document menu can access a listing of all of the current document’s pages.
Once a document is selected, use this option to add, append, or modify notes at the page level; view a particular page in a long document; print, rescan, add, or delete a particular page.
Note: Any change, such as the addition or deletion of a page, made to a PaperClip32 document will be reflected in all other copies created as shortcuts. If the copy is created as a true copy, then the two documents are completely independent.
![]() Work from the Page List Window
Work from the Page List Window
Note: Multiple pages can be printed or deleted from the page list window.
1. With a document selected in the folder window (or with the document open and displayed in the viewer window), select Page List from the Document menu. A list of all the pages in the selected document appears.
2. Select a page and then specify an action from the buttons at the right of the dialog box.
|
Choose… |
To… |
|
View |
View the selected page. |
|
|
Print the selected page. |
|
Rescan |
Rescan the selected page. |
|
Add… |
Add additional pages to the currently selected document. The Add Pages dialog box appears so you can specify how, and from where, you want to add pages to the current document. |
|
Modify… |
Attach a note to the selected page. The Modify Page dialog box appears. |
|
Delete |
Delete the selected page. |
|
Close |
Close the Page List dialog. |
With a page currently in the viewer window, select the Page menu from the menu bar. PaperClip32 displays the following page options:
|
Choose… |
To… |
|
Delete |
Delete the current or selected page(s). |
|
Rescan |
Rescan and replace the current page. |
|
Rotate Right |
Rotate selected page 90 degrees clockwise. Page will be “re-burned”, and the new orientation will be saved. |
|
Reorder |
Move selected page(s) Up or Down within document to change page order. |
|
Copy |
Create a new doc with selected pages. Pages will remain in current doc |
|
Move |
Create a new doc with selected pages. Pages will be deleted from current doc. |
|
Route |
Create a package to route the current or selected page(s). |
|
Send |
Send the current or selected page(s) to any user via Email. |
|
Send Shortcut |
Send a shortcut of the current or selected page(s) to a PaperClip32 user via Email. |
|
Internet Express |
Send the current or selected page(s) to an Internet Express subscriber. |
|
Export |
Export the selected page(s) out of Paperclip to an OS folder, or to an EDX package. |
|
Convert Image |
Convert the image according to the parameters set in the Setup/Image Conversion… dialog. |
|
History |
View the history of a current page. |
|
Select/ Unselect |
Selects (or Unselects page). In thumbnail list, selected page is designated by a red X. If thumbnail list not open, document icon in Status bar contains a red check mark. |
![]() Working with
the Thumbnail list
Working with
the Thumbnail list
With a document in the viewer window, and the thumbnail list visible, the user can perform the following actions on selected pages. If the thumbnail list is not visible, select Thumbnails from the Viewer menu.
To select a page, click the red box at the top of the thumbnail image. Multiple pages can be selected. All selected pages will be included in the following operations. If no pages are selected, then the current page will be operated on. The current page is indicated by the yellow border.
|
Create New Document |
·Drag-and-drop the selected pages into an open folder to create a new document in that folder. Select Copy or Move from the menu that appears. Selecting Move deletes the page(s) from the original document. ·Select Copy or Move from the Page menu. |
|
Transfer pages to another doc |
Transfer pages from one document to a second document. Drag-and-drop the selected pages into another document’s thumbnail list to add pages to the second document. Select Copy or Move from the menu that appears. Selecting Move deletes the page(s) from the original document. |
|
Add new pages to current document |
Drag-and-Drop images from the desktop into the thumbnail list to add pages to the current document. Select Copy or Move from the menu that appears. Selecting Move deletes the page(s) from desktop. |
|
Rotate page |
1. ·Select page(s) to rotate, and then click
on the Rotate Right 2. · Select page(s) to rotate, and then select Rotate Right from the Page menu. |
|
Reorder pages |
· Select the
page(s) to reorder, and then click on the Reorder buttons ·Drag-and-Drop the selected pages to a new position in the page order. The green indicator shows where the pages will be located |
|
Delete pages |
Select the page(s) to delete, and then press the Delete keyboard button, or select Delete from the Page menu. |
|
Change current page |
Double Click on any page in the thumbnail list to make that page the current page. The current page appears in the main viewer window. Any page operations are now performed on this current page, if no other pages are selected. |
PaperClip32 offers you the ability to add several different types of annotations to an image. These annotations can be used to draw attention to, or redact (hide) portions of, the selected image. The types of annotations available in the Viewer window are: Sticky Note, Line, Circle, Arrow, Highlight, Text, Redaction (Box) and Stamp.
The Annotation functionality encompasses the following:
· Creating Annotations
· Annotation Floating Menu
· Annotation Properties
You can create any of the following types of annotations:
· Sticky Note
· Line
· Circle
· Arrow
· Highlight
· Text Box
· Redaction (Box)
· Stamp
Sticky Notes have the following properties that may be edited after creation: Owner, Text, Font, Color.
1.
Click on the Sticky Note tool from the Viewer toolbox ![]() or by
selecting Note from the Annotations submenu of the Viewer menu.
or by
selecting Note from the Annotations submenu of the Viewer menu.
2. Click and hold the left mouse button to anchor the sticky note.
3. Drag the cursor to define the size and shape of the sticky note, and then release the mouse button.
4. A blinking cursor will appear in the sticky note. Type the desired text.
5. When all text has been entered as desired, click anywhere off of the sticky note. A sticky note will appear on the desired portion of the image.
Note: the major difference between a sticky note and a text box is that the image is visible beneath the text box.
Lines have the following properties that may be edited after creation: Owner, Text, Color. The text is not visible on the page, but may be used to associate a comment with the annotation.
1.
Click on the Line tool from the Viewer toolbox ![]() or by selecting
Line from the Annotations submenu of the Viewer menu.
or by selecting
Line from the Annotations submenu of the Viewer menu.
2. Click and hold the left mouse button to anchor one end point of the line.
3. Drag the cursor to the other end point of the line, and release the mouse button. A line will appear on the selected portion of the image.
Circles have the following properties that may be edited after creation: Owner, Text, Color. The text is not visible on the page, but may be used to associate a comment with the annotation.
1.
Click on the Circle tool from the Viewer toolbox ![]() or by
selecting Circle from the Annotations submenu of the Viewer menu.
or by
selecting Circle from the Annotations submenu of the Viewer menu.
2. Click and hold the left mouse button to anchor the circle.
3. Drag the cursor to create a circle of the desired shape and size. When finished, release the mouse button. A circle will appear on the selected portion of the image.
Arrows have the following properties that may be edited after creation: Owner, Text, Color. The text is not visible on the page, but may be used to associate a comment with the annotation.
1.
Click on the Arrow tool from the Viewer toolbox ![]() or by selecting
Arrow from the Annotations submenu of the Viewer menu.
or by selecting
Arrow from the Annotations submenu of the Viewer menu.
2. Click and hold the left mouse button to anchor the head of the arrow.
3. Drag the cursor to the end point of the arrow, and release the mouse button. An arrow will appear on the selected portion of the image.
Highlights have the following properties that may be edited after creation: Owner, Text, Color. The text is not visible on the page, but may be used to associate a comment with the annotation.
1.
Click on the Highlight tool from the Viewer toolbox ![]() or by
selecting Highlight from the Annotations submenu of the Viewer menu.
or by
selecting Highlight from the Annotations submenu of the Viewer menu.
2. Click and hold the left mouse button to anchor the highlight.
3. Drag the cursor to form a box over the text to be highlighted, then release the mouse button. A highlight will appear on the selected portion of the image.
Sticky Notes have the following properties that may be edited after creation: Owner, Text, Font, Color.
1.
Click on the Text Box tool from the Viewer toolbox ![]() or by
selecting Text from the Annotations submenu of the Viewer menu.
or by
selecting Text from the Annotations submenu of the Viewer menu.
2. Click and hold the left mouse button to anchor the text box.
3. Drag the cursor to define the size and shape of the text box, and then release the mouse button.
4. A blinking cursor will appear in the text box. Type the desired text.
5. When all text has been entered as desired, click anywhere off of the text box. A text box will appear on the desired portion of the image.
Note: The major difference between a sticky note and a text box is that the image is visible beneath the text box.
1.
Click on the Redaction tool from the Viewer toolbox ![]() or by
selecting Box from the Annotations submenu of the Viewer menu.
or by
selecting Box from the Annotations submenu of the Viewer menu.
2. Click and hold the left mouse button to anchor the redaction.
3. Drag the cursor to form a box covering the portion of the image to be hidden, and release the mouse button.
4. A blinking cursor will appear in the redaction. Type the desired text.
5. When all text has been entered as desired, click anywhere off of the redaction. A redaction will appear on the desired portion of the image.
1. Click on
the Stamp tool from the Viewer toolbox ![]() or by selecting Stamp from the
Annotations submenu of the Viewer menu.
or by selecting Stamp from the
Annotations submenu of the Viewer menu.
2. Click the location for the stamp.
3. Highlight the stamp name in the Select Stamp dialog and press the Select button.
4. Once on the document, click on the stamp and drag a handle to resize.
5. Right Click on the stamp and select Properties from the floating menu to change the owner or stamp object being used.
Note: See Creating Stamp Objects in Setup Section for instructions on how to populate the Select Stamp dialog.
The Annotation Floating menu lets you perform the following functions on existing annotations:
|
· Cut an Annotation |
· Copy an Annotation |
|
· Paste an Annotation |
· Delete an Annotation |
|
· Move Annotations to Front or Back |
· Burn an annotation onto the document |
|
· Change the properties of an Annotation |
|
1. Click on the annotation to be cut. Handles appear around the annotation to indicate that it is selected.
2. Position the cursor inside an annotation, and click the right mouse button. The Annotation floating menu will appear.
3. Click on Cut. The annotation is cut from the document image and placed on the Windows clipboard, ready to be pasted into any PaperClip32 imaged document.
Note: Cut is also available from the Edit menu.
1. Click on the annotation to be copied. Handles will appear around the annotation to indicate that it is selected.
2. Position the cursor inside an annotation, and click the right mouse button. The Annotation floating menu will appear.
3. Click on Copy. The annotation is copied to the Windows clipboard, ready to be pasted into any PaperClip32 imaged document.
1. Position the cursor in an annotation, and click the right mouse button. The Annotation floating menu will appear.
2. Select Paste. The annotation is pasted on to the image from the Windows clipboard.
Note: The pasted annotation will appear in the same location as the original, regardless of the cursor’s location in the Viewer window.
1. Click on the annotation to be deleted. Handles will appear around the annotation to indicate that it is selected.
2. Position the cursor in an annotation, and click the right mouse button. The Annotation floating menu will appear.
3. Select Delete. A message will appear to confirm deletion of the selected annotation.
4. Select Yes to delete the annotation, or No to return to the Viewer window without deleting the annotation.
Note: Delete is also available from the Edit menu.
![]() Move an Annotation to the Front or Back (of
an Image)
Move an Annotation to the Front or Back (of
an Image)
1. Click on the annotation to be brought to the front or out to the back. Handles will appear around the annotation to indicate that it is selected.
2. Position the cursor in an annotation, and click the right mouse button. The Annotation floating menu will appear.
3. Select To Front to move the selected annotation to the front of all other annotations on that page. Or, select To Back to move the selected annotation to the back of all other annotations on that page.
![]() Burn an Annotation to create an In-Image
annotation
Burn an Annotation to create an In-Image
annotation
1 Click on the annotation(s) to burn. Handles will appear around the annotation to indicate that it is selected. To select more than one annotation, press and hold the SHIFT key while selecting.
2. Position the cursor in the annotation, and click the right mouse button. The Annotation floating menu will appear.
3. Select Burn to permanently embed the annotation into the image.
4. Click the OK button of the confirmation dialog to finalize the operation. –OR- Click Cancel button to cancel the operation.
The annotations that you see in your documents may have some or all of the following properties: Author, Last Modified, Owner, Text, Color, Font.
![]() Access the Annotation Properties
Access the Annotation Properties
1. Click on the individual annotation whose properties you wish to view or change. Handles appear around the annotation to indicate that it is selected.
2. Position the cursor in an annotation, and click the right mouse button. The Annotation floating menu will appear.
3. Select Properties. The Properties dialog box appears so you can view and/or edit annotation properties.
Note: As an alternative to steps 1-3, simply double click on the annotation.
Note: Not all properties are available for all annotation types. The specific annotation type you choose determines which properties you actually see.
The following is a list of the available Annotation Properties:
|
Author |
This is a read only property of all annotations that indicates the creator of the selected annotation. It cannot be changed. |
|
|
|
|
Last Modified |
This is a read only property of all annotations that indicates the user last responsible for changing the selected annotation. It is updated by the system and cannot be changed. |
|
Owner |
This is the current owner of the annotation. To modify it: |
|
|
1. From the Properties dialog box, click on the Owner button. The Owner Selection dialog box appears. 2. Double click to select the desired owner. |
|
Text |
Note: The content that appears in the Text field is only visible on the image for Text Box and Sticky Note annotations. For all other annotations, it functions as a note/comment field. |
|
|
1. Click in the Text field in the Properties dialog box. A blinking cursor will appear. 2. Type or edit the desired text |
|
Color |
Note: For Text Box and Sticky Note annotations, the color is the background color. The color of the text itself is set using the Font attribute. This is the current color of the annotation. To modify it; |
|
|
1. From the Properties dialog box, click on the Color button from the Properties dialog box. A standard Windows Color dialog box appears. 2. Double click to choose the color for the selected annotation. |
|
Font |
This is the current font used with the Text Box and Sticky Note annotations. To modify it; |
|
|
1. From the Properties dialog box, click on the Font button from the Properties dialog box. A standard Windows Font dialog box will appear. 2. Select the desired font, font style, size, effect and script for the annotation text. 3. Once all font attributes have been selected, click on OK to return to the Properties dialog box. |
|
Stamp |
This is the stamp being used for the selected Stamp annotation. To modify it, |
|
|
1. From the Properties dialog box, click on the Stamp button. The Select Stamp dialog will appear. 2. Highlight the new stamp to display, and press Select. |
PaperClip32 documents can easily be copied from one folder to another. When a document is copied to another folder, PaperClip32 creates a new copy of the original document in the destination folder.
Notes: If you are copying documents to another drawer, the document data fields are blank (they must be filled in if required).
If documents are being copied to another drawer with any mandatory document data fields, the Do All button is grayed out, because information must be filled in for each document.
1. Open a folder and select the document to be copied. To select more than one, click on them with your left mouse button while holding down the Ctrl key.
2. Select Copy from the Document menu or press the right mouse button to select it from the floating menu. The Copy Document to Folder dialog box appears.
3. Select the destination drawer.
4. Select the destination folder by double-clicking on it or by highlighting it and clicking Select. To create a new folder for the document, click on the Add button, enter the necessary data, click on OK, and select the new folder when it appears on the list. The New Document dialog box appears.
5. PaperClip32 files each copy of a document with its own ownership and document data fields. If you would like these items to differ from those of the original, change them in this dialog box.
· When copying more than one document, click on Skip to skip the current document and proceed to the next selected document.
· Click on the Do All button to copy all of the selected documents without being prompted for each one.
· Repeat this step for each selected document.
6. Click on OK to copy the document(s). When all the selected documents are copied or skipped, PaperClip32 returns to the open source folder. You can check to see that the process was completed by opening the destination folder. The new documents appear at the top of the list.
![]() Copy a Document using Drag-and-Drop
Copy a Document using Drag-and-Drop
1. Open the folder containing the documents you wish to copy.
2. Open the destination folder. PaperClip32 opens the destination folder in front of the source folder.
3. (Optional) Select Tile from the Window menu. PaperClip32 simultaneously displays both folders.
4. Click on the document(s) to be copied. To select more than one, click on each document while continuously pressing the Ctrl key. Release the Ctrl key when all documents are selected. Drag the cursor to the destination folder.
5. Before releasing the left mouse button, press the Ctrl key.
6. Release the left mouse button. The New Document dialog box will appear.
7. Change any document data fields as desired and click OK.
· When copying more than one document, click on Skip to skip the current document and proceed to the next selected document. Click on the Do All button to copy all of the selected documents without being prompted for each one.
· The documents appear in the destination folder window(s).
· When you are finished, you may un-tile the folders by closing each one or by selecting Cascade from the Window menu.
PaperClip32 documents can easily be moved from one folder to another. When they are moved, they are removed from the source folder. Documents can be moved into existing folders or into folders newly created on-the-fly. PaperClip32 accomplishes a move by copying the document to its new folder and then deleting it from its original folder.
Note: If you are moving documents to another drawer, the document data fields are blank (they must be filled in if required).
If documents are being moved to another drawer with mandatory document data fields, the Do All button is grayed out, because information must be filled in for each document.
1. Open a folder and select the documents to be moved by clicking on them with your left mouse button, and holding down the Ctrl key.
2. Select Move from the Document menu, or press the right mouse button to select it from the floating menu. The Move Document to Folder dialog box appears.
3. Select the destination drawer.
4. Select the destination folder by double-clicking on it, or by highlighting it and clicking on Select. To create a new folder for the document, click on the Add button, enter the necessary data, click on OK, and select the new folder when it appears on the list. The New Document dialog box appears.
5. Since PaperClip32 files each copy of a document with its own ownership and document data fields, if you would like these items to change when the document is moved, change them in this dialog box.
· When moving more than one document, click on the Skip This button to skip the current document and proceed to the next selected document.
· Click on the Do All button to move all of the selected documents without being prompted for each one.
· Repeat this step for each selected document.
6. Click on OK to move the document(s).
· When all the selected documents are moved or skipped, PaperClip32 returns to the open source folder.
· You can check to see that opening the destination folder completed the process. The moved documents appear at the top of the list.
![]() Move a Document using Drag-and-Drop
Move a Document using Drag-and-Drop
1. Open the folder containing the documents you wish to move.
2. Open the destination folder(s). PaperClip32 opens the destination folder in front of the source folder.
3. (Optional) Select Tile from the Window menu. PaperClip32 displays all the selected folders on the screen simultaneously.
4. Click on the document(s) to be moved, while keeping the left mouse button pressed and dragging the cursor to the destination folder.
5. Before releasing the left mouse button, press the Shift key.
6. Release the left mouse button. The New Document dialog box will appear.
7. Change any document data fields desired, and click on the OK button.
8. When moving more than one document, click on the Skip This button to skip the current document and proceed to the next selected document.
9. Click on the Do All button to move all of the selected documents without being prompted for each one. The documents appear in the destination folder window(s).
10. When you are finished, you may un-tile the folders by closing each one, or by selecting Cascade from the Window menu.
Shortcuts to PaperClip32 documents from one folder can easily be created in another folder. When a shortcut to a document is created in another folder, PaperClip32 merely adds a reference to the original document in the destination folder. If one document is modified, all shortcuts to the document are also modified. Note that, unlike in Explorer, there is absolutely no difference between the original document and a shortcut to it. Accessing the original document or one of its shortcuts are completely equivalent operations.
Note: If you are creating a shortcut to documents in another drawer, the document data fields are blank (they must be filled in if required).
If shortcuts to documents are being created in another drawer with any mandatory document data fields, the Do All button is grayed out, because information must be filled in for each document.
![]() Create
a Shortcut to a Document
Create
a Shortcut to a Document
1. Open a folder and select the document that is to have a shortcut created. To select more than one, click on them with your left mouse button while holding down the Ctrl key.
2. Select Create Shortcut from the Document menu or press the right mouse button to select it from the floating menu. The Create Shortcut to Document to Folder dialog box appears.
3. Select the destination drawer.
4. Select the destination folder by double-clicking on it or by highlighting it and clicking Select. To create a new folder for the document, click on the Add button, enter the necessary data, click on OK, and select the new folder when it appears on the list. The New Document dialog box appears.
5. PaperClip32 files each shortcut to a document with its own ownership and document data fields. If you would like these items to differ from those of the original, change them in this dialog box.
· When creating shortcuts to more than one document, click on Skip to skip the current document and proceed to the next selected document.
· Click on the Do All button to create shortcuts to all of the selected documents without being prompted for each one.
· Repeat this step for each selected document.
6. Click on OK to create shortcuts to the document(s). When all the selected documents are processed or skipped, PaperClip32 returns to the open source folder. You can check to see that opening the destination folder completed the process. The new documents appear at the top of the list.
![]() Create
a Shortcut to a Document using Drag-and-Drop
Create
a Shortcut to a Document using Drag-and-Drop
1. Open the folder containing the documents you wish to create shortcuts to.
2. Open the destination folder. PaperClip32 opens the destination folder in front of the source folder.
3. (Optional) Select Tile from the Window menu. PaperClip32 simultaneously displays both folders.
4. Click on the document(s) to have shortcuts created. To select more than one, click on each document while continuously pressing the Ctrl key. Release the Ctrl key when all documents are selected. Drag the cursor to the destination folder.
5. Release the left mouse button. The New Document dialog box will appear.
6. Change any document data fields as desired and click OK.
· When creating shortcuts to more than one document, click on Skip to skip the current document and proceed to the next selected document. Click on the Do All button to process all of the selected documents without being prompted for each one.
· The documents appear in the destination folder window(s).
· When you are finished, you may un-tile the folders by closing each one or by selecting Cascade from the Window menu.
PaperClip32 can export imaged documents and SoftClip documents to disk. For imaged documents, each page is output as a separate image file. To identify each, PaperClip32 assigns consecutive numbers (starting with 1) to the file name you supply.
1. Open a folder and highlight a document.
2. Select Export from the Document menu. The Select Exported File Name dialog box appears.
3. Enter a file name. PaperClip32 adds the file extension. Select the target drive and directory.
4. Choose OK. When the export process finishes, the source folder reappears.
Note: Exporting a document does not remove it from its folder.
Deleting a document in PaperClip32 removes it only from the currently selected folder. All shortcuts to the document in other folders remain unchanged. This is because shortcuts are implemented in PaperClip32 using reference pointers, not actual copies.
1. Open a folder and highlight a document to delete.
2. Select Delete from the Document menu. A message appears for you to confirm the deletion.
3. Choose Yes to delete the document or No to cancel the deletion process.
Note: If this is the last copy of the document stored in PaperClip32 (no more shortcuts exist), a message appears to warns you that deleting this copy will remove the document as well as the document record. Choose OK to delete the document or Cancel to abort the deletion and return to the previous window.
PaperClip32 allows you to sort documents in the folder window by storage location, restricted access, document type, description, number of pages or time and date created in either ascending or descending order.
1. Click on the column heading for the column by which you want to sort the documents. The documents will immediately resort by the column in ascending order.
2. To sort in descending order, click the column heading again without first clicking on any other column heading.
You can use two distinct methods to print documents using PaperClip32.: print imaged documents or print SoftClip documents. Imaged and SoftClip documents are selected and printed from within PaperClip32; while SoftClip documents can also be printed from within another application window.
The printer setup option allows you to select or change the printer setup information. It uses the standard Windows Printer Setup dialog box.
1. Select Print Setup… from the File menu. The Print Setup dialog box appears.
2. You may reconfigure your printer orientation, paper size, paper source, and selected printer. Click on Properties to see additional print options. Refer to your Windows manual for additional information on setting up your specific printer.
3. Choose OK to save any changes made to the printer setup or choose Cancel to return to the previous window without making any changes to the current printer setup.
![]() Print a Document from inside PaperClip32
Print a Document from inside PaperClip32
1. Open a folder and select a document.
2. Select Print from the File menu or click on the Print Document icon. The Print dialog box appears.
3. Select All n pages (where n is the number of pages in the document) to print all pages of the document or select Pages and set the range to print a specific page range. Note that SoftClip documents are considered to be one page only.
4. Select Annotations to selectively control the printing of any on-image annotations along with an imaged document. The default is to print all annotations.
5. Choose OK. In the top left corner of the screen, the print status displays as a percentage of the document that has printed. A message appears when printing completes.
SoftClip documents are printed directly, through PaperClip32’s Print option, or indirectly from within a SoftClip application. The SoftClip application, remember; can be automatically launched when you show a SoftClip document.
If a SoftClip application defined a method to print its files when it was installed, these software files will print from within PaperClip32. If no such configuration exists, you may either minimize PaperClip32, and create that configuration in Windows NT or Windows 95, or simply open the document and then print it using the other application’s Print command.
Scanned pages can be added to imaged documents already stored in PaperClip32. They can be added from the folder window to a selected document or to a document displayed in the viewer window.
1. Open a folder and select a document.
2.
Select Add New Pages from the Document menu or click on the Add button
from the Document Page List. The Add Pages dialog appears. 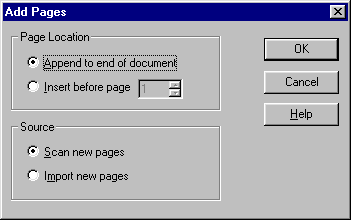
3. To add pages after the last page in the document, choose Append to end of document. To add pages anywhere else, choose Insert before page and select the page number. If adding pages from the page list, the currently selected page number is displayed by default.
4. To add new pages by scanning, choose Scan new pages and press OK.PaperClip32 goes through the standard scanning procedure. If desired, review the scanned pages, and then they can be stored.
5. To add pages that already exist as files, choose Import new pages. PaperClip32 goes through the standard import procedure.
6. PaperClip32 displays the revised folder window showing the new page count as reflected in the #Pgs column.
When a page is re-scanned, PaperClip32 replaces the old page with the new one. Three options are available to rescan:
· Rescan a Page from the Viewer window
· Rescan a Page from the Page List
· Rescan a Page from the Review Pages dialog box
![]() Rescan a Page from the Viewer Window
Rescan a Page from the Viewer Window
1. With the page to be scanned in view, select Rescan from the Page menu.
2. PaperClip32 displays the Scan dialog box, prompting you, “Select scanning option. “
3. Place your page on the scanner bed, or place the page(s) in the automatic feed tray, and click on the Scan button If you prefer to review the scanned pages after they are scanned, click on the Scan and Review button instead. If your scanner is not configured, you must click on the Configure button before you start the scan. For further information, see Scanner Configuration.
![]() Rescan a Page from the Document Page List
Rescan a Page from the Document Page List
1. Open a folder and select a document.
2. Select Page List from the Document menu. The Document Page List dialog box will appear.
3. Highlight the page to be rescanned.
4. Click on the Rescan button.
5. PaperClip32 displays the Scan dialog box, prompting you, “Select scanning option. “
6. Place your page on the scanner bed, or place the page(s) in the automatic feed tray, and click on the Scan button If you prefer to review the scanned pages after they are scanned, click on the Scan and Review button instead. If your scanner is not configured, you must click on the Configure button before you start the scan. For further information, see Scanner Configuration.
![]() Rescan a Page from the Review Pages Dialog
Box
Rescan a Page from the Review Pages Dialog
Box
1. View the image of a newly scanned document before storing.
2.
If the document needs to be rescanned, click on the Rescan Document ![]() button.
button.
3.
If only a single page needs to be rescanned, select that page and click
on the Rescan Page ![]() button.
button.
4. PaperClip32 displays the Scan dialog box, prompting you, “Select scanning option. “
5. Place your page on the scanner bed, or place the page(s) in the automatic feed tray, and click on the Scan button. If you prefer to review the scanned pages after they are scanned, click on the Scan and Review button instead. If your scanner is not configured, you must click on the Configure button before you start the scan. For further information, see Scanner Configuration.
Pages may be modified or modifications can be made to a document’s description, type, field, or data fields.
![]() Modify Pages from the Page List
Modify Pages from the Page List
1. Open a folder and select a document.
2. Select Page List from the Document menu. The Document Page List dialog box will appear.
3. Highlight the desired page and click on the Modify button. The Modify Page Data dialog box appears.
4. You can edit the note associated with this page. Enter any information you wish in the note field.
5. Click on the OK button to save any changes, or on Cancel to return to the Document Page List dialog box.
1. Open a folder and select a document.
2. Select Properties from the Document menu. The Modify Document dialog box appears.
3. You can alter or add any of the owner, type, description, or document data fields.
Note: You cannot change a document type between Imaged and SoftClip types.
Note: Changing the document type does not change the document’s storage location. Instead, you must stage the document between on-line and near-line storage to move it to a different location.
4. Choose OK. The updated folder window will appear.
![]() Delete Pages
Delete Pages
1. Open a folder and select a document.
2. Select Page List… from the Document menu. The Document Page List dialog box will appear.
3. Highlight the page and choose Delete. A message appears for you to confirm the deletion.
4. Choose OK to delete this page or Cancel to return to the Document Page List dialog box without deleting any pages.
Note: If the document is being displayed in the viewer, the current page can be deleted by selecting Delete from the Page menu.
PaperClip32’s image-storage system allows imaged and SoftClip documents to be stored on optical platters or jukeboxes connected to your server, to magnetic media, or to any other magneto-optical or optical drive. These options depend upon system-wide settings, near-line and on-line storage bins, and the document types defined by your system manager.
Your system manager determines whether each document type is to be initially stored on near-line or on-line media. Once in near-line storage, documents remain stored there, but they can be staged to on-line storage for short-term intensive use.
Note: In order to stage documents between on-line and near line storage, the document types associated with these documents should specify both an on-line and a near-line storage bin. If not, the system will use the System Parameters defaults.
Use the Stage option to move documents between near-line and on-line storage bins. Documents that need to be accessed frequently can be staged, or moved to on-line bins for faster access, or moved to near-line bins for long term storage with less frequent access.
Note: If you are staging to or from removable media, you will be prompted to insert the correct disk, if it is not already present.
![]() Stage Documents in PaperClip32;
Stage Documents in PaperClip32;
1. Open a PaperClip32 folder or Query Results window.
2. Select the desired document(s) to stage.
3. Select Stage… from the Document Menu. The Staging dialog box appears.
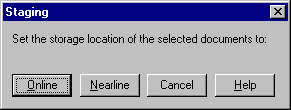
4. Choose Online to move the selected document(s) to the on-line storage bin associated with the document type.
5. Choose Nearline to move the selected document(s) to the near-line storage bin associated with the document type. The document storage location will be updated in the folder.
6. Click on Cancel to cancel the staging procedure.
Note: Any documents that are already in the storage bin selected will be unaffected by the operation.
PaperClip32’s archive feature allows a document to be stored on-line and on NOSS32 simultaneously. Archiving combines the quick access of on-line storage with the security of NOSS32.
All operations (view, print, export, etc) are performed with the online version of the archived document. If the content of an archived document is modified, then the status is changed to online, and the nearline copy is deleted. When this new document is archived, a new copy is written to NOSS.
If the online edition of an archived doc is corrupted, (for example, a page is missing), un-archiving the document can repair it. When un-archived, the nearline pages overwrite the online pages, and the storage location changes to online.
Note: The ability to archive is controlled by the Document/Stage privilege.
The following page operations will change an Archived doc to on-line.
|
Rotate Page |
Delete page |
|
Add page |
Rescan page |
|
Move page from document |
Move page to document |
The following document operations will leave the document in an Archived state.
|
Modify properties |
Copy document |
|
Reorder pages |
Edit data fields |
|
Move document to another folder |
Add, modify or delete an annotation |
![]() Archive Documents from the menu
Archive Documents from the menu
1. Open a PaperClip32 folder or Query Results window.
2. Select the desired document(s) to archive.
3. Select Archive… from the Document menu. The Archiving dialog box appears.
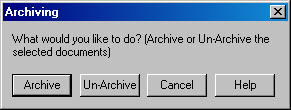
4. Choose Archive to archive the selected document(s) to the near-line storage bin associated with the document type.
5. Choose Un-Archive to change the selected document(s) from Archive to on-line storage. The document storage status will be updated in the folder.
6. Click on Cancel to cancel the Archiving procedure.
Note: Only on-line documents can be archived. To archive a near-line document, you must first stage it on-line, then archive.
![]() Search for Archived and Un-Archived docs
Search for Archived and Un-Archived docs
1. Create a new query, define the type and scope, and click on the Query tab.
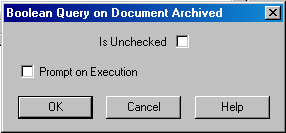
2. Select the Document/Archive node, and press Build. The Boolean Query on Document Archived dialog appears. Leave the check box unchecked to search for Un-archived documents. Check the box to search for Archived documents. Click Ok when complete.
3. Continue defining the remainder of the query. Execute, or Save when complete.
Use the Query parameter Days Old to search for documents that are were created a specific number of days ago. And use the Batch Query Archive operation to Archive those documents.
Use the Un-Archived query parameter to locate all docs that have not been archived. And use the Batch Query Archive operation to Archive these documents.
.
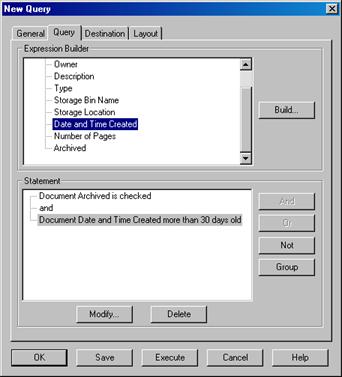
1. Query for documents that are archived and >30 days old.
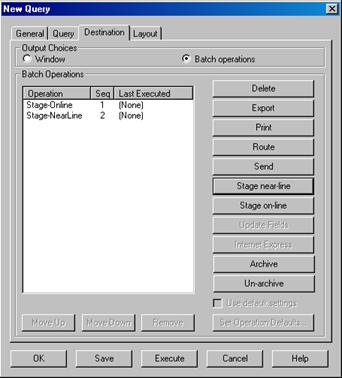
2. Stage the result set online, then stage result set nearline, as seen in the above dialog.
Image pages may be scanned into an interim type of storage, called a batch. Batched images are held in the Batch List until assembled into documents and filed into folders (indexed) at a later time.
1.
Select
New, Batch from the File menu or select the Batch icon ![]() from
the tool bar.
from
the tool bar.
2. PaperClip32 displays the Scan dialog box, prompting you, “Select scanning option.”
3. Place your page on the scanner bed, or place the page(s) in the automatic feed tray, and click on the Scan button If you prefer to review the scanned pages after they are scanned, click on the Scan and Review button instead. If your scanner is not configured, you must click on the Configure button before you start the scan. For further information, see Scanner Configuration.
4. If your scanner has an automatic document feed, PaperClip32 displays the PaperClip32 document scanner window while it scans. You may click on the Cancel button to abort the scan at any time it is in progress.
5. With a flatbed scanner, the message displays: “Please open scanner flatbed and place document face down. Press <OK> to continue.” Click on the OK button. PaperClip32 displays the PaperClip32 document scanner window while it scans. Click on the Cancel button to abort the scan in progress.
6. When prompted to “Scan another page?”, insert the next page and click on the Yes button, or click on the No button to stop scanning and store the document (or to review before storing, if that is the option you chose).
8. You can tag the batch with optional Note and ID fields. PaperClip32 does not need these fields to reference the batch; it uses date and time fields. These optional tags may be useful to you later to identify one of several batches from a log of scanned batches.
9. Enter an optional Note (up to 40 characters) to append to this batch.
10. Enter an optional eight-character ID for this batch. (Example: InsDocs)
11. Click on the OK button to store the batch.
12. If you have Routing privileges, the Route Batch dialog box opens.
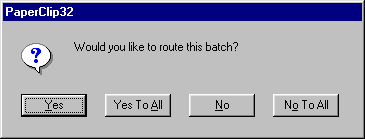
You can select from the following options
|
Yes |
This indicates that you want to Route this batch. This dialog box will appear for each subsequent batch. Once you click on Yes, the New Package dialog box will appear. |
|
Yes to All |
This indicates that you want to Route all of the batches you scan. This dialog box will not appear again until you start a new session. Once you click on Yes to All the New Package dialog box will appear. |
|
No |
This indicates that you do not want to Route this batch. This dialog box will appear for each subsequent batch you scan. |
|
No to All |
This indicates that you do not want to any batches that you scan. The dialog box will not appear again until you start a new session. |
![]() Review
and Store a Scanned Batch
Review
and Store a Scanned Batch
PaperClip32 displays the Review Pages dialog box if you selected Scan and Review:
1. Review the batch by selecting the page numbers from the Page List dropdown and examining each image (page).
2. If the scan quality is unsatisfactory, click on the Rescan button. PaperClip32 performs the scanning procedure again, replacing the entire batch of images.
3. You may manipulate the image using any of the dialog box’s image manipulation features.
|
Best Fit |
Fits the entire image within the viewer window. |
|
Fit to Width |
Sizes document to the width of the viewer window |
|
Full Size |
Restores the image to its original size in the viewer. |
|
Zoom In |
Magnifies the image; shows a smaller part of the page. |
|
Zoom Out |
Shrinks the image; shows a larger part of the page. |
|
Reverse |
Displays a negative of the document image. |
|
Enhanced Image |
Uses software to enhance scanned image, filling in partial text and lines. |
|
Zoom |
Magnifies a portion of the document. Drag the magnifier cursor to select the area to be magnified, or press the left mouse button to magnify or the right mouse button to reduce. Press the Esc key to end Zoom. |
|
Rotate 0 |
Rotates the image back to its original orientation. |
|
Rotate 90 |
Rotates the image 90 degrees clockwise from its original orientation. |
|
Rotate 180 |
Rotates the image 180 degrees clockwise from its original orientation. |
|
Rotate 270 |
Rotates the image 270 degrees clockwise from its original orientation. |
|
Up, Left, Right, Down |
Moves a different part of the image into view. |
|
Document Only |
Fills the entire screen with the viewed image. Press the Esc key to return to the dialog box. |
|
Next Page |
Advances to the next page of a multi-page document. |
|
Previous Page |
Advances to the previous page of a multi-page document. |
|
Delete Page |
Deletes the page selected in the Page List window. |
|
Rescan Page |
Rescans current page |
|
Rescan |
Rescans the document. |
4. If the scan quality is satisfactory, click on the Store button. PaperClip32 displays the Scan Batch dialog box, allowing you to tag the batch with optional Note (40-character) and ID (8-character) fields.
5. If you wish to cancel the batch, click on the Abort button.
6. If you wish to rescan the batch, click on the Rescan button.
7. Fill in the Note and Batch ID fields and click on OK. PaperClip32 stores the batch in the BatchList.
8. If you have Routing privileges, the Route Batch dialog box opens.
In order to retrieve these batched images from PaperClip32, they must be filed as documents within folders. This is accomplished by indexing the batch.
PaperClip32 allows you to import one or more individual image files as a single batch to be indexed in PaperClip32. These files must be a valid image file type supported by PaperClip32 in order to be properly imported into PaperClip32.
1. Select Import, Page(s) into Batch from the File menu. From the submenu, select Copy into New Batch to leave the files where they are or Move into New Batch to remove the files from the file system (delete them) after they are put into the PaperClip32 batch.
2. The Import File(s) dialog box appears.
3. Select the correct drive, directory and file. When the correct image file(s) appears in the File Name box, click on the OK button. The Import Batch dialog box will appear.
4. Enter an optional Note (up to 40 characters) for this batch.
5. Enter an eight-character ID for this batch.
6. Click on the OK button to store the batch.
After a batch has been scanned or imported, it may be indexed. Batch indexing requires two steps. First, the pages within the batch are assembled into one or more documents. Second, the new documents are assigned to folders.
![]() Assemble the Document for Indexing
Assemble the Document for Indexing
1.
Select Batch List from the File menu or select the Batch List icon ![]() on the
tool bar. The Batch List window appears displaying the list of batches to be
indexed.
on the
tool bar. The Batch List window appears displaying the list of batches to be
indexed.
2. Select the batch to be indexed.
3. Click Index. The Batch window will appear, displaying the first image in the selected batch. (If necessary, maximize the Batch window to view all options.)
4. The image can be manipulated using any of the image manipulation features on the tool bar or by placing your cursor on the document displayed, pressing the right mouse button and selecting an image manipulation feature.
5. Select a page number in the Batch box to inspect a particular page of the batch.
6.
If you decide that the page in the viewer belongs in the document you
are currently assembling, click on the Add button ![]() .
(If you wish to assign all pages in this batch to the document, click on the
All button
.
(If you wish to assign all pages in this batch to the document, click on the
All button ![]() .)
.)
7.
Select the Auto button ![]() to copy all
pages from the Batch list box to the Document list box until a blank page is
encountered. The blank page will then be deleted. This allows you to use blank
separator pages between documents.
to copy all
pages from the Batch list box to the Document list box until a blank page is
encountered. The blank page will then be deleted. This allows you to use blank
separator pages between documents.
A blank separator page automates batch indexing by allowing PaperClip32 to
assemble all pages belonging to a single document. When PaperClip32 reaches a
blank page, it assumes that the page following it is the beginning of a new
document.
Note: PaperClip32 determines that a page is blank by the size of the image file; hence, a page with only a bit of text may be mistaken as a separator page. It is essential that some additional markings be made on such pages so that this does not occur. It is possible to change the thresholds used for different files types.
The number of the assigned page moves to the Document list.
8. If you want to remove a page from the Document dialog box, select the page and click on the Delete Pages button. The number of the deleted page moves to the Batch list box.
9. If a page is not scanned properly, click on the Rescan Page button to rescan the page currently in view.
10. Load the appropriate document page into the scanner first.
11. To delete a page from the batch list, select that page and click on the Delete Pages button.
To scan additional pages into this batch, select Scan New Pages from the Batch menu. PaperClip32 will go through the scanning procedure, adding the new pages at the end of the batch.
To import additional pages into this batch, Select Import, Page(s) into Batch from the File menu. From the submenu, select Copy into Current Batch to leave the files where they are or Move into Current Batch to remove the files from the file system (delete them) after they are put into the PaperClip32 batch.
The Import File(s) dialog box appears.
Select the correct drive, directory and file. When the correct image file(s) appears in the File Name box, click on the OK button. The Import Batch dialog box will appear.
If you wish, you can add on-image annotations to any of the pages in the scanned batch. When these pages are indexed to a document, the on-image annotations will be carried forward to the indexed document. See the description of annotating documents for details on how to annotate a batch page.
![]() Index the Document after Assembly
Index the Document after Assembly
1.
Click on Create Document when you have selected all the pages that
belong in the document you wish to create.
When you click on Create Document and you have not already selected a folder,
either by clipping to an application or by pressing the Select Folder button
from the Batch window, the Select Folder for Batch Indexing Documents dialog is
displayed. Select the destination drawer. Select the destination folder by
double-clicking on it or by highlighting it and clicking Select. To create a
new folder for the document, click on the Add button, enter the necessary data,
click on OK, and select the new folder when it appears on the list.
Note: When the Batch window is open and you hot key from a Clipped application, the clipped folder becomes the selected one for indexing. The folder does not open on your desktop.
2. If you selected Create Document, the Folder Selection Options dialog box appears. This dialog box allows you to control the folder to be used and the appearance of the Folder Selection Options dialog box. The following chart describes the Folder Selection Options dialog box button selections, and the consequences of selecting each button for the indicated dialog box. A check indicates that the dialog box will be displayed
|
Yes |
This indicates that you want to use the currently selected folder to store this document. This dialog box will appear for each subsequent document, unless the batch is closed and reopened or another option is selected. Once you click on Yes, the New Document dialog box will appear. |
|
Yes to All |
This indicates that you want to use the currently selected folder to store all the documents in the batch. This dialog box will not appear again, unless the batch is closed and reopened. Once you click on Yes to All the New Document dialog box will appear. |
|
No |
This indicates that you want to select a new folder in which to store this document. This dialog box will appear for each subsequent batch unless the batch is closed and reopened or another option is selected. Once you click on No, the Folder Selection dialog box will appear followed by the New Document dialog box. |
|
No to All |
This indicates that you want to select the folder for each document. The dialog box will not appear again, unless the batch is closed and reopened. The Folder Selection dialog box will always appear before the New Document dialog box. |
3. Once a folder has been selected, the New Document dialog box will appear.
4.
Enter an Owner, Type, Description, and any necessary document data fields.
The New Document dialog box will remember the last document type used, and will
position the Type drop-down list selection on that document type when the list
will appear. For example, if you are indexing a group of invoices and you
select Invoice as the document type, the next time the New Document dialog box
will appear, the document type will default to Invoice. This will only happen
for the current session of PaperClip32.
5. Click on OK. PaperClip32 creates a document from the selected pages and places it in the folder.
6. Once a document has been indexed, the Page Deletion Options dialog box appears. This dialog box allows you to control two things: deletion of indexed pages and the appearance of the Page Deletion Options dialog box.
7. Select a page deletion option:
|
Yes |
This indicates that you want to delete the pages after this document is indexed. This dialog box will appear for each subsequent document, unless the batch is closed and reopened or another option is selected. |
|
Yes to All |
This indicates that you want to delete the pages each time a document is indexed. This dialog box will not appear again, unless the batch is closed and reopened |
|
No |
This indicates that you do not want to delete the pages after this document is indexed. This dialog box will appear for each subsequent batch unless the batch is closed and reopened or another option is selected. |
|
No to All |
This indicates that you do not want to delete the pages after any documents are indexed. The dialog box will not appear again, unless the batch is closed and reopened. |
8. PaperClip32 prompts you to delete the selected pages from the batch.
9. If you are finished with the indexed images, click on the Yes button to delete them.
10. If
you would like to assign these images to additional documents and/or folders,
click on the No button. The document will still be created, but copies of the
images will remain in the batch for further indexing.
The Assemble Document window reappears. Repeat this procedure until there are
no more pages in the batch.
11. When there are no more pages to be indexed, click on the X button in the top right of the window to close the batch indexing window.
Querying For Documents and Folders
Queries are the means by which you find and retrieve the information previously stored inside PaperClip32. Queries offer you powerful and flexible search capabilities that you can customize and save as often and however you choose.
When you create new Queries or work with the Queries that already exist inside of PaperClip32, you might typically perform some, one, or all, of the following actions:
· View or Refresh the Query List
· Create and Define a New Query
· Modify a Query
· Copy a Query
· Delete a Query
· Execute a Query
· Send a Query
The Query List window offers you a list view of all of the previously saved PaperClip32 Queries. The Queries that you see in the window are the ones to which you have access. These are queries that are public, are owned by you, or are owned by a group that you are a member of. Other Queries, which may exist in the system and which you do not have permission to use, do not appear in the Query List window.
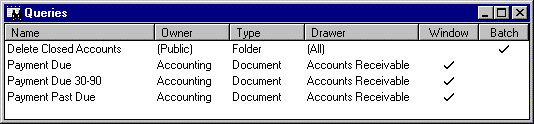
The Query List window displays the following information about each of the Queries which you can access:
|
This Column… |
Shows… |
|
Name |
The user-defined name of the Query. The query name uniquely identifies the individual query from all others on the system. |
|
Owner |
The short user name or the group name for all Queries that have an owner. If a Query has no owner, the word Public appears in this column. |
|
Type |
Either Folder or Document depending on the type of object against which the Query is run. |
|
Drawer |
The Drawer against which the Query is to be run. (All) appears if all drawers are being searched. |
|
Window |
A single check mark appears here if the Query results destination is the computer screen. |
|
Batch |
A single check mark appears here if the Query results destination is a preset Batch process. |
|
Date and Time Created |
The creation date and time of the Query. |
When the Query List window is active, the Query menu appears between the File and Setup items on the window menu bar. This pull down menu of options lets you access the same processing options that you see on the pop-up menu or toolbar icons. You use these options to work with the Queries you see in the Query List window.
To use the main menu and toolbar from the Query List window, use the mouse cursor and keyboard to choose items as you would in any other Windows-standard program.
To use the pop-up menu, simply highlight a Query in the window, place the mouse cursor somewhere over the window and click once with the right mouse button. A pop-up menu appears showing you the available processing options. These options include:
|
This option… |
Lets you… |
|
New… |
Create a new Query. When you select this option, the Query Definition dialog box appears so you can define your new Query. |
|
Copy… |
Copy the currently selected Query to a new Query name. |
|
Delete |
Delete the currently selected Query. The system deletes the Query. |
|
Execute |
Run the currently selected Query. |
|
Send to… |
Send the query to a PaperClip32 user via email, or save as a file. This is a pointer to the query, not the query results, nor query results list. |
|
View Properties… |
View the selected Query’s information. When you select this option, the Query Definition dialog box appears in view only mode showing you the search criteria for the selected Query. You can not edit the search criteria using the view option. |
|
Properties… |
Edit the currently selected Query. When you select this option, the Query Definition dialog box appears showing you the search criteria already specified for the selected Query. |
![]() Sort Queries
in the Query List Window
Sort Queries
in the Query List Window
1. Use the mouse cursor to click on the label of the particular column that you want to use to sort the displayed list. The order of the Queries in the window updates to reflect your sorting preference.
2. To reverse the sorted order shown in the window, click on the same column a second time and the display updates once again to reflect the new sort order (i.e., ascending-to-descending or descending-to-ascending) relative to the previous sort context.
Because Queries may be added and removed by other PaperClip32 users, the list of Queries you see may change. This means you may periodically want to refresh the list that you are viewing.
1. With the Query List window selected, choose Refresh from the Window pull down menu or press the [F5] key. The window updates to show a fresh view of all of the Queries you can access.
A Query is the method you use to look for the information previously stored inside PaperClip32. You have the ability to define and save a Query for later use, or you can simply run a Query once to retrieve any matching data and then simply discard your original search criteria.
You specify the search criteria for all your Queries in the New Query dialog box using its tab control views.
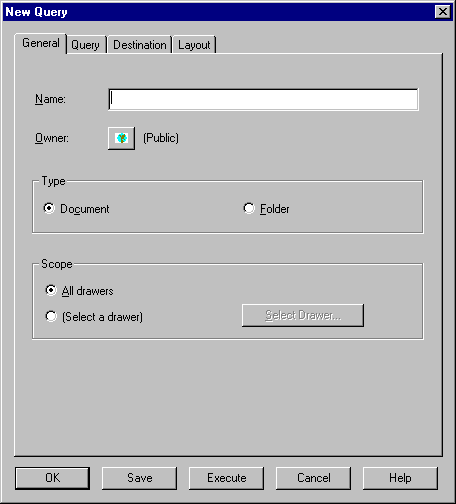
|
This tab… |
Lets you… |
|
General |
Specify the Name, Owner, Type, and Scope for the Query. |
|
Query |
Choose the type of objects to query, to build expressions, and to combine those expressions into more complex Query statements. |
|
Destination |
Specify where you want to send the results of the executed Query (e.g., Window or Batch), and, if Batch, the batch operation specifics. |
|
Layout |
Select the fields that appear in the Query Results window and the order in which they appear. Note that the Layout tab is disabled when you specify Batch Operation as the destination. |
You use the various function buttons at the bottom of the Query Definition dialog box to indicate how to process each Query.
|
This button… |
Does This… |
|
OK |
Saves the data entered on each of the tabs and closes the Query Definition dialog box. |
|
Save |
Saves the data entered on each of the tabs and leaves the Query Definition dialog box open. |
|
Execute |
Closes the dialog box and executes the Query. Any changes you make to the Query are not saved. This is how you create temporary Queries. |
|
Cancel |
Closes the dialog box without saving any Query search criteria. |
|
Help |
Displays the context sensitive, on-line help topics for the dialog box. |
Note: PaperClip32 supports two
forms of Queries: Temporary Queries and Saved Queries. The difference between a
Temporary and a Saved Query is that a Temporary Query is only used once and
then its search criteria are discarded. The next time you want to run such a
Query, you must first redefine it.
You can make temporary queries permanent by opening up the properties dialog
from the query result set and saving the query definition.
All Queries are created using the Query Definition dialog box. This dialog box contains multiple control tabs, which you use to define the Query search criteria, as well as, function buttons for executing and/or saving your Queries.
Use the General tab to specify the name, type, and scope of the Query. The Query tab is where you build the expressions used in your Queries, and combine those expressions into more complex statements. The Destination tab is used to specify a destination for the Query results, as well as to define which batch operations, if any, to perform on those results. Finally, you use the Layout tab to layout the physical order of the fields within your Queries, to define the sort position of each field (i.e., primary sort field, secondary sort field, etc.), as well as the order in which to sort the data within fields (e.g., ascending, descending, or none) that appear in the columns in the Query Results window.
The form of Query you create depends upon whether you save the Query before you exit the Query Definition dialog box or whether you simply execute the Query and discard it. The buttons at the bottom of the Query Definition dialog box control which form of Query you create and use.
1. Start a new Query by doing one of the following:
¨ Press
the New Query toolbar button ![]() .
.
¨ From the File pull down menu, choose New Query…
¨ With the Query List window open, choose New… from the Query pull down menu or from the right mouse pop-up menu. The Query Definition dialog box appears.
2. On the General tab, select the Name edit box and type a unique, case sensitive name for the Query. This can be a long descriptive name up to 100 characters in length. The name you type appears in the edit box.
3. The current owner of the Query displays on the button to the right of the Owner: label. The initial ownership is Public. To optionally change the Query owner, press the button and select a new owner from the Owner Selection dialog box. The name you select appears highlighted.
4. Choose OK to return to the Query Definition dialog box with the new owner name shown or choose Cancel to return to the dialog box without changing the current Query owner name.
5. In the Type group box, select either Document or Folder. The type you specify determines which data elements are available for selection in the Query tab view when you build the query, which fields are available for display in the Layout, which Batch operations are available to the user and the information that will result from the query execution. Choosing Document will retrieve all documents that match the specified search criterion, while choosing Folder will retrieve all folders that match the specified search criterion.
6. In the Scope group box, specify the scope of the Query you are defining. The Scope lets you search across all the drawers on the system or limits the search to a specific drawer.
Note: The scope determines which data elements are available for selection in the Query tab view when you build the query, as well as which fields are available for display in the Layout. The text label for the lower radio button varies depending upon your selection.
|
Choose… |
To… |
|
All drawers |
Specify the scope of the search as all drawers in the system. This is the default selection for the group box. If this is your choice, the text for the second radio button in the group remains unchanged and the Select Drawer… button is unavailable for selection. |
|
(Select a drawer) |
Automatically display the Select Drawer dialog box so you can make a selection. |
|
Any drawer name |
This appears after you have selected a specific drawer. The Select Drawer… button is enabled to allow you to change the selection to a different drawer. |
7. Select the Query tab to build simple expressions and combine them into more complex statements. The Query tab controls appear.
8. In the Expression Builder group box tree control, select the Drawer, Folder, or Document field for which you want to create an expression and click the Build... button.
Note: The same thing can be accomplished via a double-click on the item or dragging the item to the Statement list box.
Note: All document fields are available only for document Queries. Folder index and data fields are available only for single drawer queries.
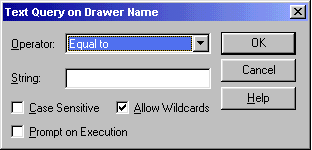
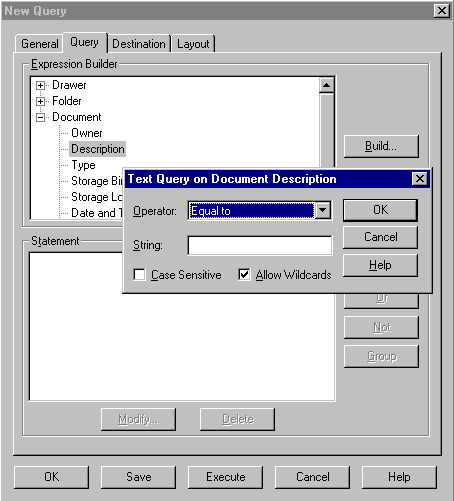
Depending on the field you select, a different Query Expression dialog box appears. That is, generic dialog boxes appear when you select the text, numeric, currency, Boolean and date fields; while more specific dialog boxes appear when you select the bin type, document type, or owner fields.
|
For a… |
You can select one of these fields… |
|
Drawer |
Name, Owner, or Description. |
|
Folder |
Owner, Description, Date Created, Folder Index Fields, or Folder Data Fields. |
|
|
|
|
Document |
Owner, Description, Document Type, Storage Bin Name, Storage Location (on-line / near-line), Date Created, Time Created, Number of Pages, Archived, or Document Data Fields. |
9. Specify the Query Expression information for the selected field type. For each field type selected (Text Query, Numeric Query, Date Query) refer to the appropriate dialog box information listed here.
|
For a… |
You need to… |
|
Text Query |
Specify the Text Query information for the expression. When you finish, choose OK to save the expression information and return to the Query tab with the expression shown or choose Cancel to return to the Query tab without saving the expression information. |
|
In this control… |
Specify… |
|
Operator: |
An operator for the text search. Select from any of the following standard operators: Equal to, Not equal to, Contains, Greater than, Greater than or equal to, Less than, Less than or equal to, Blank, and Not Blank. The default for this control is Equal to. |
|
String: |
The text string to check against. Enter the string in the edit box in mixed, upper, or lower case. Wildcards are supported. The string is scrollable but is limited to the maximum number of characters allowed for the selected field. |
|
Case Sensitive |
That the text search is either case sensitive, if checked, or case insensitive, if the box is unchecked. The default for this box is unchecked. |
|
Allow Wildcards |
Whether the text string includes wildcard characters or whether to treat those reserved characters as regular text if the checkbox is unchecked. This box is selected by default. The available wildcards are: |
|
* |
One or more alphanumeric characters, including punctuation and spaces. |
|
? |
In any position, matches any single character, including punctuation and spaces. |
|
% |
Used when a literal mask is required for reserved masking characters and the Allow Wildcards checkbox is selected. |
|
Prompt on Execution |
That you want to be prompted for the text string when the query is executed. |
|
For a… |
You need to… |
|
Numeric Query |
Specify the Numeric Query information for the expression. When you finish, choose OK to save the expression information and return to the Query tab with the expression shown or choose Cancel to return to the Query without saving the expression information. |
|
Choose… |
And Specify… |
|
Single value |
A search for a single numeric value. Selecting the Single Value button disables other controls in the dialog box. Use the edit box at the far right to enter the numeric value for which to search. You may only enter numeric values up to the maximum number of characters allowed for the selected database field. |
|
|
Use the list box to specify an operator. You may select from any of the standard operators: Equal to, Not equal to, Greater than, Greater than or equal to, Less than, and Less than or equal to, Blank and Not Blank. The default for this control is Equal to. |
|
Between |
A number range to check against in the edit boxes at the right. The numbers you enter are also included in the search. You may only enter a numeric value that is less than or equal to the maximum number of characters allowed for the selected database field. Selecting the Between button disables other controls in the dialog box. |
|
Prompt on Execution |
That you want to be prompted for the text string when the query is executed. |
|
For a… |
You need to… |
|
Boolean Query |
Specify the Boolean operands for the expression. When you finish, choose OK to save the expression information and return to the Query tab with the expression shown or choose Cancel to return to the Query without saving the expression information. |
|
Choose… |
To… |
|
Is Checked |
Item must be checked to achieve a match |
|
Is Unchecked |
Item must not be checked to achieve a match. |
For a… |
You need to… |
|
Currency Query |
Specify the Currency information for the expression. When you finish, choose OK to save the expression information and return to the Query tab with the expression shown or choose Cancel to return to the Query without saving the expression information. |
|
Choose… |
And Specify… |
|
Equal to |
a matching currency value |
|
Not equal to |
a currency value, such that any value NOT IDENTICAL to this is a match |
|
Greater than |
a currency value that is a low end limit, such that ALL AMOUNTS greater than this value are matches |
|
Greater than or equal to |
a currency value that is both a match and a low end limit, such that ALL AMOUNTS identical to or greater than this value are matches |
|
Less than |
a currency value that is a top limit, such that ALL AMOUNTS less than this value are matches |
|
Less than or equal to |
a currency value that is both a match and a top limit, such that ALL AMOUNTS identical to or less than this value are matches |
|
Blank |
that a blank field- no currency value defined- is a match |
|
Not blank |
that any value in the field other than a blank field- no currency value defined- is a match |
|
For a… |
You need to… |
|
Date Query |
Specify the Numeric Date Query information for the expression. When you finish, choose OK to save the expression information and return to the Query tab with the expression shown or choose Cancel to return to the Query tab without saving the expression information. |
|
In this control... |
Specify… |
|
Operator: box |
An operator for the date search. Select from any of the following standard operators: Equal to, Not equal to, After, On or after, Before, On or before, Between, Between Days Old, Less than Days Old, More than Days Old, Blank and Not Blank. The default for this control is Equal to. The system enables or disables the various controls in the dialog box depending on the operator you specify. |
|
|
When you select Equal to, After, or Before in the Operator: list box, the top control in the Date group box is enabled. Specify the Month, Day, and Year that applies to the operator. |
|
|
When you select Between in the Operator: list box, both the controls in the Date group box are enabled. Specify the Month, Day, and Year range that applies to the operator. |
|
|
When you select Less than Days Old or More than Days Old in the Operator: list box, the top control in the Days Old group box is enabled. Specify the number of days old that applies to the operator. |
|
|
When you select Between Days Old in the Operator: list box, both the controls in the Days Old group box are enabled. Specify the number of days old that applies to the operator. |
|
For a… |
You need to… |
|
Storage Bin Name Query |
Specify the Storage Bin Name Query information for the expression.. When you finish, choose OK to save the expression information and return to the Query tab with the expression shown or choose Cancel to return to the Query tab without saving the expression information. |
|
In this control… |
Specify… |
|
Bin Name Equal to/Not Equal to |
define the expression criteria. Select from Equal to or Not Equal to |
|
Storage Bin Name |
select from any of the user-defined bins on the system. The information in the right list box includes an icon indicating the near-line or on-line status of the specified bin |
|
For a… |
You need to… |
|
Storage Location Query |
Specify the Storage Location Query information for the expression.. When you finish, choose OK to save the expression information and return to the Query tab with the expression shown or choose Cancel to return to the Query tab without saving the expression information. |
|
In this control… |
Specify… |
|
Bin Type Equal to/Not Equal to |
define the expression criteria. Select from Equal to or Not Equal to |
|
Storage Location |
select from either Online or Nearline |
|
For a… |
You need to… |
|
|
Document Type Query |
Specify the Document Type Query information for the expression. When you finish, choose OK to save the expression information and return to the Query tab with the expression shown or choose Cancel to return to the Query without saving the expression information. |
|
|
In this control… |
Specify… |
|
Document Type Equal to/Not Equal to |
define the expression criteria. Select from Equal to or Not Equal to |
|
Document Type |
Identify the matching document type for the expression |
|
For a… |
You need to… |
||
|
Owner Query |
Specify the Owner Query information for the expression. When you finish, choose OK to save the expression information and return to the Query tab with the expression shown or choose Cancel to return to the Query without saving the expression information. |
||
|
In this control… |
Specify… |
|
|
Owner Equal to/Not Equal to |
define the expression criteria. Select from Equal to or Not Equal to |
|
|
Owner icon |
Specify the owner by clicking the icon and selecting from the displayed list. Note, that the special owner Public is also available for selection. |
|
|
For an… |
You need to… |
||
|
Archived Query |
Specify the Archived operands for the expression. When you finish, choose OK to save the expression information and return to the Query tab with the expression shown or choose Cancel to return to the Query without saving the expression information. |
||
|
Choose… |
To… |
|
|
Is Checked |
Search for Archived documents |
|
|
Is Not Checked |
Search for Un-Archived documents |
|
10. Select the Destination tab to define a destination for the results of the Query you are building. The Destination tab controls appear.
11. In the Output Choices group box, specify the output choice.
Note: The Window and Batch operations are mutually exclusive radio buttons. Only one can be selected at a time.
|
Check this button… |
To… |
|
Window |
Indicate that the results of this query are to be displayed on screen in the Query Results List. |
|
Batch Operations |
Cause the operation specified in the Batch Operations group box to be executed on the query results. Selecting this radio button enables the Batch Operations group box and those controls that apply to the current Query, otherwise the entire Batch Operations group box and its controls will be disabled. |
12. Under Batch Operations select a single or multiple operations you want to perform on the query results.
|
Select… |
To… |
|
Delete |
Delete the results of the Query as a batch process. There is no setup for this batch operation. The results are simply deleted. |
|
Export |
Export a copy of the document(s) to the specified file system location. Can also export documents assembled into an EDX package, with addressee determined by EDX Job. |
|
|
Print the specified number of copies, with or without annotations, of each document. Use the Print Setup dialog box Number of Copies control to set the number of copies of each document to print. Use the Print Annotations control to indicate whether or not to print the document annotations. |
|
Route |
Route the Query Results as specified in the Route Setup dialog box for this Batch operation. |
|
Send |
Send the Query Results to individuals via email. Can Send copies of documents, or shortcuts to folders and documents. |
|
Stage near-line |
Stage the results of the Query as specified. The results of the Query are staged to the appropriate near-line bin when this item is selected. |
|
Stage on-line |
Stage the results of the Query as specified. The results of the Query are staged to the appropriate on-line bin when this item is selected. |
|
Update Fields |
The Update Fields option is active if the query will be run against a specific drawer and the drawer has at least one document data field defined (you can add one to any drawer). The document data field will be updated with the value entered. |
|
Internet Express |
Assembles the query results into an Internet Express compatible EDX package, addressed to selected users from the subscriber list. Applicable to IE subscribers only. |
|
Archive |
The results of the document query are archived to the appropriate NOSS32 bin. |
|
Un-Archive |
The results of the document query are set to online. |
Note: If this is a Folder Query, then the Delete, Route and Send buttons are the only controls available.
Note: It is possible to perform multiple batch operations on a query result set. Click an additional operation type to add to the existing list. Use the Move Up and Move Down buttons to change the sequence order of operations. Use the Remove button to remove an operation.
Note: The Export, Route, Send, Update Fields, and Internet Express operations have settings that are required during processing. Choose the Set Operations Defaults… button to enter in the default parameters for each query type. Check the Use default settings check box to use these defaults when running the query.
13. If this is a query whose results are to be sent to a window, select the Layout tab to specify which fields PaperClip32 should display in the Query Results window when it appears. The Layout tab controls appear.
14. In the Available fields: group tree control, select the Drawer, Folder, or Document field to include in the Query Results window and choose Add. The field information appears as the last field in the Layout fields: group box at the bottom of the tab. You may optionally choose Add All… to quickly add all the fields at one time. To remove fields from the list, highlight them and choose Remove and the system removes them from the list.
|
For a… |
You can select one of these fields… |
|
Drawer |
Name, Owner, or Description. |
|
Folder |
Owner, Description, Date Created, Folder Index Fields, or Folder Data Fields. |
|
Document |
Owner, Description, Document Type, Storage Bin Name, Storage Location (on-line / near-line), Date Created, Time Created, Number of Pages, or Document Data Fields. |
15. You can optionally change the position of a field in the list, the sort position of a field (i.e., which column to use as the primary sort, secondary sort, and so on), as well as the ascending or descending sort order of any field shown in the Layout fields: box.
|
To change the field… |
Select… |
|
Position in the List (Layout Position) |
The field and use the mouse cursor to drag and drop the field in a different location in the list. The list automatically updates to show your changes when you drop the field in a new location. |
|
Sort Order |
The field whose sort order you want to change and click the Sort Order… button. The Sort Order dialog box for the field displays. Change the selection in the Order: list box to indicate the new sort order of the field. You can choose from <None>, Ascending, or Descending. Use the <<Previous and Next>> buttons to quickly navigate between the other fields in the list to change their sort order as well. Choose OK to accept the new sort order or choose Cancel to return to the Layout tab without making any changes. |
|
Sort Position |
The field whose sort position you want to change and click the Sort Order… button. The Sort Order dialog box for the field displays. Change the number in the Position: box to indicate the desired sort position of the field. Use the <<Previous and Next>> buttons to quickly navigate between the other fields in the list to change their sort position. Choose OK to accept the new sort position or choose Cancel to return to the Layout tab without making changes. |
16. When you are done creating a Query, you have the option to save the Query, to execute it without saving it or to cancel Query definition. If you choose to execute the Query without saving it, you will have to re-specify the search criteria the next time you want to run the same Query. How you process a Query depends on the button you choose at the bottom of the Query Definition dialog box.
|
Choose… |
To… |
|
OK |
Save the search criteria specified in the Query Definition dialog box tab controls. The system saves your search criteria under the name you specified in the General tab and closes the dialog box. |
|
Save |
Save the search criteria specified in the Query Definition dialog box tab controls. The system saves your search criteria under the name you specified in the General tab and Query Definition dialog box remains open. |
|
Execute |
Close the Query Definition dialog box and execute the query as specified. Any changes you made are discarded after the search executes. If you choose to execute the Query without saving it, you must re-specify the query search criteria the next time you want to run it. |
|
Cancel |
Close the Query Definition dialog box without executing the Query and discard any changes already made. |
|
|
|
The only difference between modifying a Query and creating an entirely new one is that, when you select an existing Query to modify, the fields in the various tabs in the Query Definition dialog box already contain search criteria.
1. From the Query List window, highlight the Query you want to modify and choose Modify… from the mouse button pop-up menu. The Query Definition dialog box appears with the General tab view shown with the information about the selected Query shown.
2. Select and change the Query Definition search criteria you want, and save or execute it.
3. For more detailed information about each of the individual fields in the Query Definition dialog box, refer to Creating a New Query.
4. How you decide to process the modified Query depends on the button you choose at the bottom of the Query Definition dialog box.
|
Choose… |
To… |
|
OK |
Save the search criteria specified in the Query Definition dialog box. The system saves your search criteria under the name you specified in the General tab and closes the dialog box. |
|
Save |
Save the search criteria specified in the Query Definition dialog box. The system saves your search criteria under the name specified in the General tab and the dialog box remains open. |
|
Execute |
Close the Query Definition dialog box and execute the query as specified. Any changes you made are discarded after the search executes. If you choose to execute the Query without saving it, you must re-specify the query search criteria the next time you want to run it. |
|
Cancel |
Close the Query Definition dialog box without executing the Query and discard any changes already made. |
When you copy a Query that already exists on the system, the copied Query’s information automatically appears in the Query Definition dialog box when it first appears. All you need to do is add a new name for the Query and to save it, if you intend to use it in the future. In this manner, you can quickly and easily create new Queries from those that already exist.
1. From the Query List window, highlight the Query you want to copy and choose Copy… from the mouse button pop-up menu or Query pull down menu. The Query Definition dialog box appears with the General tab view shown with the information about the selected Query displayed.
2. In the Name: box, type a new name for the Query and save or execute it.
3. How you decide to process the newly copied Query depends on the button you choose at the bottom of the Query Definition dialog box.
|
Choose… |
To… |
|
OK |
Save the search criteria specified in the Query Definition dialog box name. The system saves your search criteria under the new name closes the dialog box. |
|
Save |
Save the search criteria specified in the Query Definition dialog box under the new name. The system saves your search criteria and Query Definition dialog box remains open. |
|
Execute |
Close the Query Definition dialog box and execute the query as specified. Any changes you made are discarded after the search executes. If you choose to execute the Query without saving it, you must re-specify the query search criteria the next time you want to run it. |
|
Cancel |
Close the Query Definition dialog box without executing the Query and discard any changes already made. |
When you delete a Query, the system removes all its saved search criteria from the system. This lets you quickly and easily remove old queries from the Query list window.
1. In the Query List window highlight the Query or Queries you want to delete and choose Delete from the mouse button pop-up menu. A message appears asking you to confirm the deletion.
2. Choose Yes or Yes to All to delete the selected Query or Queries and return to the Query List window.
3. Choose No or No to All to cancel the deletion and return to the Query List window without deleting any Queries.
You can execute the Queries that you see in the Query List window. When you do, the selected Queries are executed in the order selected. Before each Query is run, the system first validates the Query to ensure it is correct and then checks that you have the proper user privileges to run it.
1. Choose Query List from the File pull down menu. The Query List window appears showing you any existing queries to which you may have access.
2. If you want to execute an existing Query, select it in the Query List window and choose Execute from the Query pull down menu or, optionally, use the right mouse button to select Execute from the pop-up menu. The system executes the Query using the saved search criteria and displays the results in the specified destination location.
![]() Run the
Query in the Background
Run the
Query in the Background
Note: Only queries that execute batch operations run in the background.
To run your Queries in the background,
1. Select the Query.
2. Execute it.
3. Then move on to the next processing task. PaperClip32 runs the Query as a background process and executes the batch operation as specified.
Note: You can view, stop or abort any of the query background operations from the Background Processes dialog box. This dialog can be invoked by double-clicking on the image that appears in the Windows System Tray (at the end of the task bar).
![]() Run a Query
from a Command Line
Run a Query
from a Command Line
This function allows a saved query to be run from a scheduler or a script. The query will run as a background process. There is only one query permitted per command line. If PaperClip32 is running, the query will run in that instance. If PaperClip is not running, then the command line will start PaperClip32, but the user will have to use the /u and /p command line switches to get past the login screen
Example: c:\pclip32\pclipwin.exe /q”Query Name”
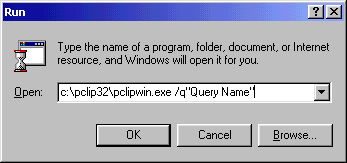
When the Destination is defined to be Window, the results of the Queries you run appear in the Query Results window. The Query Results window contains a list of either documents or folders, depending upon the type of query executed.


The information in this window is based on the search criteria previously defined using the Query Definition dialog box. Specifically, the information in the Layout tab in that dialog box determines the fields that appear as columns in the Query Results window and the information in the Query tab determines which items are listed.
When you display the properties of a Query Results window, the system shows you the definition of the Query that generated those results. You can use the View Properties command to see the Query properties in read-only mode; you can use the Properties command to see the Query properties in edit mode, from which you can then review the properties and further refine your search criteria.
1. With the Query Results window selected on the desktop, choose Properties from the Query pull down menu. The system displays the Query Properties dialog box for the selected Query.
2. Select the dialog box tabs and controls and make any changes needed to the properties and specify how you want to continue processing.
|
Choose… |
To… |
|
OK |
Save the new search criteria, close the Query Properties dialog box, and execute the Query. If the current Query is a permanent form of Query, the OK button is the default selection. If the current Query is a temporary form of Query, the Execute button is the default selection. (Note: If the previous Query was a temporary one, the Save As… dialog box appears and you have the option to save the Query under a new name.) |
|
Execute |
Store any changes you made to the currently active Query, close the Query Results Properties dialog box, and execute the Query. As with other temporary Queries, any changes you made are discarded after the Query executes. |
|
|
Note: If you choose to execute the Query without first saving it, you must re-specify the search criteria the next time you want to run it. |
|
Cancel |
Close the Query Properties dialog box without executing the Query and discard any changes you made to the properties. |
|
Apply |
Save the new search criteria, execute the Query, and leave the Query Results Properties dialog box open so you can further refine your search if necessary.
|
|
· Show by Viewing |
· Show by Opening |
· Go to Folder |
|
· Copy… |
· Move… |
· Create Shortcut… |
|
· Delete |
· Export… |
· Route |
|
· Stage… |
· Archive… |
· Send |
|
· Show Copies |
· Add New Pages |
· Page List… |
|
· History |
· View Properties |
· Properties |
For more information on these operations, see the chapter Working With PaperClip32 Documents.
![]() Print Query
Search Result List
Print Query
Search Result List
1. To print the contents of the Query Results window, select Print Search Results List in the Document or Folder drop-down menu.
Note: When your print window opens, you may want to change the orientation of the paper to allow the text to fit across a single sheet of paper.
For Queries of type folder, there are a number of operations that may be performed on the folders in the Query Results. The rest of this section describes those operations.
1. Highlight the Query Result window folders you want to open and do one of the following:
¨ Choose Open from the Folder drop-down menu.
¨ With the mouse cursor directly over the window, click once with the right mouse button to display the pop-up menu. Choose Open from the menu.
¨ Press the Enter key.
¨ Double-click on the folders one at a time.
2. A Folder window will open up for each selected folder. All of the documents that they contain and that you have access rights to are displayed.
1. Highlight the Query Result window folders you want to delete and do one of the following:
¨ Choose Delete from the Folder drop-down menu.
¨ With the mouse cursor directly over the window, click once with the right mouse button to display the pop-up menu. Choose Delete from the menu.
¨ Press the Delete key.
2. A confirmation message appears for each folder selected.
3. Specify a processing option.
|
Choose… |
To… |
|
Yes |
Delete the folder and all the documents stored within it. If any of these documents are the last copy of the document on the system, the documents will be permanently removed from the PaperClip32 system. |
|
No |
Skip the selected folder and continue processing the next selected folder. |
1. Highlight the Query Result window folders you want to route and do one of the following:
¨ Choose Route from the Folder drop-down menu.
¨ With the mouse cursor directly over the window, click once with the right mouse button to display the pop-up menu. Choose Route from the menu.
2. A new package window appears with all selected folders as attachments to the package (up to the limit of 100 folders per package).
3. Modify, add to and send this package as defined in the Package section of this manual.
![]() Send Shortcut to Folder Query
Results
Send Shortcut to Folder Query
Results
Highlight the Query Result window folders you want to Send a shortcut to.
1. Choose Send Shortcut from the Folder menu.
2. When the New email message dialog opens, the shortcut will be an attachment to the new message. Send the email to another PaperClip32 user.
Any combination of PaperClip32 documents, folders, pages, and batches can be put together in a package and sent to a variety of recipients. A routed package notice will appear in the InBox of each recipient of the package.
Although the recipient accesses the package attachments through their InBox, what is actually in the InBox is only a package notice and not a copy of the attachments to the package themselves. As with copies of documents that may appear in many folders, package records are actually pointers to the package attachments that are stored elsewhere on the network.
If a package is addressed to a task group, PaperClip32 places identical packages in each group member’s InBox. Any changes, annotations, deletions, etc. made to the package by one user will be seen by the next user who opens the package.
If a package is addressed to a user, the package record is a true private copy. This means that changes made to one recipient’s package will not affect the copies of that notice sent to anyone else.
Senders may only route attachments to which they have access, and for which they have routing privileges. On the receiving end, the level of access rights to routed attachments is dictated by the privileges in the recipient’s user profile. When a package containing private attachments (attachments with an owner defined) is routed to anyone other than its owner, those attachments may only be viewed or routed. The routing commands available at any given time depend on the attachments currently in view:
· When viewing a folder window (or at the Folder Search Results window), the Route command is available from the Folder menu. This will route the entire folder.
· When viewing a document (or at the Document Search Results window), the Route command is available from the Document menu. This will insert the selected document or group of documents into the package.
· When viewing a document, the Route command is available from the Page menu, which will enclose only the current page in the package.
· When viewing the Batch Scan Log, clicking Route places an entire batch in the package.
· All route commands activate the Package window. This is where addressing information is entered. To route additional folders, a new package must be created.
Packages can be routed in a number of ways. You can route to:
· User
· Task Group
· Users/Task Group on a Distribution List
· Users/Task Group on a Route Slip
Note: The system manager, or a user with supervisory privileges defines all Distribution lists, route slips, and task groups.
A package routed to a user or users is sent to those individuals. In order for individual users to access the PaperClip32 system, they must first be assigned a user account. The user account record contains the user’s name, password, a list of user privileges within PaperClip32, and, optionally, Production Mode settings for individual users. Users, either supervisors or not, may also be assigned global access rights which affords them access to all drawers, folders, and documents, regardless of the ownership of those components.
A thorough understanding of security issues and the accessibility to confidential documents is necessary when assigning supervisory privileges and global access rights within PaperClip32. The combination of your user privileges and task group membership determines how you may use the features and functions within PaperClip32. For this reason, you may wish to view user account details.
Task groups help manage the flow of work within PaperClip32. When an object is routed to a task group, members of that group have an opportunity to act on that object as a group, with the actions of one member of the group on the object affecting the other members of the group. Thus, if a package is deleted or routed by one member of the group, it is no longer available to the other members. This is because only a package notice, and not the actual package, is placed in the InBox of each member of a task group to which a package has been routed. To prevent some group members from acting inappropriately on the object, individual privileges may be granted to users for each task group to which they belong. When these group privileges are enforced, members of task groups can only act on objects owned by the task group in accordance with those privileges they have as members of the group, regardless of their privileges as individual PaperClip32 users.
Task groups can be organized around a specific department or work group (e.g., accounting). Because all members of a task group have common access to items routed to the group, task groups are an efficient way to make items available to more than one user. However, because any changes made to the package by one member of the group also affects other members, simultaneous multi-user access to package items is not allowed. For this reason, you may wish to view Task Group information.
Note: Task groups may be added to distribution lists and route slips, in the same way that individual users are added to task groups.
A package routed to a distribution list is sent to each member of the list. A package notice will appear in the InBox of each user or task group that is on the distribution list. All of these users are free to access the routed package according to their individually set privileges regardless of the task group privileges in force. Such a package may then be acted on without affect to other members. Each person on the distribution list can view, print, or further process the package.
Distribution lists provide a means for routing any PaperClip32 object to multiple user InBoxes. Unlike task groups, there are no special group privileges available with distribution lists.
From time to time, you might wish to view Distribution List information.
A package routed via a route slip sends a package to each addressee on the list in the sequential order given. This means that the package is sent to the first addressee then, via Continue, to the second addressee, and so on until all members on the route slip receive the package.
A route slip contains an ordered list of recipients for a package. A package routed via a route slip will appear in the InBox of the first user or task group on the route slip. That recipient must route it to the next addressee via the Continue option, and so forth, in order for subsequent users to have access to it. In this way, route slips can be used to partially automate the flow of work within PaperClip32.
From time to time, you might wish to view route slip information.
PaperClip32 allows you to create packages that contain folders, documents, pages, and batches. A package can be copied, deleted, continued to the next user, forwarded, or returned to the sender.
1. Select the attachment(s) you wish to route and select the Route command from the appropriate menu. The Package window displays. The From: box is filled in with your user account name. You may route this package to any combination of individual users, task groups, distribution lists, or route slips that exist in PaperClip32.
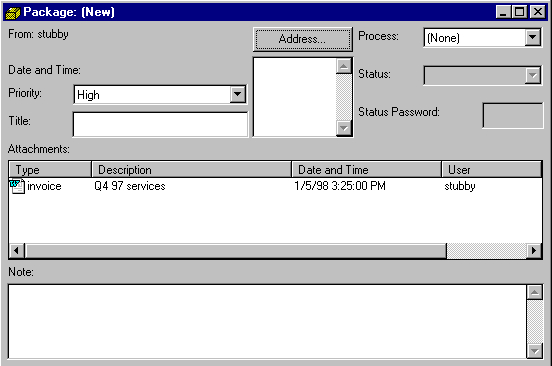
2. To select users and/or groups to be part of the address list for this package, click on the appropriate user or group name to the right of the Address List box and then click Add or double-click on that user or group name.
3. If you want to remove an addressee, click on the name and then click on Remove or double-click on that name.
4. Enter a Title: (optional) to describe the package. The title is used to identify a routed package in the user’s InBox.
5. In the Notes: box, enter a Note (optional) describing this routed package in greater detail.
6. Select a Priority for this routed package from a drop-down list. The default is High.
7. If you do not want to include additional attachments, select Send from the Package menu. This completes the routing process and sends the package to all users and groups on your address list.
1. Click Address in the Package window. The Select Recipients dialog box will appear. All eligible recipients will appear in the available window. Notice the icons that precede each addressee. These indicate the type of address.
2. Double-click on each desired recipient or highlight the desired recipient and click Add. The selected addressee will be moved to the selected window.
3. To remove a recipient from the selected window, double-click on each desired recipient, or highlight the desired recipient and click Remove.
4. When all desired recipients appear in the Selected window, click OK to accept the address list or click Cancel to return to the package window without selecting recipients.
Attachments are documents, folders, pages, or batches that are included in the package. When Package is selected from the folder, document, or page menus that item will automatically appear in the attachments section of the new package. Attachments may also be dragged from an open window into a package window. When a package is active, attachments may be opened, modified, or deleted.
1. Select a package from the InBox.
2. Select an attachment from the Attachment section of the Package window.
3. Select Open Attachment from the Package menu. The attachment will open. You can then work with the attachment and, if appropriate, change the status field.
1. Select a package from the InBox.
2. Select an attachment from the Attachment section of the Package window.
3. Select Modify Attachment from the Package menu. The Modify Attachment Status dialog box will appear.
4. Select a new status for the attachment from the drop down list.
Note: An attachment must be part of a process in order for its status to be modified.
5. Enter the password for the status. If the password is incorrect, an error message will indicate that an incorrect password has been entered.
6. Click OK to change the attachment’s status or click Cancel to return to the package window.
1. Select a package from the InBox.
2. Select an attachment from the Attachment section of the Package window.
3. Select Delete Attachment from the Package menu. A prompt appears to confirm the deletion.
4. Select Yes to delete the attachment or No to return to the Package window without deleting the attachment.
1. Select InBox from the File menu. The InBox window will appear.
2. Highlight the package you wish to copy and select Copy from the Package menu. A copy of the selected package will appear. Change at least the package title.
1. Select InBox from the File menu. The InBox window will appear.
2. Click on the appropriate package and select Delete from the InBox menu. A prompt appears to confirm the deletion process.
3. Click on Yes to delete the package, or on No to cancel the deletion.
Use the Continue option to send a package to the next addressee on a route slip or workflow process.
1. Select InBox from the File menu. The InBox window will appear.
2. Highlight the package you wish to continue and select Continue from the Package menu. The package will proceed to the next addressee.
Note: If you are continuing a package sent to you as a member of a task group, the recipient’s InBox will show user OF task group as the sender.
1. Select InBox from the File menu. The InBox window appears.
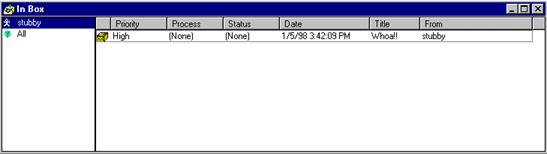
2. Highlight the package you wish to route and select Forward from the InBox menu. Forward allows you to send a package to another individual user, task group, distribution list, or route slip. The Package window will appear. The From: box will be filled in automatically with your user account name. You may route this package to any combination of individual users, distribution lists, route slips or task groups that have been defined in PaperClip32.
3. To select users and/or groups to be part of the address list for this package, click once on the appropriate user or group name to the right of the Address List box and then click Add or double-click on the user or group name. PaperClip32 moves the selected name to the Address List box on the left. Users, task groups, route slips, and distribution lists are distinguished from one another by symbols.
4. If you want to remove an addressee, double-click on the address or highlight it and click Remove.
5. Enter a Title (optional) describing this routed package.
6. Enter a Note (optional) for this package.
7. Select a Priority for the package. The default is High.
8. When you have finished entering the routing information, select Send from the File menu. The package is sent to all users and groups on the address list.
1. Select InBox from the File menu. The InBox window will appear.
2. Highlight the package you wish to return and select Return to Sender from the InBox menu. The Package window will appear.
3. You can modify the title, note and priority fields. The From: field will be filled in with your user account and the To: field will be filled with the user account of the package’s original sender.
4. Select Send from the Package menu. The package is returned to the original sender and it is removed from your InBox.
When you route the results of your Queries within the system, all of the folders or documents become attachments inside a single package (or set of packages) which you can then route to the destination of your choice. If you choose to apply default route settings to the Query results, assuming those default settings are valid, the system creates the required package and sends the results to the specified destination using the default values.
If no default values exist, or if non-default settings are used, the system displays the Route Setup dialog box so you can specify the appropriate routing information.
The system uses the default route information whenever you turn on or check the Use default settings check box in the Batch Operation group box (on the Destination tab in the Query Definition dialog box).
If you cancel the routing process, the entire batch is also canceled. Also, before the routing operation can proceed, the system first checks the package create privileges of the sender to determine if it is a valid request. A message displays if the privilege check fails.
![]() Specify
the Default Route Setup
Specify
the Default Route Setup
The system uses previously saved default route information whenever the Use default settings check box is checked in the Batch Operation group box on the Query Definition Destination tab.
1. From the main menu bar choose New, Query … from the File menu or New… from the pop-up menu when the Query List window is active. The Query Definition dialog box appears.
2. Select the Destination tab, select Batch operations in the Output options box, and choose Route in the Batch Operations group box.
3. Choose a button at the bottom of the dialog box to specify how you want to continue processing. If you choose OK, Execute, or Apply, the Route Setup dialog box appears so you can specify the route information for the Query results.
|
Choose… |
To… |
|
OK |
Save the new search criteria previously specified, close the Query Results Properties dialog box, and execute the Query. The Route Setup dialog box appears so you can specify the route information. |
|
Execute |
Store any changes you made to the currently active Query, close the Query Results Properties dialog box, and execute the Query. The Route Setup dialog box appears so you can specify the route information. |
|
Cancel |
Close the Query Results Properties dialog box without executing the Query, or setting route information, and discard any changes. |
|
|
|
|
Apply |
Save the new search criteria, execute the Query, and leave the Query Results Properties dialog box open so you can further refine your search if necessary once again. |
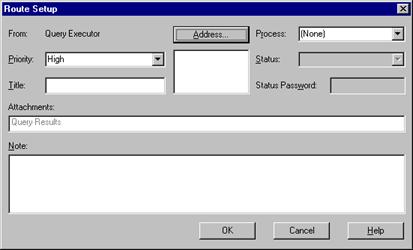
4. In the Route Setup dialog box, choose Address… to specify recipients. The Select Recipients dialog box appears. You may route this package to any combination of individual users, task groups, or distribution lists.
5. All the eligible recipients appear in the Available: box at the right. The icons that precede each recipient indicates that recipient’s type. Select recipients in the Available box and click the ß selection arrow to add those names to the Selected box.
6. Likewise, you highlight the names in the Selected: box and click the à selection arrow to remove names from the Selected: box.
7. When you are done, choose OK to save the recipient information and return to the Route Setup dialog box or choose Cancel to return to the Route Setup dialog box without saving any default recipient address information.
8. Select a Priority for this routed package from the drop-down list. The default is High.
9. Enter a Title (optional) to describe the routed package. The title identifies a routed package in the recipient’s InBox.
10. In the Note: box, optionally describe this routed package.
11. If the package has been assigned to a Workflow Process, then set the status by choosing one from the Status drop-down list and enter a valid password in the Status Password edit box.
Note: In the case of the routing of the results of Queries, the Attachments: box is disabled and always displays the “Query Results” text string.
12. Choose OK to save the default Route Setup information and return to the Query Definition dialog box or choose Cancel to return to the tab without saving any default Route Setup information.
The Route Setup dialog box lets you specify a route, other than the default route, when you want to forward the Query results to another destination and the Use default settings checkbox is left unchecked in the Query Definition Destination tab, Batch Operations group box.
1. From the main menu bar choose New… from the Query pull down menu or pop-up menu when the Query List window is in view. The Query Definition dialog box appears.
2. Select the Destination tab and then choose Route in the Batch Operations group box. Ensure that the Use default settings checkbox is unchecked.
3. Click on Set Operation Defaults… at the bottom of the group box to display the Route Setup dialog box. Enter your default routing information. The From: field is display only and displays Query Executioner text string to indicate to the recipient that the package is the result of an executed Query.
4. Choose Address… to specify recipients. The Select Recipients dialog box appears. You may route this package to any combination of individual users, task groups, or distribution lists.
5. All the eligible recipients appear in the Available: box at the right. The icons that precede each recipient name indicates their type. Select recipients in the Available box and click the ß arrow to add those names to the Selected box at the left.
6. Likewise, highlight names in the Selected: box and click the à arrow to remove names from the Selected: box.
7. When you are done, choose OK to save the recipients and return to the Route Setup dialog box or choose Cancel to return to the dialog box without saving any recipients.
8. Select a Priority for this routed package from the drop-down list. The default is High.
9. Enter a Title (optional) to describe the routed package. The title identifies a routed package in the recipient’s InBox.
10. In the Note: box, optionally describe this routed package.
11. If the package has been assigned to a Workflow Process, then set the status by choosing one from the Status drop-down list and enter a valid password in the Status Password edit box.
12. The Attachments list box is disabled and always displays the text “Query Results”
13. Choose OK to save the Route Setup information and return to the Query Definition dialog box Destination tab or choose Cancel to return without saving any Route setup information.
Any user with routing privileges may select an object and then select Route from the appropriate menu to create and route a package.
All users have an InBox. The InBox contains packages that consist of documents, folders, pages or batches that have been routed by other users. Select InBox from the File menu. The InBox window will appear.
You can view the contents of your InBox by selecting InBox from the File menu. Each package in your InBox is labeled with the sender’s name, the recipient’s name, the date and time that the object was sent, the number of items in the package, a note, and a priority. The icon to the left of the priority identifies whether or not the recipient has previously opened this package.
Each recipient category (user or task group) is listed separately on the left side of the inbox window. For example, the user JOHN may have packages listed under JOHN as well as under GROUP1, GROUP2, etc.
In addition, the 25 highest-sorted packages (see Sort Method below) are listed separately, regardless of whether they were routed to you as an individual or as a member of a task group.
As each user or group is selected, the contents of the inbox window will change to reflect the current selection.
1. Select InBox from the File menu. The InBox window will appear.
2. Click Sort. The InBox Sort Method dialog box appears.
3. Select Ascending Date to sort packages from oldest to newest, Descending Date to sort packages from newest to oldest, or select Priority to sort the packages in priority order.
1. Select InBox from the File menu. The InBox window will appear.
2. Received packages are listed in order of their creation-date-and-time fields, with the most recently received packages at the top of the list. Click on the package you wish to view and select Open Package from the InBox menu or double-click on the package to open it. The Package window appears. The From: field on the top of the Package window indicates whether the package has been routed to you as an individual user or as a member of a task group.
3. Double-click on the attachment you wish to view. Imaged documents appear in the viewer window. SoftClip documents appear in their associated software application. Folders appear in a folder window, and batches appear in the batch indexing window.
4. To view the process information for the attachment, click on the package icon in the upper right hand corner of the screen or select Package Information from the appropriate menu (document, folder, etc.).
5. To see other attachments, exit from the current object’s viewer (or application, if it is a SoftClip document.) The Package window reappears.
6. Select another attachment.
The History feature records events specific to PaperClip32 packages and their attachments (e.g., folders, documents, pages, and batches). This includes such actions as adding an attachment, opening a package or an attachment, deleting an attachment, change in status of a package or an attachment, and routing a package. This feature automatically records the history of the object that may then be reviewed at any time. However, non-package-specific events, such as modification of a document, are not recorded even if the document is attached to a package.
When History is selected, the appropriate History dialog box appears.
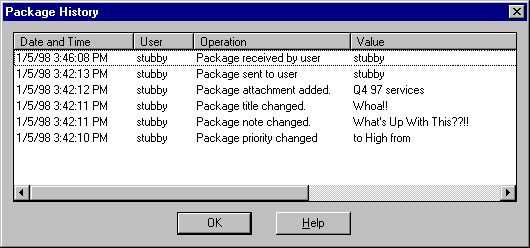
The following information is recorded in the History dialog box:
|
Date |
The date of the historical event. |
|
Time |
The time of the historical event. |
|
User |
The person that effected the historical event. |
|
Operation |
A description of the historical event. |
|
Value |
The changes the event caused. |
|
Process |
The process by which the item was routed. |
|
Package Title |
The name of the package. |
![]() View
Package History From the InBox
View
Package History From the InBox
1. Highlight the desired package.
2. Select History from the InBox menu. The Package History dialog box appears.
3. After viewing the package history, click on OK.
![]() View Package History From the Package Menu
View Package History From the Package Menu
1. Open the desired package.
2. Select History from the Package menu. The Package History dialog box appears.
3. After viewing the package history, click on OK.
![]() View Package History From the Process
Information Dialog Box
View Package History From the Process
Information Dialog Box
1. Select Package Information from the appropriate menu. The Process Information dialog box appears.
2. Click on History from the Package Information section of the Process Information dialog box. The Package History dialog box appears.
3. After viewing the package history, click OK.
![]() View
Folder History From the Folder Menu
View
Folder History From the Folder Menu
1. Open the desired folder.
2. Select History from the Folder menu. The Folder History dialog box appears.
3. After viewing the folder history, click OK.
![]() View Folder History From the Process
Information Dialog Box
View Folder History From the Process
Information Dialog Box
1. Select Package Information from the Folder menu or click the Process Information icon. The Process Information dialog box appears.
2. Click on History from the Attachment Information section of the Process Information dialog box. The Attachment History dialog box appears.
3. After viewing the folder history, click on OK.
![]() View
Document History From the Document Menu
View
Document History From the Document Menu
1. Open the desired document.
2. Select History from the Document menu. The Document History dialog box appears.
3. After viewing the document history, click OK.
![]() View Document History From the Process
Information Dialog Box
View Document History From the Process
Information Dialog Box
1. Select Package Information from the Document menu or click the Process Information icon. The Process Information dialog box appears.
2. Click on History from the Attachment Information section of the Process Information dialog box. The Attachment History dialog box appears.
3. After viewing the document history, click OK.
![]() View
Page History From the Page Menu
View
Page History From the Page Menu
1. Open the desired page.
2. Select History from the Page menu. The Document Page History dialog box appears.
3. After viewing the page history, click OK.
![]() View Page History From the Process Information Dialog Box
View Page History From the Process Information Dialog Box
1. Select Package Information from the Page menu or click on the Process Information icon. The Process Information dialog box appears.
2. Click on History from the Attachment Information section of the Process Information dialog box. The Attachment History dialog box appears.
3. After viewing the page history, click OK.
![]() View
Batch History From the Batch Menu
View
Batch History From the Batch Menu
1. Open the package and highlight the desired attachment.
2. Select History from the Batch menu. The Attachment History dialog box appears.
3. After viewing the batch history, click OK.
![]() View Batch History From the Process Information Dialog Box
View Batch History From the Process Information Dialog Box
1. Select Package Information from the Batch menu. The Process Information dialog box appears.
2. Click History from the Attachment Information section of the Process Information dialog box. The Attachment History dialog box appears.
3. After viewing the batch history, click OK.
The status of a package indicates the current state of the package. For example, a package might have two states, Open and Closed. The status then indicates whether the package is currently open or closed.
1. Select Workflow, Status from the Setup menu. The Statuses dialog box appears.
2. Click Add. The Add Status dialog box appears.
3. Enter a Name for the status.
4. Enter a Description for the status.
5. Enter a Password for the status. The password will appear as asterisks on the screen. The password acts as an electronic signature. Enabling the status password ensures that only authorized users can change the status of a package.
6. Click OK to save the new status or Cancel to return to the Statuses dialog box without saving the new status.
1. Select Workflow, Status from the Setup menu. The Statuses dialog box will appear:
2. Click on Copy. The Add Status dialog box will appear:
3. Change the name and any other desired information for the status.
4. Click on OK to save the new status, or on Cancel to return to the Statuses dialog box without saving the new status.
1. Select Workflow, Status from the Setup menu. The Statuses dialog box will appear:
2. Click on Modify. The Modify Status dialog box will appear:
3. Modify the status as desired.
4. Click on OK to save the changes, or on Cancel to return to the Statuses dialog box without saving.
1. Select Workflow, Status from the Setup menu. The Statuses dialog box will appear:
2. Click on View. The View Status dialog box will appear:
3. After viewing the status, click on Cancel to return to the Statuses dialog box.
1. Select Workflow, Status from the Setup menu. The Statuses dialog box will appear:
2. Click on Delete. PaperClip32 will prompt you to confirm the deletion.
3. Click on Yes to delete the status, or on No to return to the Statuses dialog box without deleting.
Processes comprise a number of Statuses. When these statuses occur in a particular order, they form a process. Processes combined with PaperClip32’s workflow processor provide automated office capabilities and intelligent routing.
The Process Information window will appear when you select Package Information from the appropriate window or menu. When you are finished viewing the process information, click on Cancel to return to the document window.
![]() View
Background Process Status
View
Background Process Status
You can check the status of each active background process at your workstation by displaying the Background Processes dialog box. The dialog box gives a view of up to two background process at a time and allows you to scroll forward and backwards to see the status of all the other currently active background processes. While you are viewing the Background Processes dialog box, it continually updates to show the real-time status of each process. Besides allowing you to determine the status of existing background processes, the controls in this dialog box also allow you to Stop, Abort, or Pause processes at any time.
1. Display the Background Processes dialog box.
2. Use the <<Previous button to view other processes (if any) which may have been started prior to the currently viewed one. This button is only available if previous processes exist.
3. Use the Next>> button to view other processes which may have been started after the currently viewed one. This button is only available if subsequent processes exist.
4. When you have finished viewing the status of the background processes, click Close to close the dialog box and return to the previous window.
![]() Change
the Status of a Background Process
Change
the Status of a Background Process
1. Open the Background Processes dialog box and select the process whose status you want to change.
2. Use the <<Previous and Next>> buttons to scroll to the desired processes. The group box for the selected process name shows you the current status of the process.
4. Use the dialog box buttons to change the status of the selected process.
|
Click… |
To… |
|
Stop |
Permanently end the selected process. This button is only active while the query result set is being sent to the indicated destination (e.g., window or batch). Once you press this button, the current operation immediately stops and the status message “Process stopped by user.” Appears in the process status box. |
|
Pause |
Temporarily pause the execution of the selected process. This button is only active while the query result set is being sent to the indicated destination (e.g., window or batch). Once you press this button, the current operation immediately pauses and the word “Paused” is added at the end of the state message in the process status box. The Resume button appears in place of the Pause button so you can resume the process later when you choose. |
|
Resume |
Resume a temporarily paused process. Once you press this button, the current operation immediately resumes and the word “Paused” is removed from the end of the state message in the process status box. The Pause button appears in place of the Resume button so you can pause the process if you so choose. |
|
|
|
|
Abort |
Abort the selected process completely. A message appears when you choose this button asking you to confirm your action. Aborting an active background processes also aborts any processes that are based on the result set of the first process being aborted. Choose Continue to abort the process, and all its associated processes, or choose Cancel to continue processing. Once you abort a process, the current operation immediately stops and the status message “Process aborted by user.” Appears in the process status box and the status indicator appears inactive.
|
1. Select Workflow, Processes from the Setup menu. The Processes dialog box will appear.
2. Click on Add. The Add Process dialog box will appear.
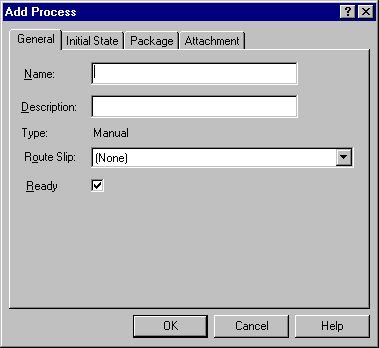
Note: The Ready selection check box indicates that the process is completely defined and ready to be used. This is important to automated processes from the Workflow processor. Processes not completed in Workflow are not available to PaperClip32.
3. Enter a Name for the process.
4. Enter a Description for the process.
5. Select a Route Slip for the process.
6. Click the Initial State tab. Select a Priority and Status for the process. The status indicates the state of the package when it first enters the process.
7. A working set should be defined for this process. A working set is comprised of all packages statuses involved in the process. One set of these statuses applies to the package itself, and the other set applies to the package’s attachments.
8. Click on the Package tab.
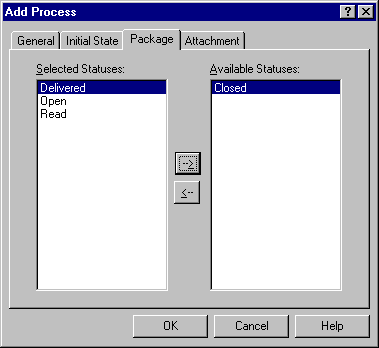
9. Highlight an available status, and click on the Add button to add it to the Selected list.
10. To remove a status from the Selected list, highlight the desired status and click on the Remove button. The selected package will move to the Available list.
11. Click on the Attachment tab. Highlight an available status, and click on the Add button to add it to the Selected list.
12. To remove a status from the Selected list, highlight the desired status and click on the Remove button. The selected status will move to the Available list.
13. Click on OK to save the new process, or on Cancel to return to the Processes dialog box without saving.
1. Select Workflow, Process from the Setup menu. The Processes dialog box will appear:
2. Click on Copy. The Copy Process dialog box will appear:
3. Change the name and any other desired information.
4. Click on OK to save the new process, or on Cancel to return to the Processes dialog box without saving the new status.
1. Select Workflow Process from the Setup menu. The Processes dialog box will appear:
2. Click on Modify. The Modify Process dialog box will appear:
3. Modify the process as desired.
4. Click on OK to save the changes, or on Cancel to return to the Processes dialog box without saving.
1. Select Workflow, Process from the Setup menu. The Processes dialog box will appear:
2. Click on View. The View Process dialog box will appear:
3. After viewing the process, click on Cancel to return to the Processes dialog box.
1. Select Workflow, Process from the Setup menu. The Statuses dialog box will appear:
2. Click on Delete. PaperClip32 will prompt you to confirm the deletion.
3. Click on Yes to delete the process, or on No to cancel.
Among the properties that the system uses to determine which action to perform on a package is its priority. Priorities are values selected by the user that the system uses during processing. Typical priorities are: Urgent, High, Medium and Low. The Priority dialog box allows you to manage the priorities set up on your system. You select the Priority you want to work with and then choose an action button. Using these buttons, you can add a new priority, or you can modify, view, copy, or delete an existing priority.
1. Select Workflow, Priority from the Setup menu. The Priorities dialog box will appear:
2. Click on Add. The Priority dialog box will appear.
3. Type a name for the priority in the Name box.
4. Type a brief description for the priority in the Description box.
5. Use the Order edit control to specify the numerical order of this priority from highest to lowest. Number ‘1’ is the highest priority.
1. Select Workflow, Priority from the Setup menu. The Priorities dialog box will appear:
2. Click on View. The Priority dialog box will appear showing the Priority properties. This is a view only dialog box; you cannot edit the properties shown.
1. Select Workflow, Priority from the Setup menu. The Priorities dialog box will appear:
2. Select a Priority and click Copy. The Priority dialog box for the selected priority appears.
3. Type a name for the new priority in the Name box.
4. Type a brief description for the new priority in the Description box.
5. Use the Order edit control to specify the numerical order of this new priority from highest to lowest. Number ‘1’ is the highest priority.
1. Select Workflow, Priority from the Setup menu. The Priorities dialog box will appear:
2. Select a Priority and click Modify. The Priority dialog box for the selected priority appears.
3. Type a new name for the priority in the Name box.
4. Type a new description for the new priority in the Description box.
5. Use the Order edit control to specify the new numerical order of this priority from highest to lowest. Number ‘1’ is the highest priority.
1. Select Workflow, Priority from the Setup menu. The Priority dialog box appears.
2. Click Delete. PaperClip32 will prompt you to confirm the deletion.
3. Click on Yes to delete the priority, or No to cancel.
Microsoft Outlook and Outlook Express
PaperClip32 is fully compliant with the Messaging Application Programming Interface (MAPI). This enables the user to send and receive e-mail and faxes to and from PaperClip32 folders. Messages can be imported into folders as documents and saved as text, rich text format, or mail message format within PaperClip32. Message attachments can be imported into folders as documents.
For convenience, users can open Microsoft Exchange and Microsoft Outlook directly from within the PaperClip32 application.
This section describes operation with Windows Outlook. PaperClip32 works in the same way with Microsoft Outlook Express.
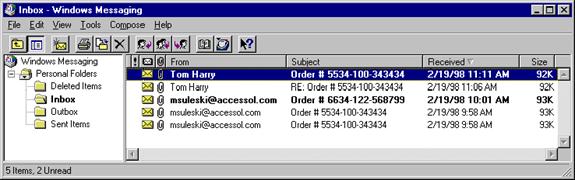
In order to import messages and/or attachments into PaperClip32 folders, proper PaperClip32 document types must be created. Mail messages are stored in Outlook message files. Attachments are stored as their native document type. The document types created should allow for proper categorization of the documents based on the document’s content. In other words, there is no need to create special document types like “Letter Message Attachment” to store letters. If there is already a document type called “Letter” which works with the attachment file it can be used.
A new SoftClip document type can be created using the registered Windows Messaging file type (.MSG) for message files. This will allow the messages to be stored in their native format. When documents are opened in PaperClip32 that are stored as .MSG files, the Microsoft Outlook message window opens to display the message just as if the message were opened from within Outlook. In this way you can work with Windows Messaging the same fashion as the other SoftClip Applications defined for your system.
Microsoft Messaging allows you to receive messages and documents from various sources. Mail can be received from the Internet, CompuServe, or another mail delivery system which is compatible with Windows Messaging. Faxes are received into your Inbox as well. Many other types of documents can also be received into your inbox by other programs. For example, you can drag and drop a Word document right into one of your Windows Messaging folders. PaperClip32 can receive this document just as any other Windows Messaging stored document.
Mail messages and attachments can be imported as documents into PaperClip32 folders by drag-and-drop. You can import the message file, any number of attachments or both. This procedure discusses how to receive mail messages and import them as PaperClip32 documents.
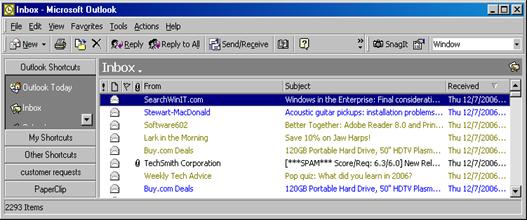
1. Open the Outlook Inbox, and leave the window open.
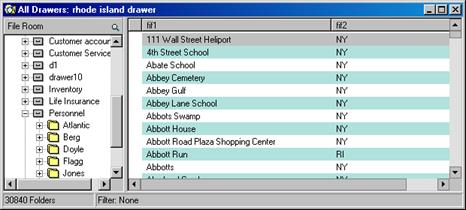
2. With PaperClip32 running, select and open a folder.
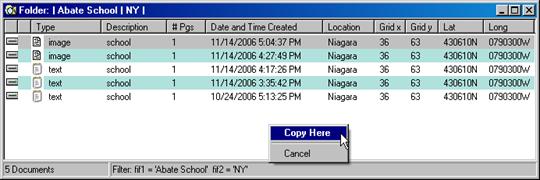
3. Drag-and-Drop the message from Outlook to the open folder. Select Copy Here from the menu that appears after dropping.
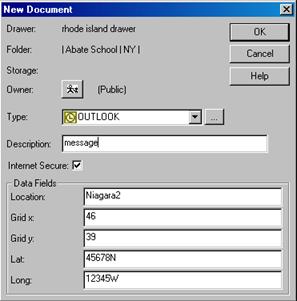
5. The PaperClip32 “New Document” dialog box will now be displayed. Use this dialog in the same way as you would normally, creating the document in PaperClip32. Select the DocType for Outlook messages (*.msg), assign ownership (optional) and enter data fields as needed.
6. Press OK to save the document.
![]() Importing Message
Attachments
Importing Message
Attachments
Message Attachments can be imported as documents into PaperClip32 folders. Open the message, and drag-and-drop the attachment into an open folder.
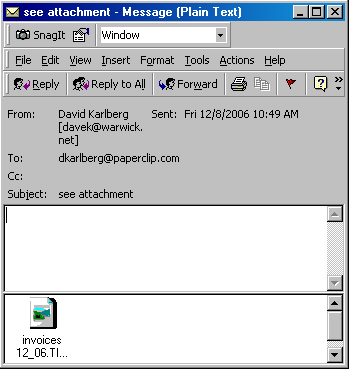
1. Open the Outlook message.
2. Select a folder to import attachment files into, then double click to open. Select Copy Here.
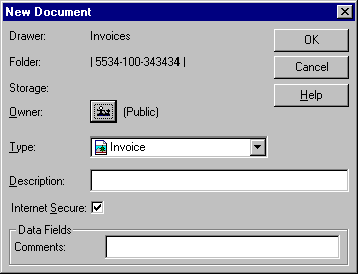
3. Drag and drop the attachment to the open folder. The New document dialog will appear. Select the correct doctype, and fill in any necessary information.
4. Press OK to save the document.
Note: You can also drag-and-drop a file to the PaperClip desktop window. Select Copy in Folder from the pop up menu, then search for the desired folder.
Any PaperClip32 document can be sent via Microsoft Messaging. This feature allows you to send documents to any Microsoft Messaging compatible software product. That includes Internet mail, CompuServe, Fax software, etc. PaperClip sends imaged documents as a single TIFF file (multiple pages in one file). Most Fax servers support this type of file format.
Documents can be sent to Outlook by selecting the PaperClip32
“Send” function from the Document menu, or the Send toolbar button ![]() .
.
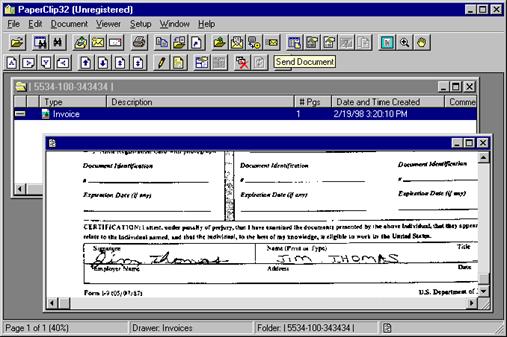
1a. From an open folder window select the document(s) that you wish to send. From the Document menu select Send/Send Copy.
1b. If the document is open, Select the Send button, or from the Document menu select Send/Send Copy.
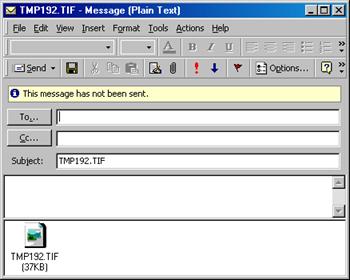
6. The Microsoft Outlook new message window will be displayed. Specify the destination (To) address(s), subject and message text as needed.
7. Press the message Send button.
You may customize your workstation three ways. First, by altering the way your application desktop appears. Second, by specifying the way your workstation acts as a front-end to other applications. And third, by setting the Hot Key assignments.
Note: The PaperClip32 system manager must have enabled Production Mode for your workstation before you can use that mode.
Production mode allows you to simultaneously operate three distinct windows inside PaperClip32 on your desktop. In order to do this, Production mode must be enabled in both the workstation and desktop setups.
1. Select Desktop from the Setup Menu. The Setup Desktop dialog box appears.
8. Select the Enable Production Mode check box. A check mark appears in this box when this feature is active and the Production Mode group controls at the bottom of the tab become active so you can modify your setup.
Note: If you plan to do extensive indexing, you should set the Maximum Open Folders and Maximum Open Documents to one.
9. To auto arrange an application, select the Auto Arrange Application. You can then select an application from the pull-down menu. If the selected application is running when you start PaperClip32, it will automatically be arranged into a production mode window. To be available for auto arrange, an application must have had an overlay template defined for it.
Note: In order to have your application running in the PaperClip32 production mode window each time you start up Windows, place both your application and PaperClip32 in your Windows Start Up group.
10. To automatically open the first document in a folder, select Auto Open First Document in Folder. This feature saves keystrokes by opening the most recently created document automatically.
11. To set production mode limits for folders; enter the desired number in the Maximum Open Folders field. This feature maximizes your system efficiency by closing the oldest open folder prior to opening a new one.
12. To set production mode limits for documents; enter the desired number in the Maximum Open Documents field. This feature maximizes your system efficiency by closing the oldest open document prior to opening a new one.
13. If PaperClip32’s hot-key defaults conflict with the operation of other software programs, you can change the defaults. Select the Hot Keys tab to specify the hot key assignments.
14. Choose OK to save your changes and return to the application desktop or choose Cancel to exit without saving your changes.
Note: Any changes made to your production mode settings will not take effect until you exit and restart PaperClip32.
The Arrange feature lets you modify, save and restore your desktop layout. This means you can enlarge, reduce and position the windows you see during processing according to your own specific needs. And, you can also easily return to the default settings at any time.
![]() Restore Desktop to Last
Saved Setting
Restore Desktop to Last
Saved Setting
1. Select Arrange Desktop from the Arrange pull-down list in the Setup menu or click on the Arrange Desktop icon at the top of the screen.
This will restore your desktop to the last saved arrangement.
![]() Alter
and Save Desktop Configuration
Alter
and Save Desktop Configuration
1. Resize and reposition each window.
2. Select Save Desktop from the Arrange pull-down list in the Setup menu.
This desktop arrangement will remain in effect until you save a different arrangement.
Note: Anytime you save a desktop arrangement, you erase the previous arrangement. Do not save desktop unless you are sure that the current arrangement is the one you prefer. Selecting Desktop… from the Setup menu has no affect on any saved desktop configuration.
![]() Restore
Desktop to Default Arrangement
Restore
Desktop to Default Arrangement
1. Select Reset Desktop from the Arrange pull-down list in the Setup menu. The desktop will return to the default setup.
2. If you want the default arrangement to be restored each time you click on the Arrange icon, select Save Desktop from the Arrange pull-down list in the Setup menu.
3. If you want to return to your last saved setup, click on the Arrange Desktop icon.
By using other applications as a front-end to PaperClip32, you can instantly access PaperClip32 folders and documents simply by pressing a hot key.
Before you can use other applications as a front-end to PaperClip32, you must define an overlay template.
Once the template is set up, using your application to add and retrieve folders and documents is simple.
![]() Select
the Application Record Before Hot-Keying
Select
the Application Record Before Hot-Keying
1. With PaperClip32 running in the background (that is, minimized), select the desired record in your other application. The method of selecting the record depends on the type of overlay template and on whether a script has been created to automate the selection of data.
|
If the other application … |
then…. |
|
Displays a Database Record in Form View |
select a record that occupies a whole screen. |
|
Displays a Database Record in Table View or Spreadsheet |
select the entire row. |
|
Displays a Dialog Box Type Application |
click anywhere in the box to select it. |
|
Is a Dial-up, Terminal Emulation, or Free-Form Text Application |
highlight every character from the first character of the first field in a record to the last character of the last field. |
Note: You can automate this process with an overlay script.
In all cases, after selecting the appropriate record data, press the Visual Context Processor (VCP) hot key.
1. Select the record in your other application.
2. Press Ctrl+F3 to invoke the visual context processor (VCP).
PaperClip32 comes to the foreground and displays the folder window that matches the selected record.
1. Select the appropriate record in your other application.
2. Press Ctrl+F3 to invoke the visual context processor (VCP).
A message will inform you if no folders already exist for the selected record.
3. Choose Yes to create the new folder.
PaperClip32 automatically extracts all the required labeling information from the selected record in the application window. PaperClip32 then displays the New Document dialog box to you can create a new document.
4. If you do not want to create a document now, choose Cancel. The new empty folder is still created for you.
5. Click anywhere on your application screen to return PaperClip32 to the background.
![]() Scan
a New Document into a Clipped Folder
Scan
a New Document into a Clipped Folder
1. Select the record in your application.
2. Press Ctrl+F3 to invoke the visual context processor (VCP).
3. Once the clipped folder is open, select New… from the Document pull down menu. The New Document dialog box will display.
4. Specify the document type in the Type: list box. Because you are scanning in a document be sure to choose an imaged document type.
5. Type a Description (optional) of the document.
6. Enter the appropriate values for any document data fields defined for this folder and choose OK. The Scan dialog box will display.
7. If required, place the document in the scanner and choose Scan to scan in a new document. After scanning is completed, the updated folder window shows the new document.
![]() Add
a SoftClip Document to a Clipped Folder
Add
a SoftClip Document to a Clipped Folder
1. Select the record in your application.
2. Press Ctrl+F3 to invoke the visual context processor (VCP).
3. Once the clipped folder is open, select New Document from the File menu. The New Document dialog box appears.
4. Specify the document type in the Type: list box. Because you are clipping a document be sure to choose a SoftClip document type.
5. Type a Description (optional) of the document.
6. Enter appropriate values for any document data fields defined for this folder and choose OK.
7. Once PaperClip32 launches your SoftClip application, create the file, save it, and exit. The updated folder window displays the new document.
![]() Index
a Batch to Clipped Folders
Index
a Batch to Clipped Folders
If documents in a batch are to be indexed to folders clipped to an application, be sure to follow the procedures below while indexing. This will save searching time and improve system performance.
1. Select View Log from the Batch menu.
2. Select the appropriate batch and click Index. The Assemble Document window opens.
3. Click a page number in the Batch box.
4. If you decide that the page in the viewer belongs in the document you are currently assembling, click Add. If you wish to assign all pages in this batch to the document, click All.
5. The number of the assigned page moves to the Document box. If you move an incorrect page to the Document box, click on it and click Remove and the number of the removed page moves to the Batch box.
6. After selecting all the appropriate pages for the first document, press Alt +Tab to switch to your application.
7. Select the appropriate record in your application, and press Ctrl + F3 to hot-key to the corresponding PaperClip32 folder. The Assemble Document window will display.
8. Click Create Document to create a new document in your clipped folder.
9. Create a new document
.
Anchors are regions of text that do not change on the screen (such as buttons) that help identify the window context to PaperClip32. When you press the VCP hot key, PaperClip32 will use the anchor regions to uniquely identify the screen that you are on, and find the appropriate overlay template. Anchors are needed if you intend to clip to more than one screen in a single application.
On-image annotation allows you to attach annotations to specific areas of a page on imaged documents. Supported annotation types include: lines, free hand, arrows, highlighting, text, notes
The window in which a program appears. The application’s menu bar, the currently open data file, and the name of the application and data file are visible in the window.
Attachments are documents, folders, pages, or batches that are included in a package. When a package is active, attachments may be opened, modified or deleted. Attachments may be added to or deleted from a package using menu choices or drag and drop.
A group of pages that has been scanned into PaperClip32 but has not yet been labeled or filed as one or more documents. For example, all of the letters or invoices received on Monday can be scanned into PaperClip32 as a batch. Later, the pages will be assembled into documents and filed into folders.
Choose this item to display a listing of all Batches (if any) on your system.
PaperClip32 users can store documents in different on-line or near-line storage bins according to the document type they wish to store. Documents requiring frequent retrieval may be stored on-line, while documents that are retrieved less frequently may be stored near-line.
Storage bins, along with NOSS optical platter storage class assignments, offer more efficient management of storage resources. Backing up and copying of specific types of documents on magnetic drives or specific optical platters is more convenient.
PaperClip32 can be integrated with (clipped to) your existing application software, including custom applications, in such a way that you may attach folders, containing either imaged documents or SoftClip documents, to one or more screens within the application. The documents are retrieved via a hot key from within the application.
The date-and-time stamp that PaperClip32 assigns to documents when they are initially created. This is used to sort documents inside folder windows.
There are a number of ways to customize your workstation. You can alter the way your application desktop appears, and you can control the way it acts as a front-end to other applications and/or set the Hot Key assignments.
This type of user can only view, print, fax, Email and annotate documents, but can also send packages to other users. A user with Desktop Workstation capability can be given the Special Privilege of having Workflow Access rights. To add such users, at least 10 Full Production users must be part of the system.
Distribution lists provide a means for routing PaperClip32 objects to multiple user InBoxes. When a package is routed to a distribution list, it appears in the Inbox of each user on the list. Users on the list may then process the entry from their own InBoxes, and their individual actions will not affect one another with regard to the routed package. Each person on the distribution list can view, print, or further process the package.
A scanning technique used to simulate shades of gray. Black and white pixels are mingled in patterns that vary according to the brightness of the image area.
Document-level fields that uniquely identify each document within a folder and allow you to search for specific groups of documents. Every document is labeled with six document data fields: Storage Location, Owner, Document Type, Document Description, Date, and Number of Pages.
You may add custom document data fields if you need them. (e.g., Approval, Transaction Status, Follow-up Date, Credit Memo Number, PO Number.)
Categories of documents, such as: Letter, Proposal, Contract, Floorplan, Resume, Budget, Invoice. Document types can be created for both imaged documents and SoftClip documents, and for which a specific storage location may be assigned.
A link established between an application’s data file and a PaperClip32 folder, regardless of whether or not that data file is stored in the folder as a SoftClip document. Once established, DocumentLink enables hot key access of PaperClip32 folders directly from the application’s data file.
Dots-per-inch, the measurement of the resolution (i.e., the number of pixels per inch) of scanned input, or output on a monitor or printer. A lower DPI image requires less storage space.
Clicking on Drawers displays the Drawer dialog box. From this dialog box, a number of file drawers can be established for each user. Access to these drawers is restricted by assigned ownership of the drawers. Once the drawer is established, the user can hot key to it from any application.
A Full Production user can be given the Special Privilege of an Executive, which means that documents stored by that user are not available for viewing to any other user, including those with Supervisor privilege or global access rights
An area of storage in PaperClip32 that holds all related folders, just as a group of related folders in a manual filing system might be contained in a single file drawer. The drawer may stand alone and be searched manually, or it may be clipped to an application and thus accessible via hot keys. Multiple applications may be clipped to the same drawer.
A qualifying test, composed of search criteria, used to retrieve specific documents or folders in a search. For example, you may want to create a filter to select documents related to inactive employees.
Summoned by pressing the right mouse button during certain operations (such as viewing an image), the floating menu offers the options most often used for the current folder, document, or currently active window.
Folders serve the same purpose in PaperClip32 that paper folders serve in a manual filing system. They hold documents with common characteristics so that they may be more easily located. Every document in a folder shares the same folder index fields.
Folder data fields are additional non-index fields that can be used to further identify a particular folder. A total of 10 folder index fields may be defined for each file drawer in PaperClip32.
Up to ten fields that, together, form a unique label for a folder in the PaperClip32 database. Established by the user when a file drawer definition is added. These fields may be entered manually, or extracted automatically by PaperClip32’s Visual Context Processor (VCP) from a clipped application.
The folder label is the combined string created by concatenating all of the index fields defined for a drawer. In the Folder Window, the folder label appears as the title of the window, with the drawer name followed by each index separated with a / symbol.
A user type in PaperClip32. This type of user can store, modify and delete documents if given appropriate rights. He can also view, print, fax, E-mail and annotate documents and can send packages to other users. Only a Full Production user can be given the Special Privileges of being a Supervisor, of having Executive privileges, of having Global Access Rights, or having Workflow Access rights.
A user assigned global access rights has access to all PaperClip32 documents, folders, and drawers in the system regardless of individual or group ownership of those objects, except for objects owned by executive users.
PaperClip32 image-enables your application software by allowing you. Folders (containing both imaged documents and SoftClip documents) are accessed via hot key. When creating new documents, this link between the application window and PaperClip32 folders also allows you to index documents automatically.
Imaged documents are groups of PaperClip32 pages. SoftClip documents are data files, such as word-processing files, spreadsheets, presentation graphics, etc. Every document stored in PaperClip32 must be filed in a folder. Documents are stored only once in PaperClip32; copies contained in more than one folder are simply linked by a shortcut pointer to the original document.
Every PaperClip32 user has an InBox that contains a list of all packages that have been sent to them from other users of the system.
Indexed Fields
Folder label fields are indexed by the database in order to optimize retrieval. Manual Workflow
Manual WorkFlow
Manual workflow in PaperClip32 allows you to send packages to a sequential list of Users or Task Groups. The sequential list is called a Route Slip. As each recipient receives a package and works on the contents, they can modify the status of the package and it’s attachments.
Mapped Fields
Fields from an application window that have been associated with the PaperClip32 folder index fields or folder data fields of a specific file drawer by means of an overlay template.
A pattern of numbers, alphabetic characters, wildcards and/or specific characters that are used to validate data entered into a field. For example, social security numbers may have a mask that requires 3 numbers, a hyphen, 2 numbers, a hyphen, then 4 numbers (--). This ensures consistency of data entry by the user. Masks can also be used in Query search criteria.
Near-line bins are used to store documents that do not require as frequent access as do documents stored in on-line bins. They may be magnetic, magneto-optical, or optical media that map to DOS drive letters. That is, they fully support the DOS file system. Near-line bins typically offer greater storage capacity, but slower access time, when compared to on-line bins.
The Network Object Storage System in PaperClip32 manages the optical disk and jukebox storage of documents. PaperClip32 can support multiple NOSS servers as part of one PaperClip32 installation, allowing you to optimally configure your near-line bin storage to match the data volumes and retrieval traffic that may be created.
On-line bins offer faster access time, but more limited capacity, in comparison to near-line bins. On-line bins are hard drive or network directories used to store imaged documents and/or SoftClip documents that need to be accessed frequently.
PaperClip32 provides several kinds of help to assist you. These include both field-level “What’s This? Style help, and a context-sensitive, on-line help system which you may access at anytime during processing by pressing <F1> or by clicking the dialog box Help buttons. You may also access help by choosing Contents from the Help pull down menu.
To obtain information about the current version and date of the application software installed at your location, choose About… from the Help pull down menu. The About dialog box appears showing you your system information.
A keystroke combination (Ctrl+F2), when pressed from within a Windows application, invokes the sequence of PaperClip32 dialog boxes used to define an overlay template.
Overlay templates link file drawers (and the folders and documents contained in them) to a specific application window. These links tell PaperClip32 where to look on the application window for folder index fields. Overlay Templates are used to automatically retrieve PaperClip32 folders from within an application program, without searching. They are also used to automatically label new folders that are created via hot key from within an application program.
Every drawer, folder and document in PaperClip32 may be assigned an owner, which limits the access to that item to either a single user, or a group of users. Whenever any of these items are created inside PaperClip32, an Owner field may be filled in from a drop down list of users or task groups.
Any combination of PaperClip32 documents, folders, pages, and batches can be placed in a package and sent to a variety of destinations. The destination may be a user, a task group, a distribution list, or a workflow process. A package notice, will appear in the InBox of the recipient for each package that has been routed in this manner.
The smallest component of a PaperClip32 drawer, a page is an electronic copy of a paper document that has been scanned, faxed, or imported into PaperClip32. Taken together, pages, folder index fields, folder data fields, and document data fields make up a document.
The page count column indicates the number of pages in an imaged document. In the case of a SoftClip document, this column will always contain a 1.
The personal drawers feature allows users to hot key to a pre-selected set of frequently accessed drawers from within any Windows application, without setting up an overlay template.
Among the properties which the system uses to determine which action to perform on a package is its Priority. Priorities are values selected by the user that the system uses during processing. Typical priorities are: Urgent, High, Medium and Low. The Priority dialog box allows you to manage the priorities set up on your system.
Processes are comprised of a number of Statuses. When these statuses occur in a particular order, they form a process. Processes combined with PaperClip32’s workflow processor provide automated office capabilities and intelligent routing.
Production Mode allows you to set up your PaperClip32 desktop so that an image viewer window, a PaperClip32 window and a clipped application window may be viewed on the screen simultaneously. For best results, Production Mode requires a large screen (larger than 17”) monitor.
The search criteria you enter to search for folders or documents within PaperClip32. Queries are the means by which you find and retrieve the information previously stored inside PaperClip32.
Relational operators are expressions that describe the relationship between a field and a given value. They are used to build search criteria to retrieve specific documents. (Examples: greater than, less than, greater than or equal to, matches, contains, etc.)
Route Slips support manual the workflow process inside PaperClip32. Route slips are ordered list of recipients (users or task groups) for a package. A package routed via a route slip will appear in the InBox of the first user or task group in the route slip list. That recipient must then route it to the next addressee via the Continue command, and so forth, in order for subsequent users to have access to the package.
PaperClip32 scripts are used to copy information to the Windows clipboard when defining an overlay template.
PaperClip32 allows you to implement security on all drawers, folders, and documents, by allowing you to assign ownership to each of these objects. This is done through setting of the owner field for each of these objects. Objects that you do not have access to will not be displayed.
In addition, functional privileges may be assigned to each user and groups when these are defined in setup.
A SoftClip application is any 32-bit Windows program (such as word-processing and spreadsheet software) that is used to create files that can be stored in PaperClip32 folders as documents. SoftClip applications are automatically launched when their associated documents are retrieved.
Note: A SoftClip application may also be defined as a clipped application. In other words, you may want to store the data files of the 32-bit version of Excel as SoftClip documents, and you may also want to hot-key from Excel into PaperClip32 folders. In the first instance, Excel is a SoftClip application. In the second instance, you must define an overlay template that maps an Excel screen to a PaperClip32 file drawer.
A SoftClip document is a data file (such as spreadsheets, word-processing files, presentation graphics, etc.) created within any 32-bit Windows program. When a SoftClip document is retrieved from a folder, its associated software is automatically started.
Staging is the process of moving documents back and forth, between on-line bins and near-line bins.
Standalone Drawer
File drawers that are not mapped to applications can be said to stand alone. The term refers to the direct method of using PaperClip32, in which folders and documents are accessed and stored directly through the file drawers. This is different from clipping, in which mapped applications serve as a front end to the PaperClip32 database. The most efficient way to set up PaperClip32 for finding folders is to use another front end and set up templates for clipping.
PaperClip32 allows you to define unique words to identify the status of a package, as well as the attachments in the package. As work is performed by users participating in the workflow process, they can set the status. Each workflow process may have a set of specific status words defined, which are then available to you when you work with the package and attachments.
The status bar at the bottom of the PaperClip32 main window displays messages relevant to current operations.
PaperClip32’s storage bins are used to indicate how and where documents are stored. You can store documents to on-line bins (magnetic) and near-line bins (magnetic, optical, or alternative storage options that appear to PaperClip32 as UNC paths ). The storage bin is used when defining document types. Documents requiring frequent retrieval can be stored to on-line bins which provides faster access, while documents that do not need to be accessed as often may be stored to near-line bins.
A user assigned supervisory rights will be granted all privileges in the PaperClip32 privileges dialog box and the ability to access all setup functions. This includes the ability to create, modify and delete user accounts, task groups, distribution lists, route slips, workstation records, system parameters, on-line bins, near-line bins, document types, and SoftClip applications.
System-wide parameters, or default settings, tell the system where to store on-line and near-line documents, scanned batches, temporary files, and SoftClip template files. These settings are initially established when PaperClip32 is installed, but they may be changed.
Task groups can be created to help manage workflow within PaperClip32. By assigning users to task groups, you can allow groups of users to share drawers, documents, and folders.
Task groups can be organized around a specific department or functional work group (e.g., accounting). Because all members of a given task group may simultaneously access items routed to the group, task groups are an efficient way to make items available to more than one user.
Task groups are also used to assign access rights to drawers, folders, and documents using the owner field for each of these objects.
Tag Image File Format, a standard file format designed to facilitate the exchange of digital image data. PaperClip32 stores its image documents in this format, further compressed in up to a 20:1 ratio (in CCITT group IV format).
In order for individual users to access PaperClip32, they must first be assigned a user account. The user account record contains the user’s name, password, a list of user privileges within PaperClip32, and, optionally, Production Mode settings for individual users. Anyone with supervisory privileges may also be assigned global access rights which enables that user to access all drawers, folders, and documents, regardless of ownership.
Beyond the capabilities specific to each user profile type, individual users may only perform those tasks for which they have been assigned privileges. These privileges enable a user to create, modify, delete, route, copy, move, archive, index and export documents, folders, batches, drawers, and overlays in PaperClip32. The system administrator may modify these privileges at any time.
A keystroke combination (Ctrl+F3), that when pressed from within a Windows application, invokes the PaperClip32 Visual Context Processor and retrieves a folder, without searching.
Document Link Hot Key
A keystroke combination (Ctrl+F7), that when pressed from within a Windows application, invokes the PaperClip32 DocumentLink feature and associates the SoftClip document with a PaperClip folder.
A user type in PaperClip32. This type of user can only view, print, fax and E-mail documents. To add such users, at least 10 Full Production users must be part of the system.
Use the menu items to perform any of the viewing actions described.
|
Choose… |
To do this… |
|
Best Fit |
Fits the entire image within the viewer window. |
|
Full Size |
Restores the image to its original size in the viewer. |
|
Fit to Width |
Fits the width of the document into the viewer window. |
|
Doc Only |
Fills the entire screen with the viewed image. Press Esc to return to the dialog box. |
|
Magnify |
Magnifies the image; shows a smaller part of the page. |
|
Reduce |
Shrinks the image; shows a larger part of the page. |
|
Reverse |
Displays a negative of the document image. |
|
Zoom |
Magnifies a portion of the document. Drag the cross-hair to frame the area to select the area to be magnified. |
|
Pan |
Moves different parts of the image into view. |
|
Rotate 0 |
Rotates the image back to its original orientation. |
|
Rotate 90 |
Rotates the image 90 degrees clockwise from its original orientation. |
|
Rotate 180 |
Rotates the image 180 degrees clockwise from its original orientation. |
|
Rotate 270 |
Rotates the image 270 degrees clockwise from its original orientation. |
|
First Page |
Advances to the first page of a multi-page document. |
|
Last Page |
Advances to the last page of a multi-page document. |
|
Next Page |
Advances to the next page of a multi-page document. |
|
Previous Page |
Advances to the previous page of a multi-page document. |
|
Go to Page… |
Advances to the page specified. |
|
Thumbnails |
Opens and closes the thumbnail viewer window |
|
Enhance Image |
Enhance the display of the selected document. |
|
Show Annotations |
Display any annotations associated with the selected document. |
|
Annotations |
Add annotations of the type specified to the current document. |
The Visual Context Processor (VCP) is the PaperClip32 feature that allows you to press a hot key (Ctrl+F3) from within an application and instantly retrieve the associated folder from within PaperClip32. It uses the overlay template defined for the application to extract the folder label from the application screen. Where no such folder exists, it allows one to be created on-the-fly.
Every PC used with PaperClip32 must have a workstation record defined. The dialog box for setting up a workstation allows you to define the scanner interface and the location of certain PaperClip32 files. It is also used to enable the Production Mode features.